![]()
![]()
![]()
![]()
![]()
Java 1.1 Unleashed
![]()
![]()
![]()
![]()
![]()
by Rick Darnell
IN THIS CHAPTER
Although Java is a general-purpose programming language suitable for a large variety of tasks, the task most people use it for is applet programming. An applet is a Java program that can operate only within a compatible Web browser, such as Netscape Navigator or Microsoft Internet Explorer.
Your first experience with Java may have been one of the demonstration applets released in 1995 with the first Java Development Kit--spinning heads, an animated "Duke" cartoon doing cartwheels, and so on. Today, applets are used to accomplish far more than demonstrative goals. Current uses of applets include these:
For example, the Instant Ballpark applet from Instant Sports (http://www.instantsports.com/ballpark.html) takes real-time data from live baseball games and updates its graphical display to reflect what's happening in the game. Players run the bases, the ball goes to the place it was hit, and sound effects are used for strike calls, crowd noise, and other elements. The program, which was unique enough to qualify for a U.S. patent, is reminiscent of the old-time baseball tradition of presenting the play-by-play for road games by moving metal figures on the side of a building. In addition to the live coverage, Instant Ballpark can be used to review the play-by-play action of past games.
With HTML and some kind of gateway programming language such as Perl, a Web page can offer textual updates to a game in progress. In addition to the text, Instant Ballpark offers a visual presentation of a live game and can respond immediately to user input. This interactive nature of Java is used to provide information to Web users in a more compelling way, which is often the reason site providers offer applets.
With Microsoft's and Apple's encouragement of windowing software in the past five years, users now expect software to make use of graphical window features like buttons and scrollbars. In Java, windows and other graphical user interface functions are handled by the Abstract Windowing Toolkit (AWT).
The AWT is one of the most useful packages included with the Java API, but it is also one of the hardest to become familiar with. The AWT is a set of classes used to build graphical user interfaces for Java applications and applets. It enables programmers to easily create the following features for programs:
The AWT also includes classes to handle graphics, fonts, and color, plus an Event class to enable programs to respond to mouse clicks, mouse movements, and keyboard input.
In the early days of Java, the Java Developer's Kit (JDK) and a text editor was the only choice available to programmers for developing applets and applications. Today, there are numerous ways to develop programs with Java, including SunSoft Java WorkShop, Symantec Café and Visual Café, and Rogue Wave JFactory. Java WorkShop, Café, and Visual Café include tools for drag-and-drop development of windows, dialog boxes, and other elements common to windowing systems. JFactory is an interface builder that can be used with different Java programming environments.
Java applets are programs that run on a Web user's machine. As you know, anything that can execute code is a potential security risk because of the damaging things that can occur. Viruses can damage a computer's file system and reproduce onto other disks, Trojan horses can masquerade as helpful programs while doing harmful things, and programs can be written to retrieve private information surreptitiously. Even Microsoft applications such as Word and Access have security risks because of Visual Basic for Applications--an executable programming language that can be used in conjunction with application documents.
Security is one of the primary concerns of Java's developers, and they have implemented safeguards at several levels. Some of these safeguards affect the language as a whole: removal of pointers, verification of bytecodes, and restricted remote and local file access. This means that some of Java's functionality is blocked for applets because of security concerns.
n Popup windows opened by applets are identified clearly as Java windows. A Java cup icon and text such as Untrusted Applet Window appear in the window's border to prevent a window opened by Java from pretending to be something else, such as a Windows dialog box requesting a user's name and password.
These restrictions limit Java applets more than standalone Java applications. The loss is a tradeoff for the security that must be in place for the language to run remotely on users' computers. Refer to Chapter 34, "Java Security," for more information about security and Java.
Now that you understand what applets are, it's time to get out some power tools and see what it takes to put one together. We'll begin with a quick introduction to some basic elements of applet programming.
Each applet starts out with a class definition, like this:
public class LearnPigLatin extends java.applet.Applet {
    // to do
}
In this example, LearnPigLatin is the name of the applet's class. An applet must be declared as a public class. All applets extend the java.applet.Applet class, also referred to simply as the Applet class. Another way to write the class definition is to use import to load the Applet class and simplify the declaration:
import java.applet.Applet
public class LearnPigLatin extends Applet {
    // to do
}
The superclasses of Applet give all applets a framework on which you can build user interface elements and mouse events. These superclasses also provide a structure for the applet that must be used when the program is developed.
The structure of an applet takes its form from four events that take place during the life of an applet. When each stage is reached, a method is automatically called. There are default versions of each of the methods if you choose not to override them:
Other important methods--although not directly required for program execution--are paint() and repaint(). These methods apply only to the display in the applet window and occur automatically at certain times, such as when the applet window is redisplayed after being covered or when the applet window is resized. An applet can call repaint() directly to update the window whenever necessary.
Of all the methods, repaint() is the only one that requires a parameter. This parameter is an instance of the Graphics class, as in the following method definition:
public void paint(Graphics g) {
    g.drawString("One moment, please", 5, 50);

}
The Graphics object used as the parameter represents the applet window. The g.drawString() line uses this Graphics object to indicate where a string should be drawn. Every time the repaint() method is called, the applet window is updated with the string One moment, please drawn at the x, y position 5, 50.
Each of these applet methods--init(), destroy(), start(), stop(), and paint()--is inherited by an applet. However, each of the applet methods is empty by default. If something specific is supposed to happen in an applet, some or all of these methods must be overridden. Although you do not have to override any of these methods, as a general rule, you always provide your own start() method.
Applets are displayed as a part of a Web page by using the HTML tag <APPLET>. To run an applet, you need a Web browser or some other software that serves the function of a browser, such as the applet viewer program that ships with the Java Development Kit from JavaSoft.
The browser acts as the operating system for the applet--you cannot run an applet as a standalone program in the same way you can run an executable file. The two leading browsers--Netscape Navigator (version 2.02 and later) and Microsoft Internet Explorer (version 3.0 and later)--both support Java applets. A third choice--Sun's HotJava--also handles applets but is not widely used.
These programs load applets from a Web page and run them remotely on the Web user's computer. This arrangement raises security issues that must be handled by the Java language itself and by Java-enabled browsers.
Running Java applets on a Web page requires the use of two special HTML tags: <APPLET> and <PARAM>. These tags are included on a Web page along with all other HTML code. In this respect, inserting a Java applet on your Web page is no different than inserting a picture, as the following lines demonstrate:
<APPLET CODE="NowShowing.class" CODEBASE="progdir" WIDTH=376 HEIGHT=104>
<PARAM NAME="speed" value="100">
<PARAM NAME="blink" value="5">
<PARAM NAME="text" value="FREE THE BOUND PERIODICALS!">
<PARAM NAME="fontsize" value="21">
<PARAM NAME="pattern" value="random">
<H5>This applet requires the use of a Java-enabled browser!</H5>
</APPLET>
When included on a Web page, this HTML code causes the following to take place on a Java-enabled browser:
If the CODEBASE attribute is used without a leading slash (/), it indicates the path from the Web page's directory to the directory containing the applet's class file. For example, CODEBASE="usr" indicates that the applet is in a directory called usr that is a subdirectory of the Web page's directory. CODEBASE can also specify a complete path on the Web site separate from the page's current location.
2. The applet is set to a width of 376 pixels and a height of 104 pixels using the WIDTH and HEIGHT attributes. These attributes work the same with <APPLET> as they do with <IMG>.
The ALIGN attribute used with images also can be used with <APPLET>. The ALIGN attribute determines how the applet is positioned in relation to the other parts of the Web page; it can have the value TOP, MIDDLE, or BOTTOM.
3. A parameter named speed is sent to the applet with a value
of 100. Four other parameters are sent to the applet: blink, text,
fontsize, and pattern. Parameters are optional; you can include
as many as you want. The NAME attribute indicates the name a parameter should
be given; the VALUE attribute indicates the value to associate with the
parameter.
For example, <PARAM NAME="speed" value=100> and <PARAM NAME="speed" value="100"> both pass the string "100" to the applet. This restriction eliminates a lot of guesswork between the browser and the applet because neither has to guess what kind of value is being sent. Everything is converted to a string, and the programmer can take care of casting the value to a new type after it enters the applet.
4. The line <H5>This applet requires a Java-enabled browser!</H5>
is ignored unless the page is loaded by a nonJava browser. An incompatible browser
won't recognize the two <APPLET> tags and ignores each line until
it reaches the line with the <H5> heading tag. Because the browser
knows what to do with this tag, it displays the appropriate text.
If the applet makes use of class files that are not part of the standard Java API, these class files must be located in the same directory as the applet's class file.
It's easy to make your applet available on the Web after it's created and placed on an HTML page using the <APPLET></APPLET> tags. Put all .class files required by the applet on your Web site, making sure that you put the files in the directory specified by the CODEBASE attribute (if this attribute has been used). If the CODEBASE attribute has not been used, put the .class files in the same directory as the Web page that includes the applet.
That's all it takes. Unlike CGI programming (which requires special access to the computer providing the Web pages), Java applets can be added by anyone who can put pages on a Web site.
As you saw earlier, parameters are sent to an applet using the <PARAM> tag and its attributes of NAME and VALUE. For example, <PARAM NAME="blink" VALUE="100"> sends a parameter named blink with a value of 100 to the applet.
Parameters are passed to the applet after it's loaded; all parameters are sent as strings whether or not they are encased in quotation marks. All parameters are converted to other data types within the applet. For an applet to use a parameter, the applet must retrieve the parameter using the getParameter() method, which is usually used within the init() portion of applet execution.
For example, use the following line in a Java applet to store the blink parameter in a variable called blinkValue:
String blinkValue = getParameter("blink");
If you want to retrieve the value and convert it to an integer, use the following
code:
int blinkValue = -1;
try { blinkValue = Integer.parseInt(getParameter("blink")); }
catch (NumberFormatException e) { }
This example uses the parseInt() method of the java.lang.Integer class to convert a String to an int. The try and catch block is used to trap errors if the String cannot be converted to a number.
In subsequent chapters, you delve into the specific details of programming, including user interface design and event handling. For now, it is worthwhile to take a look at a working example of an applet to get a clearer picture of how applets are constructed.
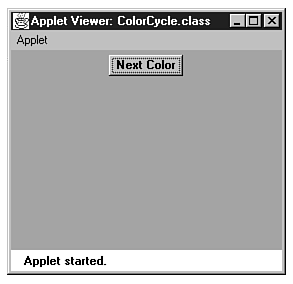
ColorCycle is a simple applet with one button labeled Next Color. When you click this button with the mouse, the background color of the applet changes. The program demonstrates basic applet structure and a simple bit of event handling. The source code for this applet is shown in Listing 8.1 and can be found on the CD-ROM that accompanies this book.
1: import java.awt.*;
2:
3: public class ColorCycle extends java.applet.Applet {
4:     float hue = (float).5;
5:     float saturation = (float)1;
6:     float brightness = (float)0;
7:     Button b;
8:
9:     public void init() {
10:         b = new Button("Next Color");
11:         add(b);
12:     }
13:
14:     public void start() {
15:         setBackground(Color.black);
16:         repaint();
17:     }
18:
19:     public boolean action(Event evt, Object o) {
20:         if (brightness < 1)
21:             brightness += .25;
22:         else
23:             brightness = 0;
24:         Color c = new Color(Color.HSBtoRGB(hue, saturation, brightness));
25:         setBackground(c);
26:         repaint();
27:         return true;
28:     }
29: }
Don't worry if some aspects of this program are unfamiliar to you at this point. Several aspects of this applet are discussed later in this chapter, including the creation of user interface components such as buttons and the action() method.
The following things are taking place in the applet:
Notice that there are no stop() or destroy() methods defined in this applet because we have no need to override either one of these method's activities. When the user moves to a different Web page or otherwise dumps this applet page from the viewer, the applet will stop and its resources will be recovered.
Once the ColorCycle applet has been written and compiled using your development software, you can put it on a Web page using the HTML tags <APPLET>, </APPLET>, and <PARAM>, described earlier in this chapter.
Listing 8.2 shows the full text of an HTML page that loads the ColorCycle.class applet. (This code can also be found on the CD-ROM that accompanies this book.) Because the CODEBASE attribute is not used with the <APPLET> tag, the .class file must be placed in the same directory as the Web page containing the applet.
1: <html>
2: <body>
3: <applet code=ColorCycle.class height=250 width=250>
4: </applet>
5: </body>
6: </html>
Although the applet loses something in the translation from color to black and white, Fig- ure 8.1 shows how the ColorCycle applet looks when viewed with the applet viewer provided with the Java Development Kit from Sun.
The ColorCycle applet consists of a square frame whose background color changes when the Next Color button is clicked.
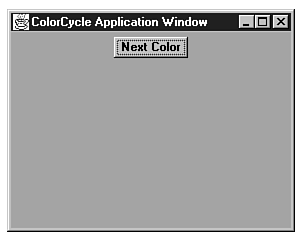
To underscore the difference between applets and applications, let's now turn the ColorCycle applet into an application that can run independently of a browser (see Listing 8.3 and the code on the CD-ROM). Remember that the application must provide the basic framework normally supplied for the applet by the browser, and must also invoke each of the applet methods in turn.
1:  import java.applet.Applet;
2:  import java.awt.*;
3:
4:  public class ColorCycleApplication extends Applet {
5:     float hue = (float).5;
6:     float saturation = (float)1;
7:     float brightness = (float)0;
8:     Panel p;
9:     Button b;
10:
11:    public static void main(String args[]) {
12:         ColorCycleFrame app = new ColorCycleFrame("ColorCycle Application Window");
13:         app.resize(200,200);
14:         app.show();
15:         app.applet.start();
16:    }
17:
18:    public void init() {
19:         b = new Button("Next Color");
20:         add(b);
21:    }
22:
23:    public void start() {
24:         setBackground(Color.black);
25:         repaint();
26:    }
27:
28:    public boolean action(Event event, Object obj) {
29:         if (brightness < 1)
30:             brightness += .25;
31:         else
32:             brightness = 0;
33:         Color c = new Color(Color.HSBtoRGB(hue, saturation, brightness));
34:         setBackground(c);
35:         repaint();
36:         return true;
37:    }
38: }
39:
40: class ColorCycleFrame extends Frame {
41:    ColorCycleApplication applet;
42:
33:    public ColorCycleFrame(String frameName) {
44:         super(frameName);
45:         applet = new ColorCycleApplication();
46:         add("Center",applet);
47:         applet.init();
48:    }
49:
50:    public boolean handleEvent(Event event) {
51:         if(event.id == Event.WINDOW_DESTROY) {
52:              applet.stop();
53:              applet.destroy();
54:              System.exit(0); }
55:         return false;
56:    }
57: }
An extra class and method are added to the ColorCycle applet so that the necessary overhead normally provided by the browser is now supplied by the application itself. This allows the same piece of code to run as an applet or an application (see Figure 8.2).
The ColorCycle applet transformed into a standalone application.
In Listing 8.3, the application begins by importing the classes needed to support both types of operation (lines 1 and 2). The imported classes include the Applet class for the applet and the awt.Frame class for the application.
The next step is ensuring that the code can run on a browser: in line 4, the ColorCycleApplication class extends the Applet class. Then the main() method required by an application is placed as the first method within the class. This method creates and displays a frame to hold the program (line 11), which in turn starts the body of the program. If the program is run as an applet, main() is never used and the browser begins with the init() method. If the class runs as an application, the main() method is executed first, which creates a frame to hold the applet functions using the ColorCycleFrame class. After the frame is created, the applet is centered within it.
Remember that a browser normally supplies all the overhead required by an applet; the browser also is responsible for calling each of the four required methods in turn--init(), start(), stop(), and destroy(). However, when the program runs as an application, we must replace this overhead because the browser is not available. These details are handled primarily by the ColorCycleApplication.main() method and the ColorCycleFrame class. Let's look closer at the ColorCycleFrame class.
When an applet runs on a browser, the browser provides a frame for it to reside in. Because the application is not a browser, it doesn't know about this requirement, so the ColorCycleFrame class provides the first bit of necessary overhead. Next, the program has to provide an instance of the application class to use as an applet (line 41). Lines 33 through 46 actually create the physical frame and add an instance of ColorCycleApplication within it. The first method of the applet, init(), is called to prepare the applet for operation.
After the frame and applet are instantiated, control is passed back to the main() method. Lines 13 and 14 set the initial size of the window and force its display on the screen. The main method of the applet, start(), is then called. At this point, the program performs its tricks and functions until the user closes the window.
Any action concerning the frame triggers an event. An event can be moving the mouse into or out of the frame, resizing the frame, or minimizing or maximizing the frame. Each event is handled using ColorCycleFrame.handleEvent() on line 50. Line 51 looks at the event to see whether the user has closed the window. If the window has been closed, the last two applet methods, stop() and destroy(), are called to close program operation and shut down the Java system.
By adding the frame class and an extra bit of code to virtually any applet, you enable the applet to run on machines that don't have a compatible browser but that do have a Java virtual machine.
Now that you understand the basic framework in which you develop an applet, it's time to take a closer look at the Abstract Windowing Toolkit (AWT). The AWT is used to build the graphical user interface with standard windowing elements. Each window element is represented by its own component. There are components for buttons you can click, components for text fields you can type into, and components for scrollbars you can control. There also are components for some things you cannot directly manipulate, such as labels.
For more information about the other capabilities and classes within the AWT, see Part IV of this book, "Programming the AWT."
To use AWT components in a program, you must contain them. After all, buttons floating freely in the computer don't do anyone any good. A Java container is a blank slate that holds the interface components. All containers in Java are subclasses of the Container class.
There are two basic types of containers:
A Panel container is not visible when it is added to an applet. Its purpose is to provide a way to organize components as they're laid out in a window.
Listing 8.4 is the source code for an applet that has a new Panel added to its surface. The applet is also located on the CD-ROM that accompanies this book. This code does not produce any output other than a blank window. However, it is useful as a template for the components you will learn to add throughout this chapter.
1: import java.applet.Applet;
2: import java.awt.*;
3: public class ContainerAndPanel extends Applet {
4:     Panel p = new Panel();
5:
6:     public void init() {
7:         add(p);
8:     }
9: }
The statement that puts the instance of panel p in the applet window is add(p) (line 7). The add() method is used whenever a component of any kind is added to a container.
By default, components are added to a container in left-to-right, top-to-bottom order. If a component does not fit on a line, it is placed at the leftmost edge of the next line. In addition, there are several layout managers that offer greater control of component placement. Organizing components using layout managers is covered later in this chapter and also in Chapter 14, "The Windowing (AWT) Package."
Now it's time to look at the various components you can add to your applet. Detailed information about the various AWT components can be found in Chapter 22, "Creating User Interface Components," and Chapter 23, "Working with Dialog Boxes."
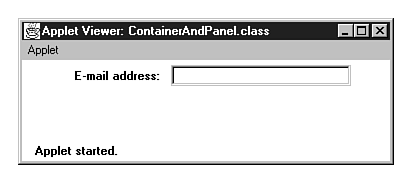
The Label component is a string displayed in the container that cannot be modified by the user. Figure 8.3 shows an example of an applet with a label next to a text field.
A Label component to the left of a text field.
The following code is used to create a Label component and add it to an applet window:
Label l = new Label("E-mail address: ");
add(l);
The parameter in the constructor Label("E-mail address: ") identifies the text to be displayed.
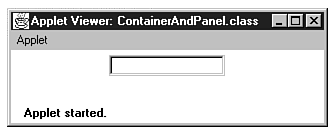
The TextField component is an input box in which a user can type a single line of text. The number of characters visible in the text field is configurable. Figure 8.4 shows an example of an applet with a text field.
A TextField component.
Adding a TextField component to a window is the same as adding a button or any other component:
TextField t = new TextField(12);
add(t);
The parameter 12 in the constructor TextField(12) sets up the text field so that the field is limited to displaying approximately 12 characters. The user can type more characters than that, but only some of the characters will be displayed.
NOTE: The actual number of characters displayed depends on which characters are typed. A text field can display more is than ms because the former characters are narrower than the latter.
If a string is specified as a parameter, such as TextField t = TextField("your name"), the text field is created with that string as the default text in the input area of the field.
You can specify default text and a width at the same time by using a statement such as this:
TextField country = new TextField("United States", 20)
TIP: There is no default length for the text field. If you don't supply a length parameter, the result is a one-character-wide text field.
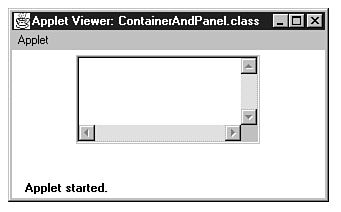
The TextArea component is an extended input box that makes it possible for the user to enter more than one line of text. The number of lines and the number of characters per line visible in the text area are configurable. Figure 8.5 shows an example of an applet with a text area.
A TextArea component.
The following code is used to create a TextArea component and add it to an applet window:
TextArea t = new TextArea(5,20);
add(t);
The parameters 5 and 20 specify the text area's number of lines and the number of characters per line, respectively. If the text extends beyond the borders of the text area, a scrollbar appears to enable the user to scroll to the different sections of the text area.
If a string is specified as a parameter to the constructor, as in the statement TextArea t = TextArea("It was a dark and stormy night.", 7, 25); the text area is created with the string as the default text in the input area of the field. To cause parts of this text to start at the beginning of the next line, use a newline character (\n) in the text of the parameter. For example, to put the text "stormy night" at the beginning of a new line, use the following statement:
TextArea t = TextArea("It was a dark and \nstormy night", 7, 25);
The Button component is a rectangular button that can be clicked with a mouse. The ColorCycle applet, earlier in this chapter, used a Button component to change the background color. Creating a Button component and adding it to an applet window requires two lines:
Button b = new Button("Cancel");
add(b);
Because the add(b) method does not refer to a specific container object, it defaults to adding the button to the applet surface. You can also create a new Panel and add a new Button component to that panel:
Panel p = new Panel();
Button b = new Button("Cancel");
p.add(b);
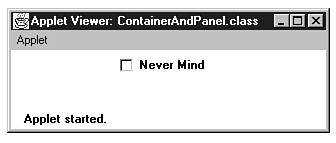
The Checkbox component is a toggle box that can be either selected or deselected. When selected, the checkbox displays a checkmark. This element usually has a line of text next to it explaining what the box signifies. Figure 8.6 shows an example of an applet with a checkbox.
A Checkbox component.
The following code is used to create a Checkbox component and add it to an applet window:
Checkbox c = new Checkbox("Never Mind");
add(c);
The parameter in the constructor Checkbox("Never Mind") identifies the text to be displayed. If you omit this parameter, a checkbox is displayed without any text next to it.
A checkbox is often used with a group of related checkboxes so that only one of the boxes can be selected at one time. In HTML, such groups of checkboxes are known as radio buttons. To create a group of checkboxes, you use the CheckboxGroup class. The setCheckboxGroup() method associates a checkbox with a particular group. The setCurrent() method of CheckboxGroup is used to make one of the boxes the selected box. Listing 8.5 shows the use of Checkbox and CheckboxGroup; the code is also located on the CD-ROM that accompanies this book.
1:  import java.applet.Applet;
2:  import java.awt.*;
3:
4:  public class ContainerAndPanel extends Applet {
5:      CheckboxGroup cbg = new CheckboxGroup();
6:
7:      public void init() {
8:          Checkbox c1 = new Checkbox("I hug trees.");
9:          c1.setCheckboxGroup(cbg);
10:         c1.setState(false);
11:         add(c1);
12:
13:         Checkbox c2 = new Checkbox("I cut trees.",cbg,false);
14:         add(c2);
15:
16:         Checkbox c3 = new Checkbox("I've never seen a tree",cbg,true);
17:         add(c3);
18:     }
19: }
When adding a checkbox to a group, note the difference between lines 8 through 10 and line 13. Line 8 creates the checkbox with its label; line 9 adds it to the group; line 10 sets its initial state to false. Line 13 combines these three operations into a single statement by merging the three parameters into the Checkbox method instantiation. Figure 8.7 shows the checkbox group that results from Listing 8.5.
A group of Checkbox components.
The Choice component is a popup list of strings from which a single string can be selected, similar to a group of checkboxes. A choice list provides a group of options and enables selection of one at a time. Figure 8.8 shows an example of an applet with a choice list.
A Choice component.
The addItem() method of the Choice class is used to build the choice list. To create a list, you instantiate the list, add individual items to it, and then add the loaded list to an applet window:
Choice c = new Choice();
c.addItem("Moe");
c.addItem("Larry");
c.addItem("Curly");
add(c);
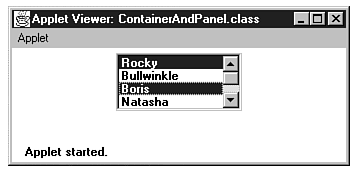
The List component is a scrolling list of strings from which one or more strings can be selected. Figure 8.9 shows an example of an applet with a scrolling list.
A List component.
The addItem() method of the List class is used to build the scrolling list. The following code is used to create a scrolling list, add items to it, and then add the list to an applet window:
List l = new List(4,true);
l.addItem("Rocky");
l.addItem("Bullwinkle");
l.addItem("Boris");
l.addItem("Natasha");
l.addItem("Dudley Do-Right");
l.addItem("Nell");
add(l);
The List() constructor can be used with no parameters or with two parameters. The List l = new List(4, true) statement uses two parameters; the first parameter indicates the number of list items to display in the list window and the second parameter determines how many list items can be selected. If the second parameter is true, multiple items can be selected. Otherwise, only one choice is allowed at a time, similar to the choice list.
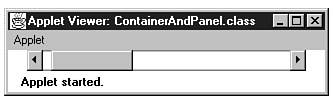
The Scrollbar component is an up-down or left-right slider that can be used to set a numeric value. You use this component by clicking the mouse on an arrow or by grabbing the box on the slider. Figure 8.10 shows an example of an applet with a scrollbar.
A Scrollbar component.
The first parameter of the Scrollbar constructor determines whether it is a vertical or horizontal scrollbar. If you want the bar to be vertical, use the constant Scrollbar.VERTICAL. Otherwise, use the constant Scrollbar.HORIZONTAL. Four other parameters follow the alignment parameter; these parameters determine the slider's initial setting, the size of the scrollable area, the minimum value, and the maximum value.
Consider the following statement:
Scrollbar sb = new Scrollbar(Scrollbar.HORIZONTAL, 50, 500, 0, 1000);
add(sb);
This code creates a horizontal Scrollbar component with the slider initially set to 50. When the user moves the slider, the scrollable area can return a value from 0 (the minimum value on the left) to 1000 (the maximum value on the right). The value changes in increments of 2 because the overall size of the scrollbar is limited to 500 elements (half the maximum value).
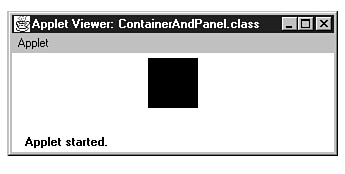
The Canvas component is a section of a window used primarily as a place to draw graphics or display images. In that respect, a canvas is more similar to a container than a component--however, a Canvas component cannot be used as a place to put components. The following code creates a Canvas component, resizes it to 50x50 pixels, sets the background of the canvas to the color black, and adds the canvas to an applet window:
Canvas c = new Canvas();
c.resize(50,50);
c.setBackground(Color.black);
add(c);
Figure 8.11 shows the code as it appears to the user: a black area on a white applet background.
A Canvas component.
Up to this point, all the components have been added to a container in a manner similar to the way HTML elements are arranged on a Web page. Things are loosely organized from left to right and from top to bottom; the look of the container is highly dependent on the size of its display area.
This approach is an easy way to implement Java's multiplatform capability. Because the language must work on any system that has a Java implementation, the windowing environment must be flexible. This also means that the same Java applet looks dramatically different when shown on a Windows 95 system, a Macintosh system, and a SPARC workstation, although it works exactly the same.
However, Java's developers understood the need for organizing the components in a user interface. Therefore, they extended Java's capability to customize your applet's interface to work on each of the platforms and to look close enough in appearance on different platforms to ensure cross-platform usability.
The tools added for this purpose are called layout managers. In the preceding sections, when you added components to a container--the main applet window--you were using the default layout manager: a class called FlowLayout. There are four other layout managers you can use as you organize your interface: BorderLayout, GridLayout, GridBagLayout, and CardLayout.
The FlowLayout class is the default layout manager for all panels, including the Applet class. It's the simplest to use. Components placed under the rules of FlowLayout are arranged in order from left to right. When a component is too big to be added to the current row, a new line of components is begun below the first line.
Each row of components can be aligned to the left, right, or centered. The only parameter used with the add() method is the name of the object to add.
The following setLayout() statement sets up a container to use the FlowLayout manager:
setLayout( new FlowLayout() );
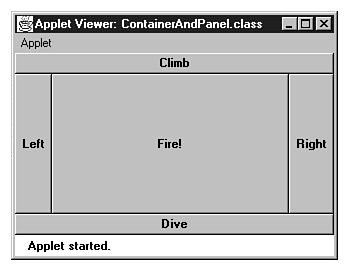
The BorderLayout class is the default layout manager for all Window, Dialog, and Frame classes. In a border layout, components are added to the edges of the container; the center area is allotted all the space that's left over. The add() method takes an additional parameter--a string that can be North, South, East, West, or Center. This parameter specifies the location in the border layout for the component. For example, the following statements create five buttons and add them to a container laid out with the BorderLayout manager, as shown in Figure 8.12:
Button b1 = new Button("Climb");
Button b2 = new Button("Dive");
Button b3 = new Button("Left");
Button b4 = new Button("Right");
Button b5 = new Button("Fire!");
setLayout( new BorderLayout() );
add("North", b1);
add("South", b2);
add("West", b3);
add("East", b4);
add("Center", b5);
Note the use of the setLayout() method to select a layout manager for the container. Its single parameter is an instance of the desired layout. Remember to capitalize the directional parameter to the add() method. Like many other case-sensitive aspects of the Java language, the BorderLayout manager requires the directions to be capitalized consistently as North, South, East, West, and Center.
The GridLayout class puts each component into a place on a grid that is equal in size to all the other places. The grid is given specific dimensions when created; components are added to the grid in order, starting with the upper-left corner. This is similar to the way components are added with the FlowLayout manager, but with GridLayout, components are given equal amounts of space in the container.
Components arranged by the BorderLayout manager.
Components added to the container with the GridLayout manager are arranged in order from left to right. When there are no more grids remaining on a row, the next component to be added is placed in the leftmost grid on the next line. New rows are added as needed--if you create a three-by-three grid and add a tenth item, a fourth row is added. The only parameter used with the add() method is the name of the object to add.
The following setLayout() statements set up a container to use the GridLayout manager with three rows and two columns and then add a series of buttons:
setLayout( new GridLayout(3, 2));
Button b1 = new Button("Lefty");
Button b2 = new Button("Righty");
Button b3 = new Button("Loosey");
Button b4 = new Button("Tighty");
Button b5 = new Button("White on Right");
Button b6 = new Button("Red on Ribs");
add(b1);
add(b2);
add(b3);
add(b4);
add(b5);
add(b6);
Figure 8.13 shows an example of an applet with all the components arranged according to the rules of the GridLayout manager.
The GridBagLayout class is similar to the GridLayout class except that GridBagLayout provides much more control over how the grid is organized and how components are presented. Cells in the grid are not required to take up the same amount of space, and components can be aligned in different ways in each grid cell.
A special GridBagConstraints object is used to determine how a component is placed in a cell and how much space the cell will occupy. Unlike the FlowLayout and GridLayout managers, the GridBagLayout manager permits you to add components to the grid in any order.
Components arranged by the GridLayout manager.
The first step you take to use the GridBagLayout manager is to set up the
layout and the GridBagConstraints object, as shown here:
GridBagLayout gl = new GridBagLayout();
setLayout ( gl );
GridBagConstraints gb = new GridBagConstraints();
Before you can add a component to the container, you use instance variables of the GridBagConstraints object to determine the component's location and alignment within its grid cell.
The following GridBagConstraints variables can be set:
gb.fill = GridBagConstraints.BOTH;
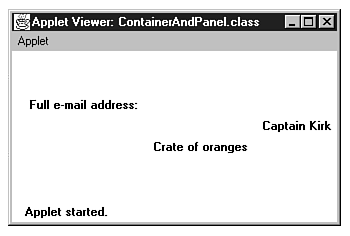
Listing 8.6 shows an example of placing a component on a page using the GridBagLayout class. The code can also be found on the CD-ROM that accompanies this book.
// declare variables
GridBagLayout gl = new GridBagLayout();
GridBagConstraints gb = new GridBagConstraints();
// choose a layout manager
setLayout ( gl );
// create components
Label l1 = new Label("Full e-mail address:");
Label l2 = new Label("Captain Kirk");
Label l3 = new Label("Crate of oranges");
// set up the constraints and add component
gb.gridx = 1;
gb.gridy = 1;
gb.gridwidth = 2;
gl.setConstraints(l1, gb);
add(l1);
// set up the constraints and add component
gb.gridx = 5;
gb.gridy = 3;
gb.gridwidth = 2;
gl.setConstraints(l2, gb);
add(l2);
// set up the constraints and add component
gb.gridx = 3;
gb.gridy = 5;
gb.gridwidth = 2;
gl.setConstraints(l3, gb);
add(l3);
In this example, the first component is placed in row 1, column 1 of the grid and takes up two cells in width. The second component is placed in row 5, column 3; the third component is placed in row 3, column 5. Figure 8.14 shows an example of an applet with all components arranged according to the rules of the GridBagLayout manager and its GridBagConstraints.
Components arranged by the GridBagLayout manager.
The CardLayout class is a special type of layout organizer. Instead of displaying several panels concurrently, it creates a stack of panels that can then be displayed one at a time, much like the stack of cards in the ubiquitous Solitaire game. The CardLayout class has its own group of methods that are used to control which panel is displayed.
Listing 8.7 uses a series of panels with different-colored canvases to illustrate the CardLayout class. Clicking on the applet area causes the layout manager to load the next panel. If the last panel is already loaded, the CardLayout manager automatically returns to the first panel. This code is also located on the CD-ROM that accompanies this book.
import java.applet.Applet;
import java.awt.*;

public class cardStack extends Applet {
     private Panel   canvasCards = new Panel(),
        p1 = new Panel(), p2 = new Panel(), p3 = new Panel();
     private CardLayout cardDeck = new CardLayout();

    public void init() {
        canvasCards.setLayout( cardDeck );

        p1.setLayout (new BorderLayout());
        p2.setLayout (new BorderLayout());
        p3.setLayout (new BorderLayout());

        Canvas c1 = new Canvas(), c2 = new Canvas(), c3 = new Canvas();
        c1.setBackground(Color.black);
        c2.setBackground(Color.red);
        c3.setBackground(Color.green);

        p1.add("Center", c1);
        p2.add("Center", c2);
        p3.add("Center", c3);

        canvasCards.add("p1", p1);
        canvasCards.add("p2", p2);
        canvasCards.add("p3", p3);

        setLayout(new BorderLayout());
        add("Center", canvasCards);
    }

    public boolean mouseDown(Event event, int x, int y) {
        cardDeck.next(canvasCards);
        return true;
    }
}
Although the Abstract Windowing Toolkit offers several different kinds of layout managers, frequently, one specific manager does not fit the user interface you are trying to create.
The solution to this problem is to nest one type of container inside another so that the nested container can have one type of layout manager and the larger container can use another. You can nest containers as many times as necessary because containers can contain other containers; each container can use its own layout manager.
The following code creates a container that uses the BorderLayout manager and then adds a panel of choice boxes to that container. Because no layout manager is specified for the boxes, they default to the FlowLayout manager.
setLayout( new BorderLayout() );
Button b1 = new Button("Purchase");
add("North", b1);
Button b2 = new Button("Exit");
add("West", b2);
Button b3 = new Button("Help");
add("East", b3);
Button b4 = new Button("Browse Catalog");
add("South", b4);
Panel p = new Panel();
// add check boxes to panel
Checkbox c1 = new Checkbox("Brazil: $9.95");
p.add(c1);
Checkbox c2 = new Checkbox("Time Bandits: $12.95");
p.add(c2);
Checkbox c3 = new Checkbox("12 Monkeys: $39.95");
p.add(c3);
// add panel to main container
add("Center",p);
Figure 8.15 shows an applet that uses this code. By using nested panels and different types of layout managers, you can create many different types of user interface windows.
A container organized by the BorderLayout manager with a nested panel in the center organized by the FlowLayout manager.
At this point, you have the tools necessary to build an impressive graphical user interface for a Java applet. You can use text fields to enter characters, click buttons, move scrollbars from side to side, and so on.
However, the interface has no way to respond to any of this user input. In a windowing environment such as the one provided by the Abstract Windowing Toolkit, user input--whether from the mouse, keyboard, or other means--generates an event.
An event is a way for a program to communicate that something has taken place. Events generate automatic calls to methods in the same way that a paint() method can be called automatically when an applet window has to be redrawn, or that an init() method is called automatically when an applet is first run.
Events can involve a user interface element--such as a button that has been clicked. Events can also be something unrelated to the interface--such as an error condition that causes the program to stop execution.
In Java, the class java.awt.Event handles all events related to the user interface.
For the purposes of controlling the user interface components you can create for use with applets, there are two kinds of events to consider: action events and scrollbar events.
An action event is generated by most user interface components to signify that something has happened. This means different things depending on the component:
The action() method is part of the Event class and follows this syntax:
public boolean action(Event e, Object o) {
// method code here
}
All user interface components that must generate an action event use the action() method. Two parameters to the method determine which component generated the event and gather some other information about what occurred. These two parameters are an instance of an Event and an Object class.
The Event class has several instance variables that provide information about the event that has taken place. The one you use most with action() events is the target variable, which indicates which component generated the event.
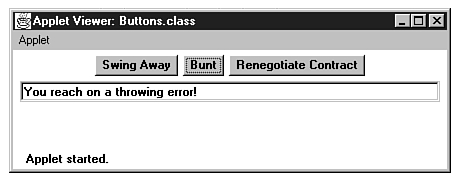
The code in Listing 8.8 creates three buttons on an applet window and sets a TextField in response to the button that was pressed, as shown in Figure 8.16. The code can also be found on the CD-ROM that accompanies this book.
1: import java.awt.*;
 2:
 3: public class Buttons extends java.applet.Applet {
 4:     Button b1 = new Button("Swing Away");
 5:     Button b2 = new Button("Bunt");
 6:     Button b3 = new Button("Renegotiate Contract");
 7:     TextField t = new TextField(50);
 8:
 9:     public void init() {
10:         add(b1);
11:         add(b2);
12:         add(b3);
13:         add(t);
14:     }
15:
16:     public boolean action(Event e, Object o) {
17:         if (e.target instanceof Button) {
18:             String s = (String)o;
19:             if ( s.equals("Swing Away") )
20:                 t.setText("A long fly to center ... caught.");
21:             else if ( s.equals("Bunt") )
22:                 t.setText("You reach second base on an  infielder's error!");
23:             else
24:                 t.setText("You're now America's newest multimillionaire!");
25:             return true;
26:         }
27:         return false;
27:     }
28: }
The Buttons applet.
The action() method is generated by every component described in this chapter except for Scrollbar. The Scrollbar component uses the handleEvent() method. Unlike the action() method, handleEvent() takes only one parameter: an instance of the Event class:
public boolean handleEvent(Event e) {
    // method code here
}
Using the target variable of the Event class, you can determine which component generated the event and respond to it. Listing 8.9 sets a value in a text field based on user input to a scrollbar. You can find the code on the CD-ROM that accompanies this book.
1: import java.awt.*;
 2:
 3: public class Scroller extends java.applet.Applet {
 4:     Scrollbar s = new Scrollbar(Scrollbar.HORIZONTAL,
 5:                     50,100,0,100);
 6:     Label l = new Label("Choose Your Own Tax Rate: ");
 7:     TextField t = new TextField("50%", 3);
 8:
 9:     public void init() {
10:         add(s);
11:         add(l);
12:         add(t);
13:     }
14:
15:     public boolean handleEvent(Event e) {
16:         if (e.target instanceof Scrollbar) {
17:             int taxrate = ((Scrollbar)e.target).getValue();
18:             t.setText(taxrate + "%");
19:             return true;
20:         }
21:     return false;
22:     }
23: }
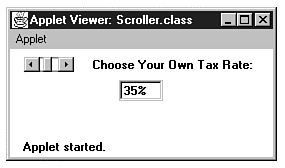
When you use a Web browser or the JDK applet viewer utility to view the completed applet, it should resemble Figure 8.17.
The Scroller applet.
As you will find when programming your own applets, the Java API has built-in functionality that handles a lot of the work for you. The user interface provides many components such as buttons, text fields, and choice boxes--and subclassing makes it possible to extend these components without requiring a lot of new code.
Tasks that can be arduous in some languages--such as animation and event handling--are relatively easy with Java. One of Java's original design goals was simplicity. Some folks argue that object-oriented programming is never simple. However, applet programming is a good area for novice Java programmers to begin because it can be easy to develop useful Web programs without a lot of coding.
This introduction to applet programming and the Abstract Windowing Toolkit demonstrated a lot of Java's functionality as it's built into the class libraries. For many applets, creating the user interface represents the bulk of the work because a lot of the code required to control the interface has already been written.
Each of the user interface components has methods you can use to retrieve or change their values, enable or disable their operation, and perform other tasks. The full reference to these methods is available in Appendix C, "Java Class Library."
![]()
![]()
![]()
![]()
![]()
©Copyright, Macmillan Computer Publishing. All rights reserved.