
Next in the long list of Java controls are the scrollbar and canvas controls, which are represented by the Scrollbar and Canvas classes. Using a scrollbar, you can enable the user to choose values from a slider or even set up your own scrolling displays. The canvas control, on the other hand, enables you to draw and display graphics in an applet. In this chapter, you'll get a handle on both of these handy controls.
Practically every application that runs under Windows supports scrollbars. In most cases, you use a scrollbar to move to different portions of a document. However, a good alternative use for these controls is selecting a value from a range. Although scrollbars are not as common in applets, Java does include a class for adding scrollbars to your programs. To create a scrollbar, you first call the Scrollbar class's constructor, like this:
Scrollbar scrollbar = new Scrollbar(orientation,

    start, page, min, max);
The constructor's five arguments are the scrollbar's orientation (can be Scrollbar.HORIZONTAL or Scrollbar.VERTICAL), the starting setting for the scrollbar, the scrollbar's page size (the amount the display scrolls when the user clicks above or below the scroll box), and the minimum and maximum values represented by the scrollbar.
After creating the scrollbar object, you add it to the applet by calling the add() method, like this:
add(scrollbar);
Suppose you need to create a scrollbar that'll enable the user to select a value from 1 to 100. You can create such a scrollbar like this:
Scrollbar scrollbar =

    new Scrollbar(Scrollbar.HORIZONTAL, 50, 0, 1, 100);

add(scrollbar);
The constructor's first argument tells Java that the scrollbar should be drawn horizontally on the display. The second argument tells Java that you want the scrollbar to start off set to the value of 50. The third argument is the page size, which represents the area in the slider covered by the scroll box. Finally, the fourth and fifth arguments give the scrollbar a minimum value of 1 and a maximum value of 100.
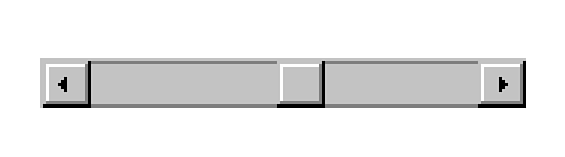
These settings enable the user to select a value from 1 to 100. So, why is the scrollbar's page size set to zero? Doing this forces the scroll box in the scrollbar to center on the selected value. It also enables the user to select the maximum value of 100. To understand why this is necessary, imagine that the scrollbar's scroll box represents the page of data that's currently displayed (such as in a word processor document). The scroll box then starts on the selected value and ends on the selected value plus the page size. Figure 21.1 illustrates this concept. The scrollbar in the figure was created like this:
Scrollbar scrollbar =

    new Scrollbar(Scrollbar.HORIZONTAL, 50, 10, 1, 100);
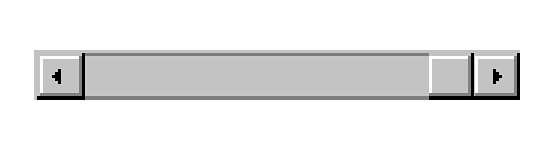
Because the scrollbar's starting value is 50, and the scrollbar's page size is 10, the scroll box covers the area of the slider from 50 to 60. If the user were to drag the scroll box to its maximum value, the scroll box would cover the area in the slider from 90 to 100, as shown in Figure 21.2. In this case, the page size of 10 makes it impossible for the user to actually select the value of 100. This is because, if the user could select the value 100, the scrollbox would have to cover the slider area from 100 to 110. But, the scrollbar's maximum value is 100.
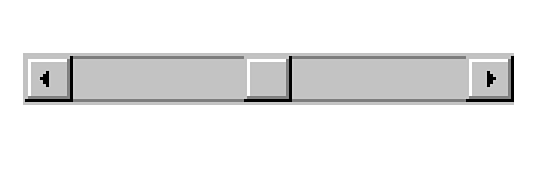
When using a scrollbar to select specific values rather than areas of a document, you can either set the page size to zero or set the maximum to the maximum you want plus the page size. Both of these scrollbars will operate the same way:
Scrollbar scrollbar =

    new Scrollbar(Scrollbar.HORIZONTAL, 50, 10, 1, 110);

Scrollbar scrollbar =

    new Scrollbar(Scrollbar.HORIZONTAL, 50, 0, 1, 100);
Figure 21.3 shows the scrollbar produced by either of the above examples. Notice that the scroll box is now centered on 50. When the scrollbox is at its maximum position now, it indicates a value of 100.
Because of the many different types of events a scrollbar generates,
you need to capture its events in the class's handleEvent()
method, rather than in action(), as you did with other
controls. What's handleEvent()? Like action(),
handleEvent() is a method that's defined in one of your
applet's superclasses (in this case, Component). The
handleEvent() method handles all the specific event messages
that are generated by the typical windowing system. Table 21.1
lists some of the events to which the handleEvent() method
can respond.
| Event Message | Description |
| ACTION_EVENT | An event that can be handled by action(). |
| GOT_FOCUS | The component received the focus. |
| KEY_PRESS | A key on the keyboard was pressed. |
| KEY_RELEASE | A key on the keyboard was released. |
| LIST_DESELECT | An item in a list was deselected. |
| LIST_SELECT | An item in a list was selected. |
| LOST_FOCUS | The component lost the focus. |
| MOUSE_DOWN | The user pressed a mouse button. |
| MOUSE_DRAG | The user dragged the mouse pointer. |
| MOUSE_ENTER | The mouse pointer entered an area. |
| MOUSE_EXIT | The mouse pointer left an area. |
| MOUSE_MOVE | The user moved the mouse. |
| MOUSE_UP | The released a mouse button. |
| SCROLL_ABSOLUTE | The user moved a scrollbar's scroll box. |
| SCROLL_LINE_DOWN | The user clicked a scrollbar's down arrow. |
| SCROLL_LINE_UP | The user clicked a scrollbar's up arrow. |
| SCROLL_PAGE_DOWN | The user clicked in a scrollbar below the scroll box. |
| SCROLL_PAGE_UP | The user clicked in a scrollbar above the scroll box. |
| WINDOW_DEICONIFY | The window has been restored from an icon state. |
| WINDOW_DESTROY | The window has been destroyed. |
| WINDOW_EXPOSE | The window has been activated. |
| WINDOW_ICONIFY | The window has been reduced to an icon. |
| WINDOW_MOVED | The window has been moved. |
As you can see from the list in Table 21.1, there are five event
messages associated with a scrollbar. These messages are SCROLL_ABSOLUTE,
SCROLL_LINE_DOWN, SCROLL_LINE_UP, SCROLL_PAGE_DOWN,
and SCROLL_PAGE_UP. You can respond to these event messages
when you want to customize how the scrollbar functions. (You learn
how to handle event messages in Chapter 25, "Mouse and Keyboard
Events.") However, you don't need to get into such details
when you just need to know where the user set the scrollbar. Instead,
you can override handleEvent() and check for the scrollbar
object in that method. If the user generates an event with the
scrollbar, you can then call the scrollbar's methods to determine
what change was made. Table 21.2 lists the most useful methods
of the Scrollbar class:
| Method | Description |
| int getLineIncrement() | Returns the line increment. |
| int getMaximum() | Returns the maximum value. |
| int getMinimum() | Returns the minimum value. |
| int getOrientation() | Returns the orientation. |
| int getPageIncrement() | Returns the page increment. |
| int getValue() | Returns the currently set value. |
| int getVisible() | Returns the page size. |
| setLineIncrement(int inc) | Sets the line increment. |
| setPageIncrement(int inc) | Sets the page increment. |
| setValue(int value) | Sets the selected value. |
| setValues(int value, int | Sets all the slider's values.pgsize, int min, int max) |
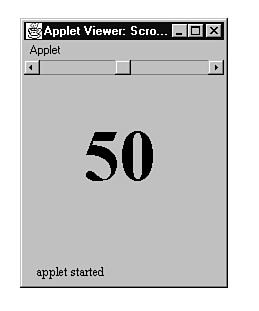
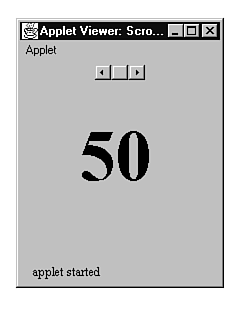
Now that you know how to use a scrollbar, you can put together an applet that demonstrates the concepts involved. Listing 21.1 is just such an applet. Called ScrollbarApplet, this applet enables you to manipulate a scrollbar with your mouse and see the results on the screen. Figure 21.4 shows the applet when it first starts up.
Figure 21.4 : This is ScrollbarApplet running under Appletviewer.
Listing 21.1 ScrollbarApplet.java: An Applet That Uses a Scrollbar.
import java.awt.*;

import java.applet.*;


public class ScrollbarApplet extends Applet

{

    Scrollbar scrollbar;

    String s;


    public void init()

    {

        BorderLayout layout = new BorderLayout();

        setLayout(layout);


        scrollbar = new Scrollbar(Scrollbar.HORIZONTAL,

            50, 0, 1, 100);

        add("North", scrollbar);


        s = "50";

        Font font = new Font("TimesRoman", Font.BOLD, 72);

        setFont(font);

        resize(200, 200);

    }


    public void paint(Graphics g)

    {

        g.drawString(s, 60, 120);

    }


    public boolean handleEvent(Event evt)

    {

        if (evt.target instanceof Scrollbar)

        {

            scrollbar = (Scrollbar)evt.target;

            int value = scrollbar.getValue();

            s = String.valueOf(value);

            repaint();

            return true;

        }

        else

        {

            boolean result = super.handleEvent(evt);

            return result;

        }

    }

}
Tell Java that the applet uses the classes in the awt package.
Tell Java that the applet uses the classes in the applet package.
Derive the ScrollbarApplet class from Java's Applet class.
Declare the scrollbar and display string.
Override the init() method.
Create and set the layout.
Create and add the scrollbar.
Initialize the display string, the font, and the applet size.
Override the paint() method.
Draw the display string.
Override the handleEvent() method.
If the toolbar caused the event...
Cast the target object to a scrollbar.
Get the scrollbar's current setting.
Convert the setting to a string.
Force Java to redraw the applet's display area.
Tell Java that the event was handled.
Else if this is not a scrollbar event...
Send the event on to the superclass's handleEvent().
Return the result.
There are two things that you should be sure to notice in ScrollbarApplet. First, notice that the scrollbar isn't just added to the applet. It is, instead, added to the applet after the applet's layout manager has been set. This is because the size of the control bar is dependent upon the active layout manager and how the control is added to the manager. (For more information on layout managers, see Chapter 22, "Panels and the Layout Manager." By creating a BorderLayout manager and adding the horizontal scrollbar to the "North" position, you get a scrollbar the stretches across the top of the applet. Failure to place the scrollbar properly in an appropriate layout manager will result in a useless scrollbar like the one shown in Figure 21.5.
Figure 21.5 : The scrollbar in this applet was not placed properly in an appropriate layout manager.
Canvases are nothing more than areas on which you can draw. You can combine canvases with other types of components, such as buttons, in order to build layouts that that are attractive, as well as functional. The first step in creating a canvas is to call the Canvas class's constructor, like this:
Canvas canvas = new Canvas();
The Canvas constructor requires no arguments.
Once you have the canvas created, you add it to your layout just as you would any other component, by calling the add() method:
add(canvas);
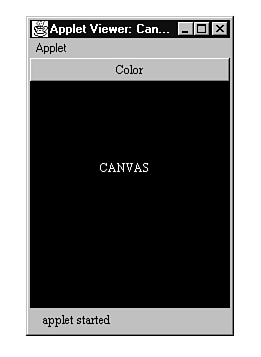
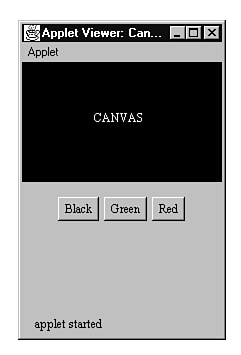
To end this chapter, take a look at Listing 21.2, which is an applet that creates a canvas class and uses the class to display a colored area on the screen. When you run the applet with Appletviewer, you see the window shown in Figure 21.6. The applet displays two components: a button at the top of the applet and a canvas below the button. When you click the button, the canvas changes color.
Figure 21.6 : This is CanvasApplet running under Appletviewer.
| NOTE |
Often, you'll want to derive your own custom canvas class from Java's Canvas class. Then, you can more easily control what's drawn in the canvas, by overriding the canvas's paint() method. This is the approach that's used in the CanvasApplet applet. |
Listing 21.2 CanvasApplet.java: An Applet That Displays a Canvas.
import java.awt.*;

import java.applet.*;


public class CanvasApplet extends Applet

{

    CustomCanvas canvas;


    public void init()

    {

        setLayout(new BorderLayout());


        Button button = new Button("Color");

        add("North", button);


        canvas = new CustomCanvas();

        add("Center", canvas);


        resize(200, 250);

    }


    public boolean action(Event evt, Object arg)

    {

        if (arg == "Color")

            canvas.swapColor();


        return true;

    }

}


class CustomCanvas extends Canvas

{

    Color color;


    public CustomCanvas()

    {

        color = Color.black;

    }


    public void paint(Graphics g)

    {

        Rectangle r = bounds();

        g.setColor(color);

        g.fillRect(0, 0, r.width, r.height);

        g.setColor(Color.white);

        g.drawString("CANVAS", 72, 90);

    }


    public void swapColor()

    {

        if (color == Color.black)

            color = Color.red;

        else if (color == Color.red)

            color = Color.green;

        else

            color = Color.black;


        repaint();

    }

}
Tell Java that the applet uses the classes in the awt package.
Tell Java that the applet uses the classes in the applet package.
Derive the CanvasApplet class from Java's Applet class.
Declare the custom canvas object.
Override the init() method.
Create and set the layout.
Create and add the button.
Create and add the canvas.
Size the applet.
Override the action() method.
if the "Color" button was pressed...
Tell the canvas to change color.
Tell Java that the event was handled.
Define the CustomCanvas class.
Declare the class's single data field.
Declare the class's constructor.
Set the initial canvas color.
Override the paint() method.
Get the canvas's size.
Set the currently selected color.
Fill the canvas with the selected color.
Set the color for the text.
Display the text string.
Define the swapColor() method.
Set color to the next color.
Repaint the canvas with the new color.
Most often, you see scrollbars being used to manipulate such controls as scrolling lists and text areas. However, scrollbars also enable you to create a reasonable facsimile of a Windows 95 slider control, which enables the user to select a value from a given range. Remember that you need to use the appropriate layout manager in order for the scrollbar to be drawn properly. Unlike scrollbars, canvases aren't usually used to obtain input from the user (although they do generate some types of event messages). Instead, canvases enable you to create graphical areas in your applets.


