
So far in this book, when you created and displayed an applet, you had a single window on the screen. This window was either Appletviewer or the browser you were using to display the applet. However, applets can create additional windows. Although you probably won't use this feature a lot, it's nice to know it's around in case you need it. Moreover, when you create a window in Java, you can add a full-featured menu bar that can contain commands, checked options, and separator objects. In this chapter, you learn to display windows and their menu bars, as well as how to respond to menu commands.
Java's libraries include a class called Frame that represents a frame window that you can create and display from within an application. To create a frame window, you call the Frame class's constructor, like this:
Frame frame = new Frame("Frame Window");
This constructor's single argument is the window's title, which will appear in the window's title bar.
When you have the window created, you can display it by calling the window's show( ) method. To remove the window from the screen, you call the hide( ) method. You can even size the window by calling resize( ) or position the window by calling move( ).
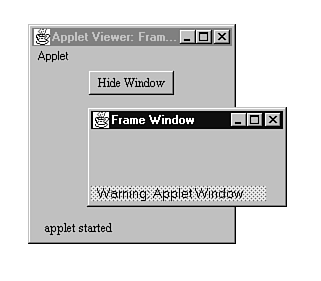
To demonstrate the basics of using the Frame class, Listing 23.1 is the source code for an applet that can display a frame window. When you click the applet's button, the applet displays a frame window. When you click the button a second time, the applet removes the window from the screen. Figure 23.1 shows the applet and its frame window. Notice that, when the button is clicked, the button's label switches between "Show Window" and "Hide Window."
Figure 23.1 : Your Java applets can display additional windows.
Listing 23.1 FrameApplet.java: Displaying a Frame Window.
import java.awt.*;

import java.applet.*;


public class FrameApplet extends Applet

{

    Frame frame;

    Button button;


    public void init()

    {

          frame = new Frame("Frame Window");

          button = new Button("Show Window");

          add(button);

    }


    public boolean action(Event evt, Object arg)

    {

        boolean visible = frame.isShowing();

        if (visible)

        {

            frame.hide();

            button.setLabel("Show Window");

        }

        else

        {

            frame.show();

            frame.resize(200, 100);

            button.setLabel("Hide Window");

        }


        return true;

    }

}
Tell Java that the applet uses the classes in the awt package.
Tell Java that the applet uses the classes in the applet package.
Derive the FrameApplet class from Java's Applet class.
Declare the frame-window and button objects.
Override the init( ) method.
Create the frame window.
Create the button component.
Add the button to the applet.
Override the action( ) method.
Determine whether the window is visible.
If the window is visible...
Hide the window.
Change the button's label to "Show Window."
Else if the window is hidden...
Show the window.
Set the window's size.
Change the button's label to "Hide Window."
Tell Java that the message was handled okay.
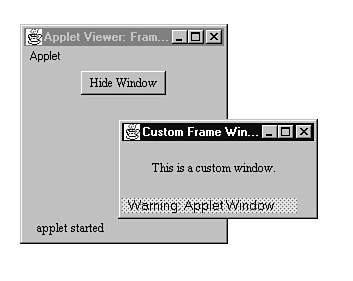
When you decide that your applet needs to display a frame window, you're usually better off creating a special class for the window. That way, you have complete control over how the window is constructed and displayed. To create a custom window class, you simply derive your window class from Java's Frame class. Listing 23.2 is a rewritten version of FrameApplet, called FrameApplet2, that gives the frame window its own class. This new frame window also takes advantage of having its own class by overriding the paint( ) method in order to display text in the window. Figure 23.2 shows FrameApplet2 running under Appletviewer.
Figure 23.2 : This is FrameApplet2 running under Appletviewer.
Listing 23.2 FrameApplet2.java: Creating a Frame-Window Class.
import java.awt.*;

import java.applet.*;


public class FrameApplet2 extends Applet

{

    CustomFrame frame;

  Button button;


    public void init()

    {

          frame = new CustomFrame("Custom Frame Window");

          button = new Button("Show Window");

          add(button);

    }


    public boolean action(Event evt, Object arg)

    {

        boolean visible = frame.isShowing();

        if (visible)

        {

            frame.hide();

            button.setLabel("Show Window");

        }

        else

        {

            frame.show();

            button.setLabel("Hide Window");

        }


        return true;

    }

}


class CustomFrame extends Frame

{

    CustomFrame(String title)

    {

        super(title);

    }


    public void paint(Graphics g)

    {

        resize(200, 100);

        g.drawString("This is a custom window.", 30, 30);

    }

}
Tell Java that the applet uses the classes in the awt package.
Tell Java that the applet uses the classes in the applet package.
Derive the FrameApplet2 class from Java's Applet class.
Declare the custom frame-window and button objects.
Override the init( ) method.
Create the custom frame window.
Create the button component.
Add the button to the applet.
Override the action( ) method.
Determine whether the window is visible.
If the window is visible...
Hide the window.
Change the button's label to "Show Window."
Else if the window is hidden...
Show the window.
Change the button's label to "Hide Window."
Tell Java that the message was handled okay.
Derive the CustomFrame class from Java's Frame class.
Define the class's constructor.
Pass the title string on to the Frame class.
Override the window's paint( ) method.
Resize the window.
Display a message in the window.
| NOTE |
When you compile FrameApplet2, notice that, although both the FrameApplet2 and CustomFrame classes are defined in the same file, the Java compiler creates two class files called FrameApplet2.class and CustomFrame.class. |
Frame windows are just like any other window you see when you create an applet. That is, you can add components organized into a variety of layouts and respond to the user's selections of these components. In fact, adding layouts and components to a frame window is not unlike doing the same thing with your applet's main window, which you did in the previous chapter. First you create and set the layout manager, and then you add the components as appropriate for the layout manager you've chosen.
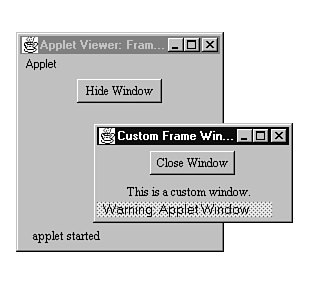
Listing 23.3 is an applet called FrameApplet3 that not only creates a custom frame window, but also creates a simple layout for the window. This layout contains only a single button; however, you can create as sophisticated a layout as you like. Feel free to experiment further with this applet. Figure 23.3 shows FrameApplet3 running under Appletviewer, after the user has displayed the frame window. As you can see in the figure, the window has a single button labeled "Close Window." When you click this button, the frame window's action( ) method responds by calling the dispose( ) method, which not only removes the window from the screen, but also destroys the window in memory.
Figure 23.3 : This is FrameApplet3 running under Appletviewer.
Listing 23.3 FrameApplet3.java: Adding Components to a Window.
import java.awt.*;

import java.applet.*;


public class FrameApplet3 extends Applet

{

    CustomFrame frame;

    Button button;


    public void init()

    {

          frame = new CustomFrame("Custom Frame Window");


          button = new Button("Show Window");

          add(button);

    }


    public boolean action(Event evt, Object arg)

    {

        boolean visible = frame.isShowing();

        if (visible)

        {

            frame.hide();

            button.setLabel("Show Window");

        }

        else

        {

            frame.show();

            button.setLabel("Hide Window");

        }


        return true;

    }

}


class CustomFrame extends Frame

{

    Button button;


CustomFrame(String title)

    {

        super(title);


        FlowLayout layout = new FlowLayout();

        setLayout(layout);


        button = new Button("Close Window");

        add(button);

    }


    public void paint(Graphics g)

    {

        resize(200, 100);

        g.drawString("This is a custom window.", 30, 50);

    }


    public boolean action(Event evt, Object arg)

    {

        if (arg == "Close Window")

            dispose();


        return true;

    }

}
Table 23.1 shows some useful methods you can use to manipulate
a frame window. Some of these methods are defined in the Frame
class, whereas others are inherited from the class's superclasses,
such as Window and Container.
| Methods | Description |
| void add( ) | Adds components to the window. |
| void dispose( ) | Deletes the window from memory. |
| int getCursorType( ) | Returns the window's cursor type. |
| Image getIconImage( ) | Returns the window's icon object. |
| LayoutManager getLayout( ) | Returns the window's layout manager. |
| MenuBar getMenuBar( ) | Returns the window's menu bar object. |
| String getTitle( ) | Returns the window's title. |
| void hide( ) | Removes the window from the screen. |
| Boolean isResizable( ) | Returns true if the window is resizable. |
| void remove( ) | Removes components from the window. |
| void removeAll( ) | Removes all components from the window. |
| void setCursor(int cursorType) | Sets the window's cursor type. |
| void setIconImage(Image image) | Sets the window's icon object. |
| void setLayout( ) | Sets the window's layout manager. |
| void setMenuBar(MenuBar mb) | Sets the window's menu bar. |
| void setResizable(boolean | Sets the window's resizable resizable)attribute. |
| void setTitle(String title) | Sets the window's title. |
| void show( ) | Displays the window on the screen. |
Most Windows applications have menu bars, which enable the user to more easily locate and select the various commands and options supported by the program. The frame windows you create from within your applets can also have menu bars. To create a menu bar in a window, you must follow a series of steps:
Each of the above steps is covered in the sections that follow.
The first step in adding a menu bar to a frame window is to create the MenuBar object that'll hold all the menus and commands. The menu bar in a window is the horizontal area near the top that contains the names of each of the menus in the menu bar. To create the MenuBar object, call the MenuBar class's constructor, like this:
MenuBar menuBar = new MenuBar( );
As you can see, the MenuBar( ) constructor requires no arguments.
After you've created the MenuBar object, you have to tell Java to associate the menu bar with the frame window. You do this by calling the window's setMenuBar( ) method:
setMenuBar(menuBar);
At this point, you have an empty menu bar associated with the window. In the next steps, you add menus to the menu bar.
A menu bar is the horizontal area near the top of a window that contains the names of the menus contained in the menu bar. After creating and setting the MenuBar object, you have the menu bar, but it contains no menus. To add these menus, you first create objects of the Menu class for each menu you want in the menu bar, like this:
Menu fileMenu = new Menu("File");

Menu editMenu = new Menu("Edit");

Menu optionMenu = new Menu("Options");
The Menu class's constructor takes a single argument, which is the string that'll appear as the menu's name on the menu bar. The example lines above create three menus for the menu bar.
After creating the Menu objects, you have to add them to the menu bar, which you do by calling the MenuBar object's add( ) method, like this:
menuBar.add(fileMenu);

menuBar.add(editMenu);

menuBar.add(optionMenu);
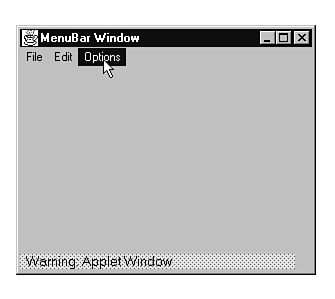
After Java executes the above three lines, you have a menu bar with three menus, as shown in Figure 23.4. Note, however, that at this point the menus contain no commands. If you were to click on the menu names, no pop-up menus would appear.
Figure 23.4 : This window's menu bar contains three empty menus.
You may have empty menus at this point, but you're about to remedy that problem. To add items to your menus, you first create objects of the MenuItem or CheckboxMenuItem classes for each menu item you need. To add items to the Options menus you made previously, you might use Java code something like this:
MenuItem option1 = new MenuItem("Option 1");

MenuItem option2 = new MenuItem("Option 2");

MenuItem option3 = new MenuItem("Option 3");
The MenuItem constructor takes as its single argument the string that'll be displayed in the menu for this item.
If you're thinking that, after you create the menu items, you must call the appropriate Menu object's add( ) method, you're be exactly right. Those lines might look like this:
optionMenu.add(option1);

optionMenu.add(option2);

optionMenu.add(option3);
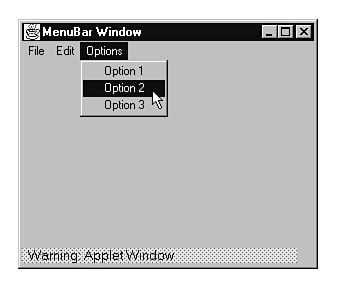
Now, when you display the frame window sporting the menu bar you've just created, you'll see that the Options menu contains a number of selections from which the user can choose, as shown in Figure 23.5.
Figure 23.5 : Now the Options menu contains menu items.
| TIP |
Sometimes, you may have several groups of related commands that you'd like to place under a single menu. You can separate these command groups by using menu separators, which appear as horizontal lines in a pop-up menu. To create a menu separator, just create a regular MenuItem object with a string of "". That is, the string should contain a single hyphen. |
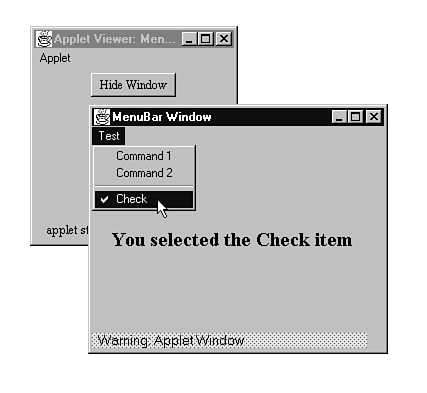
Now that you have this menu bar business mastered, it's time to put what you've learned to work. Listing 23.4 is an applet called MenuBarApplet. This applet displays a single button, which, when selected, displays a frame window with a menu bar. This menu bar contains a single menu with three items. The first two items are regular MenuItem objects. The third item is CheckboxMenuItem, which is a menu item that can display a check mark. Figure 23.6 shows MenuBarApplet with its frame window displayed and the Test menu visible. (Notice the menu separator above the checked item.)
Figure 23.6 : This is MenuBarApplet's frame window and menu bar.
Listing 23.4 MenuBarApplet.java: An Applet That Uses a Menu Bar.
import java.awt.*;

import java.applet.*;


public class MenuBarApplet extends Applet

{

    MenuBarFrame frame;

    Button button;


    public void init()

    {

          frame = new MenuBarFrame("MenuBar Window");


          button = new Button("Show Window");

          add(button);

    }


    public boolean action(Event evt, Object arg)

    {

        boolean visible = frame.isShowing();

        if (visible)

        {

            frame.hide();

            button.setLabel("Show Window");

        }

        else

        {

            frame.show();

            button.setLabel("Hide Window");

        }


        return true;

    }

}


class MenuBarFrame extends Frame

{

    MenuBar menuBar;

    String str;


    MenuBarFrame(String title)

    {

        super(title);

        menuBar = new MenuBar();

        setMenuBar(menuBar);


        Menu menu = new Menu("Test");

        menuBar.add(menu);


        MenuItem item = new MenuItem("Command 1");

        menu.add(item);

        item = new MenuItem("Command 2");

        menu.add(item);


        item = new MenuItem("-");

        menu.add(item);


        CheckboxMenuItem checkItem =

            new CheckboxMenuItem("Check");

        menu.add(checkItem);


        str = "";

        Font font = new Font("TimesRoman", Font.BOLD, 20);


setFont(font);

    }


    public void paint(Graphics g)

    {

        resize(300, 250);

        g.drawString(str, 20, 100);

    }


    public boolean action(Event evt, Object arg)

    {

        if (evt.target instanceof MenuItem)

        {

            if (arg == "Command 1")

                str = "You selected Command 1";

            else if (arg == "Command 2")

                str = "You selected Command 2";

            else if (arg == "Check")

                str = "You selected the Check item";


            repaint();

            return true;

        }

        else

            return false;

    }

}
Tell Java that the applet uses the classes in the awt package.
Tell Java that the applet uses the classes in the applet package.
Derive the MenuBarApplet class from Java's Applet class.
Declare the custom frame-window and button objects.
Override the init( ) method.
Create the custom frame window.
Create and add the button component.
Override the action( ) method.
Determine whether the window is visible.
If the window is visible...
Hide the window.
Change the button's label to "Show Window."
Else if the window is hidden...
Show the window.
Change the button's label to "Hide Window."
Tell Java that the message was handled okay.
Derive the MenuBarFrame class from Java's Frame class.
Declare the class's menu bar and string objects.
Define the class's constructor.
Pass the title string on to the Frame class.
Create and set the menu bar.
Create and add the Test menu.
Create and add two regular menu items.
Create and add a menu separator.
Create and add a checkmark menu item.
Initialize the class's display string and font.
Override the window's paint( ) method.
Resize the window.
Show the display string in the window.
Override the action( ) method.
if a menu item was selected...
Respond to the selected menu.
Repaint the window, so the new string is displayed.
Return true if the message was handled.
Or else return false so Java knows the event is unhandled.
| NOTE |
To determine the state (checked or unchecked) of a CheckboxMenuItem object, you can call its getState( ) method. This method returns true if the item is checked and false if the item is unchecked. In addition, you can set the item's state by calling its setState( ) method. |
As you can see from MenuBarApplet's source code, you respond to menu-item selections in the same way you respond to other events in applets. This time, however, you have overridden two action( ) methods. The first is in the MenuBarApplet class and handles the applet's single button. The second overridden action( ) method, which is the one that handles the menu items, is in the MenuBarFrame class.
Although it's an ability you may not frequently take advantage of, Java applets can display windows. The Frame class makes this possible, by providing the functionality for frame windows, which can be sized, moved, used to display components, and much more. A frame window can, in fact, even have a full-featured menu bar, just like the menu bars you see in many Windows applications. Creating a menu bar, however, requires knowing how to create and manipulate MenuBar, Menu, MenuItem, and CheckboxMenuItem objects. Luckily, you learned about those classes in this chapter, so you're all ready to amaze the world with your Java frame windows.


