


by David P. Geller
The World Wide Web has made it incredibly easy for anyone to explore new places throughout the world. With just a mouse click, you can transport yourself to almost any location on the globe. Web-based video cameras have made this experience even more realistic, allowing anyone to literally peer into someone else's home, business, or community.
Right now, most Web cameras are being installed and used in a somewhat experimental and hobbyist manner. But if current trends relating to Web-based video continue, you'll likely see thousands of new camera-equipped sites popping up all throughout the world. They'll be inviting you to visit them not only through the words they send through their Web pages, but through vivid images captured by ordinary video cameras.
Some Web cams will continue to be used in a playful manner, whereas others will take on more serious and important roles. Some practical uses for Web cams include traffic monitoring, weather, seismology, ski slope reports, security and surveillance, and safety monitoring.
A quick visit to Yahoo (http://www.yahoo.com) on the Web reveals an already huge assortment of Web-based camera sites that you can visit. To find this area, go to the section named Computers and the Internet and perform a search on Web cameras. A list of several indoor and outdoor camera-based sites will appear, including links to sections on Yahoo dedicated to Web cameras. Already, hundreds of sites are listed, with new ones appearing all the time. You can even find a site dedicated to head-mounted Web cams!
In this chapter, you'll learn about
Hardware requirements for operating a Web cam vary greatly and depend not only on the type of computer you're operating, but also on the type of video input device you're planning to use. Until just recently, capturing video (still or moving) on a PC was a rather expensive proposition. Luckily, with the advent of new technology and the market becoming more aware of digital media, electronic video-capture products have become less expensive, easier to install and operate, and significantly more commonplace.
You can typically have two kinds of video-capture setups with your computer:
Getting the images you capture on your computer to the Web is quite simple and is generally performed by using a tool such as FTP. Before transferring files, however, you need to ensure that the images are saved in a format compatible with most Web browsers (GIF and JPEG are two such formats). If the capture program you use doesn't support these formats, you can use a public-domain graphics conversion utility. Several different programs are described later in the section "Image Formats: GIF vs. JPEG."
Take a quick journey around the world right now. First stop: Silicon Valley in northern California. At http://www.mcom.com/fishcam/, you can see some beautiful fish living inside a 90-gallon tank at the offices of Netscape Communications, the company that developed the popular Netscape Web browser. One of the earlier Web-based video sites, the Fishcam is operated using a Silicon Graphics Indy workstation. These UNIX-based computers come equipped with small monitor-mounted color cameras called IndyCams. They can easily be configured to automatically capture images that can be viewed from the Web.
If California isn't what you had in mind, perhaps a quick trip to Germany will do. At http://www.stern.de/cam/abend.html you can find the Harbour CAM peering out into the Port of Hamburg. This site is sponsored by Stern, Germany's largest illustrated weekly.
One practical use of Web cams now appearing at several sites is the capturing of new construction progress. At http://www.connection.se/hoga-kusten/uk/bilder.html, you can see images taken-almost live-at the site of the High Coast Bridge in Sweden. This huge suspension bridge is set to be completed in 1997. In addition to still images, this site also offers audio (in Swedish) and QuickTime movies related to the construction project. The mark of a good Web cam site is one that offers an explanation of the scene, accompanied by technical information. The High Coast site certainly falls into this category and makes for interesting viewing and reading.
The Internet is truly an amazing network. Although this chapter covers the technical aspects of Web sites and bandwidth issues (in the section "Server Performance Considerations"), you'll discover that because of the way some Web sites are connected to the Net, you can find some sites halfway around the world that are more responsive than those located in your own city. For example, the STARCam in Hong Kong (http://www.hkstar.com/starcam.html) offers an almost instantaneous view of Nathan Road in the heart of Kowloon. The site http://www.ktt.fi:8001/evideo.htm is located at the Vaalimaa border between Finland and Russia, yet can sometimes beam back its images to your Web browser in seconds. (Actually, this site isn't really beaming anything. Your browser is the one requesting images and then displaying them. But when it's so far away, and the images are so real looking, the word beam seems appropriate.) For a quick view of Web cam sites located throughout the world, check out http://www.isk.kth.se/~ib94_fjo/outdoor.cameras.html. The Nuttin but NetCams! site at http://www.cs.utexas.edu/users/spatel/cams.html has an even larger assortment of sites all in one Web page.
Not all Web cam sites display images captured from video cameras.
Some display images taken directly from television or captured
from weather radar. Some astronomy-related sites display images
taken from their telescopes. If you want to check to make sure
that Southern California is still connected to the rest of the
United States, you can take a peek at KNBC's Seismo-Cam located
at http://www.knbc4la.com/seismo/index.html. If watching
a city street or campus square is too banal for you, perhaps you'd
like to take a peek at the whole planet by visiting http://www.earthwatch.com/.
| NOTE |
Whatever image you decide to capture and then present on the Web, make sure that you have the right to do so. Although you can probably display scenes taken from public places or your own office environment, television stations don't allow you to rebroadcast their programming without special permission. |
The Internet isn't quite ready to stake the place of cable or broadcast television because, for most of us, the Internet is a relatively slow network of vastly connected computers. If you connect to the Net using a 28.8kbps modem, your bandwidth is fairly limited. Although words and small graphics download quickly and offer a responsive feel to Web navigation, you'll find that downloading and viewing movies-even very small ones-can be excruciatingly slow and awkward. So most Web sites offering images tend to offer still images-single frames captured with video cameras and then grabbed and converted to a bitmap format that's compatible with your browser.
But some sites go the extra mile and offer still images as well as movies created from the images they accumulate. The bridge-building project in Sweden mentioned in the preceding section is one such site.
If you're determined to offer visitors to your Web site the option of viewing movies, you'll have to decide which formats to support. All Windows 95 systems come with the MPLAYER program, which recognizes the AVI (Audio-Video Interleave) format. Macintosh systems typically support the QuickTime format. Another format gaining in popularity is MPEG (Moving Pictures Experts Group). Digital home satellite systems use MPEG for their encoding because it offers a good combination of high compression and image quality.
No matter which movie format you decide to offer at your Web site,
it's a good idea to provide links to the various viewers that
some users might have to acquire before they can view your files.
Here are some locations you can visit on the Web for movie players
and additional information:
| Format | URL |
| QuickTime | QuickTime players for Windows (both 16- and 32-bit versions) and Macintosh can be obtained from http://quicktime.apple.com/ |
| MPEG | For Windows, grab the VMPEG from ftp://ftp.cica.indiana.edu/pub/pc/win3/desktop/For Macintosh, try the Sparkle program, available from ftp://sumex-aim.stanford.edu/info-mac/grf/util or ftp://ftp.utexas.edu/pub/mac/graphics/ |
For a list of other file formats and links to viewers, try http://www.matisse.net/files/formats.html.
| NOTE |
Another interesting tool that's related to capturing live video on the Internet is the program CU-SeeMe. Developed at Cornell University, CU-SeeMe allows two or more people to hold live video and audio conversations over the Net. You can download the latest versions of the program (for Mac or PC) from ftp://gated.cornell.edu/pub/video/. CU-SeeMe isn't really applicable as a Web cam device, but nonetheless you'll be fascinated by the technology. |
Web browsers typically understand two kinds of graphic formats: GIF and JPEG. Other formats-such as those for movies and specialized audio-are generally available when external viewers, applications, or plug-ins are used.
GIF (Graphical Interchange Format) is, by far, the most popular and well-supported bitmap format on the Web. Because of its popularity and because it's supported by just about every graphical browser, GIF is a great choice when you're deciding what type of images to include on your Web pages. However, JPEG (pronounced jay-peg) offers numerous advantages for the Web cam operator. For one, JPEG is a 24-bit color format (compared to GIF's 8-bit format) that generally offers far better compression than GIF. One simple reason for this is that JPEG, which is short for Joint Photographic Experts Group, is a lossy format. In other words, JPEG has flexible compression features. The more heavily compressed a JPEG image, the more original image data is lost.
Does this mean you'll lose parts of your images? No, not really. But it does mean that some level of detail could be sacrificed. This, however, depends entirely on how much compression you use (sometimes called a quality value) and even the type of image being compressed. The best way to determine the ideal image format for your Web cam application is to experiment with different image sizes and formats. Because I'm talking about a Web application, and many visitors to your site will be accessing the Internet through modems, size becomes more than just an image-quality issue. The issue becomes a matter of how long it takes the average viewer to download your page and all its images. If your Web cam images can be cut down in size by a factor of 2 or more by adopting the JPEG format, you should seriously consider moving away from GIF.
Luckily, the Web offers you a way to please just about everyone. If you want to offer visitors to your Web cam page the opportunity to view your captured images in GIF and JPEG format, you can simply create a page with links to both types. You might even present them with thumbnail images (tiny examples of the original image) before making them download the larger, more detailed versions.
Creating thumbnail images is easy if you've got a graphics program that can resize bitmaps. Thumbnails are typically quite small and designed to provide only enough detail for someone to make a quick identification of the image. If you're collecting and publishing 320x240-pixel images, you might want to make your thumbnails 80x60 pixels. Although tiny, most scenes will still be recognizable, and they'll maintain the same aspect ratio of the larger image. Best of all, thumbnails load almost instantly on a Web page, making them ideal for catalog-like applications where multiple images are planned for a single page.
If you're a Macintosh owner looking for a utility to display and
convert GIF and JPEG images, you can try the GIFConverter shareware
program from http://www.kamit.com/gifconverter.html. Windows
users can try the LView Pro and PolyView shareware programs. LView
is available via ftp from ftp://ftp.cdrom.com/pub/simtel/win3/graphics/;
PolyView is available from ftp://ftp.cica.indiana.edu/pub/pc/win95/desktop/.
| TIP |
If you need a simple GIF or JPEG viewer, you needn't look any further than your own Web browser. Netscape, Internet Explorer, Mosaic, and several other graphical browsers support GIF and JPEG. For Windows users, simply drag the bitmap file you want to view directly onto the browser for it to appear. You can also associate the .GIF and .JPG extensions with your browser so that you can open them directly from the Explorer program that comes with Windows 95. |
One of the more interesting consumer products now available for computer users is the Connectix QuickCam (http://www.connectix.com/). With a street price of approximately $100 and available in PC and Macintosh versions, the QuickCam is an almost ideal video capture device. At first glance, the QuickCam could easily be mistaken for a large golf ball or toy. It's that tiny. Inside, however, rests a black-and-white CCD (charge-coupled device) camera that can capture still or moving images at 320x240 pixels. For movies, the QuickCam can capture images at a rate of almost 18 fps (frames per second). But this rate depends on a number of factors, including the speed of your PC and hard disk drive, and image size. The movie format used by the QuickCam is AVI under Windows and QuickTime for the Macintosh.
The QuickCam is a great choice if you want to begin capturing short, simple, black-and-white movies with your PC or Macintosh. It's inexpensive, is easy to install and operate, and comes with everything needed to get the job done. If you need to create higher quality movies (or movies in color), you should examine frame grabbers. They are hardware products available for the PC and Macintosh platforms that typically take an input video signal (such as from a video camera) and digitize the data at frame rates that can support movies. Different products support different formats, although you generally can use one or more utilities to convert between them.
Frame grabbers are also available for UNIX workstations, but you'll find that they're often much more expensive (and specialized) than their consumer-oriented PC counterparts.
Two products now on the market make capturing still video as easy
as plugging a device into your printer port and installing some
software. The Connectix QuickCam (mentioned in the preceding section)
and Snappy, a product developed and sold by Play, Inc. (http://www.play.com),
both connect to your PC through the parallel port. Snappy is powered
by a 9-volt battery, whereas the QuickCam draws power from your
keyboard. An adapter that allows your keyboard and the QuickCam
to operate together comes with the product.
| COUTION |
Before attaching any device to your computer, it's important that you first turn it off. Doing so is especially important with the QuickCam because the simple act of disconnecting your keyboard while your PC is running could render it inoperable until the next time you reboot. |
Whereas the QuickCam is a camera (of sorts), the Snappy product is strictly a capture device. By itself, it can't capture images. But what makes Snappy so special is that it can grab color images from any NTSC video source. This format of the video signal is put out by video cameras, VCRs, and televisions in the United States. If you're traveling abroad, be aware that some countries have different video standards and formats that might be incompatible with Snappy. With the QuickCam, however, you needn't worry about this problem because it's entirely digital and never relies on an analog video signal.
Although the QuickCam is cheap and easy to use, it offers only small 320x240 black-and-white images (a color version is being developed and might be available sometime in 1996 or '97). Snappy, on the other hand, can grab images from your video camera, off the TV, or from your VCR. Snappy does a surprisingly good job of digitizing video. It allows you to capture images at three resolutions: 320x240, 640x480, and 1,500x1,125. What's even more remarkable about Snappy is that all its images are captured in 24-bit color!
Using Snappy in your Web cam application has other advantages,
even if the solution could be more expensive than one based around
an integrated camera device such as the QuickCam. Because you
can use any video source with Snappy, you're free to select the
type of device that best suits your needs. The QuickCam has a
fixed-focused lens that's great for sitting on top of a monitor
and peering down on a single person, but not very good for capturing
outdoor scenes. Snappy sites, on the other hand, generally work
with video cameras that have far better optics and image quality
characteristics. But the cost of a Snappy-based Web cam site can
be much more than one using a QuickCam. Snappy, by itself, costs
approximately $190, and that doesn't include a video camera.
| TIP |
If you're shopping for a video camera that you plan to use in a Web cam setup, here are some suggestions: |
If you operate a UNIX workstation and are looking to capture still or moving images, you'll want to examine the products available directly from your workstation vendor. For example, Silicon Graphics (SGI) offers a workstation named Indy that comes with a built-in video camera. The Fishcam site, mentioned earlier in the section "Examples of Web-Based Video Cameras," uses this product.
Generally, cameras that come attached to UNIX workstations are easy to set up and use. They also, typically, allow greater interoperability with the other software tools available on the workstation. If you visit the Fishcam site (http://www.mcom.com/fishcam/) and find your way to the page that describes how the images are captured, you'll see a remarkably simple shell script:
#!/bin/sh
rm /tmp/out-00000.rgb
/usr/sbin/vidtomem -f /tmp/out
/usr/local/bin/convert /tmp/out-00000.rgb /tmp/out.jpg
# send the image to the client
echo "Content-Type: image/jpeg"
echo ""
cat /tmp/out.jpg
rm /tmp/out-00000.rgb /tmp/out.jpg
What's interesting about how this shell script works is that it's a CGI application launched whenever a user reaches the Fishcam page. The vidtomem program captures the image, followed by the convert program, which takes it and turns it into a JPEG image. (JPEG images typically carry the extension .JPG.)
From the other chapters in this book, you'll recognize the Content-Type notation as being part of the HTTP header sent to the Web browser. So with just a few lines of code calling system-provided programs and a little knowledge of CGI, you can have a Web cam on your Indy workstation.
You could modify the preceding script to simply capture an image, create a JPEG file, and then exit. This way, it could be controlled from the system's cron program. Having it execute as a CGI program is expensive and slow in terms of system resources. By creating a job that's launched by cron, you have to execute the capture only once-no matter how many people access the image through the Web server.
Still, most people don't have workstations-they have either PCs or Macs. And although most Web cam sites today are running on workstations, that trend will slowly change as devices such as the QuickCam and Snappy begin permeating the market.
Operating a Web cam under Microsoft Windows is almost as easy as running one from a system such as the SGI Indy, with its built-in camera. Although you sometimes compromise ease of use when selecting a PC/Windows solution, you almost always gain a strong price/performance advantage.
I've already talked about the QuickCam and how it's a self-contained, CCD-based black-and-white camera ideal for capturing single frames and full-motion video. Here are some additional facts about it and how it can be used to support a Web site.
The QuickCam works with a Macintosh or a PC. For the PC you need a 486DX2-50 or faster PC (you can run it with some 386 PCs, but some features might be sacrificed due to performance issues). Pentiums are perfect for the QuickCam. It's recommended that you also have at least 8M of RAM and a VGA display capable of at least 256 colors. Windows 3.1, Windows for Workgroups, and Windows 95 are supported. The QuickCam for the Macintosh features an integrated microphone, but the PC model requires the presence of a Windows-compatible sound card. Windows NT isn't supported by the QuickCam at this time because of the stricter interface requirements that it imposes on devices that need to connect using the parallel (printer) port.
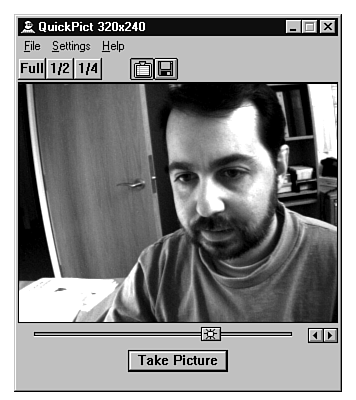
When you buy the QuickCam, you get two software programs: QuickPict and QuickMovie. QuickPict is a still-image capture utility that allows you to take black-and-white still images and save them in BMP, TIFF, or JPEG format (see fig. 19.1). For Web-based applications, only the JPEG format is of particular value. QuickMovie, on the other hand, allows you to capture full-motion video movies. The frame rate will depend on image size, image quality, and the speed of your PC and disk drive.
Figure 19.1 : Here's QuickCam's still image capture program shown running on a Windows 95 system.
Connectix also has a version of the QuickCam packaged as the VideoPhone. In addition to the movie and still-image capture programs, you also get a video telephone-like application that lets you communicate with other QuickCam users across TCP/IP, NetWare/IPX, modem, or direct serial connections.
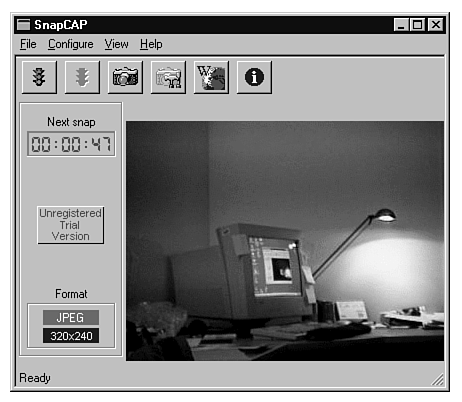
When you buy Snappy, you get a program that can digitize images directly from your video camera, VCR, or television. Its base solution is similar to that offered with the QuickCam-namely, a single capture tool that lets you snap pictures and then manually save them in different formats. But this solution offers nothing that can help you automate a Web cam for the Internet. That's where SnapCAP comes in (see fig. 19.2). SnapCAP is a shareware application included on the accompanying CD-ROM that's designed to improve Snappy by offering automatic image capturing. Its main features include
Figure 19.2 : The SnapCAP user interface displays a captured image of a PC and desk lamp.
SnapCAP's timed capture feature allows you to set the interval between shots from between 15 seconds and 24 hours. A digital display on the program's main window provides you with a countdown timer for when the next image will be snapped. SnapCAP's support of GIF and JPEG (with a configurable quality setting) allows you to put images on your Web site compatible with just about everyone running a graphical browser. If you plan to create JPEG images, you should experiment with the quality setting. A value of 75 provides a good balance between image size and quality. However, dropping that number to 50 or 60 could result in even greater file size savings with only a marginal change in quality.
SnapCAP's naming feature is extremely flexible. You can assign
incrementally numbered file names such as capture001.jpg and capture002.jpg
automatically. SnapCAP also remembers the highest image number
between sessions. You can also include additional attributes in
the name by using a simple coding scheme. A file name under Windows
95 can contain as many as 256 characters. When specifying the
name, you can include special characters that get translated to
information such as the current day, what hour it is, and so on.
The complete list of these special codes follows:
| Produces | |
| Julian day (1-365) | |
| Month (1-12) | |
| Day (1-31) | |
| Hour (0-23) | |
| Minute (0-59) | |
| Second (0-59) | |
| Year (for example, 95) | |
| Counter value |
To produce a captured file name that contains the month, day of the month, and time, you can specify the following:
image-%o-%d-%h-%m.jpg
Be careful not to include illegal file-naming characters such as \, /, :, *, ?, ", <, >, and |. Currently, SnapCAP doesn't check for the presence of illegal characters, so be sure not to use them.
SnapCAP relies on Play's Snappy, so you need to have Snappy installed
and tested on your PC. However, after you verify that Snappy works
and is capturing images, you can safely ignore all the software
that came with it and simply run SnapCAP.
| NOTE |
SnapCAP tries to keep pace with changes made to the core Snappy software (specifically, snapntsc.dll) through continual updates. If you get a DLL-related error when you first run SnapCAP, your original Snappy software is probably out of date. You can get a new version from Play's Web site at http://www.play.com. |
The installation of SnapCAP begins when you run the setup.exe program from the SnapCAP directory or after you download and run a self-extracting zip file from http://www.halcyon.com/artamedia/snapcap/. The Windows-based installation procedure guides you through just a few steps. After the installation program completes, you can run SnapCAP from the Windows 95 Start menu by choosing Programs and then selecting the program icon for SnapCAP.
The first step in preparing SnapCAP for use with your Web site is determining where the captured image files will be placed. Because you want people to see your images, they must reside somewhere the Web server can reach. If you don't have direct access to the Web server software or its configuration files, check with your Webmaster (the person responsible for maintaining your Web site) and ask where the public-access directories are located. After you find or determine where the directory for your Web images will be, you can start planning the look and feel of your HTML pages.
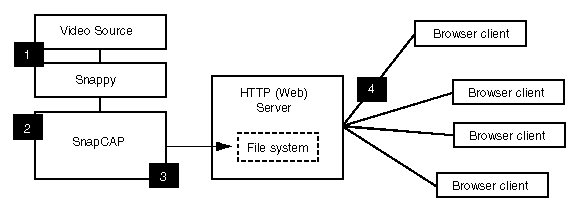
Figure 19.3 shows the basic model for how a Snappy-based Web cam works.
Figure 19.3 : Digitizing the video source is performed under the control of SnapCAP.
Images are created from a video source-usually a video camera (step 1). They're digitized with Snappy, which interfaces with the camera through a standard BNC-type video cable. SnapCAP actually controls the Snappy unit and creates image files in GIF or JPEG, depending on your preference (step 2). Because Snappy connects to the parallel port (and captures 24-bit color images), you may find that a single 320x240 "snap" takes anywhere from 10 to 30 seconds, depending on the speed of your computer. Naturally, the larger the image, the longer it takes to process and convert to GIF or JPEG.
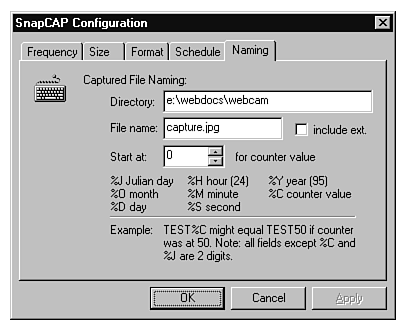
After the bitmap image is created, you save it to a location on your Web server (step 3). For the sake of this scenario, assume that you have a directory named /webcam off the root of your Web server's document hierarchy (remember, the document root for a Web server is often unrelated to the physical file system root of your computer). If your Web root is named /webdocs, the Web cam area would be /webdocs/webcam. To save the image to this location, you configure SnapCAP by using its naming feature (see fig. 19.4).
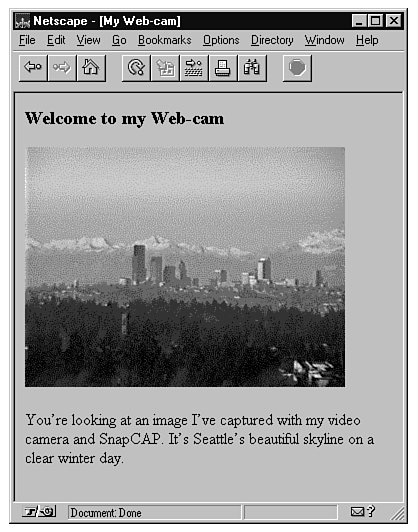
In this example, the file is named capture.jpg and, as you can tell from its extension, is a JPEG image. If, for example, your Web server were named www.mycam.com, you could view this image from your Web browser (step 4 in fig. 19.3) by simply opening the URL http://www.mycam.com/webcam/capture.jpg. However, having a bare image available on your Web server isn't very interesting, and it doesn't allow you to add in any descriptive text about your image and why you've created it. The solution is to create an HTML file that references the image. Here's a sample HTML file for this example:
<html>
<title>My Web-cam</title>
<body>
<h3>Welcome to my Web-cam</h4>
<p>
<img src="capture.gif">
<p>
You're looking at an image I've captured with my
video camera and SnapCAP. It's Seattle's beautiful
skyline on a clear winter day.
</body>
</html>
Notice that the image file captured with SnapCAP is referenced inside the HTML using the <img src> tag. If you save this bit of HTML into a file named index.html and put it in the same directory as your image, you can reference it with the URL http://www.mycam.com/webcam/index.html. Figure 19.5 shows what this bit of HTML looks like when viewed inside a Web browser.
Figure 19.5 : This sample HTML page illustrates how easy it is to add content around an image.
Some Web servers have conventions for default pages enabling you to leave off the name of the actual HTML in the URL. If index.html works at your site, you could reference the example using just http://www.webcam.com/webcam. Index.html is definitely the most popular default name, but several sites have been known to use welcome.html.
The key to having a successful Web cam site is making sure that
the image you're displaying is constantly updated. This way, you
make your site interesting and worth visiting. Automating the
capture process is what SnapCAP was designed to do. As I mentioned
previously in the section "ARTA Media's SnapCAP," you
can configure it to snap images at intervals ranging from 15 seconds
to 24 hours. As you visit different Web cam sites throughout the
Internet, you'll discover that many of them update their images
on a fairly frequent basis-generally every 5 minutes, and some
even more frequently.
| TIP |
One factor to consider when you specify the frequency for captured images is the load your Web cam will place on your network and Web server. Every time you capture an image and transfer it to your Web server's file system, you're moving bits across your network. Check to make sure that you're not causing undue stress for your co-workers! Sure, your own version of the "fishcam" is important, but so might be the boss's spreadsheet that's waiting in the queue to be printed. |
Have you ever wondered how some Web pages seem to refresh themselves automatically after a certain amount of time? They are written using a special HTML tag that tells your browser to reload the page. If you want to have your Web cam page automatically reload every 30 seconds, add the following tag to the top of the HTML file:
<META HTTP-EQUIV="Refresh" CONTENT=30>
Just remember, however, that the more often a page is reloaded, the more data your Web server is required to process. If your page is very popular and automatically reloads itself every 30 seconds, you might be causing too much stress for your Web server. This is especially true if your site is connected to the Internet using a relatively slow connection such as ISDN or Frame Relay.
Besides offering an automated capture feature for Snappy, SnapCAP includes its own HTTP server. HTTP is the protocol that Web servers follow when communicating with Web browsers such as Netscape or Mosaic. Every time you request a Web document from your browser, you're actually initiating a conversation with a Web server.
The model for HTTP is quite simple. For example, when you try to access the page http://www.mycam.com/webcam/index.html, your browser tries to open a connection to a computer named www.mycam.com. If the browser is successful, it asks the other computer (or, rather, the HTTP server running on that computer) for the document /webcam/index.html. If the Web server can find the document, it sends the document back to the browser and closes the connection. The result is your seeing the page index.html. If that HTML page contains references to images, such as <img src="capture.jpg">, your browser goes out and makes a new connection to www.mycam.com, this time requesting the file /webcam/capture.jpg. The more embedded images that an HTML page has, the more conversations your browser will have with a remote Web server.
Now that you understand the model for HTTP server, you can experiment with your own-right on your desktop. To activate SnapCAP's HTTP server, select the toolbar button with the W and globe on it. You then see a dialog box with the first tab displaying information about HTTP (see fig. 19.6).
If you activate SnapCAP's HTTP server and want to test it, you can use a browser running SnapCAP on the same PC. Simply use the system name localhost to reference the server. For example,
http://localhost/
should open the default SnapCAP Web page. Alternatively, you can reference your system using the IP address 127.0.0.1, as in
http://127.0.0.1/
These special names are valid only on your local system. For others to reach your PC, you must let them know its name or IP number. Under Windows 95, you can discover your PC's name through the Control Panel's Network application. If you're unsure of the specifics of TCP/IP configuration, you should seek the advice of your organization's computer system administrator.
Although SnapCAP features a built-in HTTP server (or a daemon in UNIX-terminology), it's not particularly useful unless the PC on which it's running is constantly connected to the Internet. Web servers need to remain active to field requests from remote browsers. If your PC isn't always connected to the Net, people have no way of finding and reaching your site. For that reason, SnapCAP features an FTP push mechanism.
SnapCAP's FTP feature is compatible with any FTP server-whether
it's running under DOS, Windows, the Macintosh, or UNIX. Images
are sent as binary streams of data and should retain their format
across all platforms.
| NOTE |
Using SnapCAP's FTP feature is an ideal way to connect a remote Web cam site with a Web server. In fact, this model makes it easy to deploy Web cams almost anywhere a portable computer and video camera can be situated. |
Operating a Web cam incurs overhead on your PC, your network, and usually your Web server. If your site previously offered only files without embedded pictures, you might see a dramatic increase in overall load placed on your Web server when you start offering images. You should take into consideration the following points:
Such issues contribute to making (or breaking) a great Web site with captured digital images.
In this chapter, I have discussed a great deal of information related to specific products, image formats and sizes, and techniques you can use to ensure that your site functions smoothly. This section provides some examples of HTML that you can use to wrap your images so that they appear professional and, at the same time, interesting.
One way in which you can add style to Your HTML documents is by using tables, of which listing 19.1 provides an example. Tables are particularly useful for encapsulating images because of the control you have over border size and cell width (see fig. 19.7). Some browsers, such as Microsoft's Internet Explorer, even allow you to control the color and background image on a cell-by-cell basis. In listing 19.1 you'll also see how the <BODY> tag is used to specify a custom background color for the page.
Listing 19.1 Using HTML Tables to Encapsulate Images
<META HTTP-EQUIV="Refresh" CONTENT=90>
<!------------------------------------------------
File:     citycam.html
created:     1/16/96
-------------------------------------------------->
<html>
<HEAD>
<TITLE>CityCam</TITLE>
</HEAD>

<BODY bgcolor="#000000"
      text="#ffffff"
      vlink="#80f080"
      link="#00ff00">

<P>
<center>
<font face=Lucida-Sans size=+3 color="#ff00ff">CityCAM</font>

<table cellpadding=4 border=4>
<tr>
     <td valign=top align=center>
          <img src="capture.jpg" alt="Image">
          <P>
     </td>
</tr>
</table>

<table cellpadding=4 border=0 width=330>
<tr>
     <td><font size=-1>
          <P>
          You're looking at Seattle's skyline.
          This page will refresh itself every 90 seconds.
     </td>
</tr>
</table>
</center>
</BODY>
</HTML>
Some browsers, such as Microsoft's Internet Explorer, allow you to customize your HTML pages in a way that table cells can take on their own background colors and bitmaps. The sample HTML shown in listing 19.2 and in figure 19.8 uses a custom background color for a table cell. The HTML <td rowspan=2 BGCOLOR=663300> signifies to a browser that the cell should span two rows and take on the RGB background color 66,33,00. Notice the same convention used to specify background colors for the entire page.
Listing 19.2 Using Cell Coloring to Enhance Images Within Tables
<META HTTP-EQUIV="Refresh" CONTENT=90>
<!------------------------------------------------
File:     citycam2.html
created:     1/16/96
-------------------------------------------------->
<html>
<HEAD>
<TITLE>CityCam</TITLE>
</HEAD>

<body     bgcolor="#000000"
          text="#ffffff"
          vlink="#80f080"
          link="#00ff00">

<P>
<center>
<font face=Lucida-Sans size=+3 color="#ff00ff">CityCAM</font>

<table cellpadding=4 border=4 width=460>
<tr>
     <td rowspan=2 BGCOLOR=663300>
     <font size=+1>
          You're looking at Seattle's
          majestic skyline framed by the
          beautiful Cascade mountain range.
     </font>

     <td valign=top align=center>
          <img src="capture.jpg" alt="Image">
          <P>
     </td>

</tr>

<tr>

     <td BGCOLOR=F2D9D9 align=center valign=center>
     <font color="#000000">
     This image is automatically updated every
     90 seconds. Thank you for visiting the SeattleCAM.
     </font>
     </td>
</tr>

</table>

</center>
</BODY>
</HTML>
Without question, the single most exiting new technology for the Web is Java-a language developed by Sun Microsystems. The current version of Java was designed with the Internet closely in mind. Java is a rich, object-oriented language similar in many ways to C++. One important attribute of Java is that it's an interpreted language-much like BASIC. But there's a twist: Java is platform-independent. The Java compiler produces Java byte code, which is interpreted and run by the Java runtime engine. If you develop an applet for the Web in Java, you can be sure that it will run on any platform that supports Java.
Java is an ideal development tool for Web cam applications. The sample Java applet shown in listing 19.3 illustrates this point. You can run it from the Java appletviewer (a program you can use to run Java applets locally and during testing) or on a Web browser that supports Java. Currently, Netscape's Navigator 2.0, Sun's HotJava, and Microsoft's Internet Explorer 3.0 support Java.
Listing 19.3 Java Applet for Displaying Captured Images
///////////////////////////////////////////////////////////////////
//
// name:          Camera.java
//
// author:          David Geller
//                    geller@starwave.com
//

import java.awt.*;
import java.net.*;

public class Camera extends java.applet.Applet implements Runnable
{
     URL                imageURL = null;
     Thread          scroller = null;
     Image          img = null;
     Image          im = null;
     String          imageFile;
     String          outputText;
     Color          color = Color.blue;
     Color          scrollerColor;
     Font               font;
     Font               scrollerfont;
     Graphics          offScrGC;
     int               timeout;
     int               xpos = 0;
     int               msgWidth;
     int               msgHeight;
     int                msgStartY = 255;
     int               secondsLeft = 0;
     int               imgPos = 0;
     int               textHeight = 0;
     int               textWidth = 0;
     int               counterWidth = 0;
     boolean          imgBusy = false;
     boolean          imgCollected = false;
     boolean          noImages = true;
     MediaTracker     tracker = null;

     ///////////////////////////////////////////////////
     //

     public void init()
     {
          setLayout (null);

          // load up parameters passed from HTML
          String at = getParameter("image");
          imageFile = (at != null) ? at : "capture.gif";

          at = getParameter("refresh");
          timeout = (at == null) ? 30 :
               Integer.valueOf(at).intValue();

          at = getParameter("message");
          outputText = (at != null) ? at :
               "Welcome to DavidCAM.";

          // initialize our font object
          scrollerfont = new Font("Helvetica",Font.BOLD,14);

      // initialize the color for our scrolling banner
      scrollerColor = Color.yellow;

           // create an off-screen image area
          im = createImage (size().width, size().height);
          offScrGC = im.getGraphics();
          offScrGC.setFont (scrollerfont);

          FontMetrics metrics = offScrGC.getFontMetrics();
          textWidth = metrics.stringWidth(outputText);
          textHeight = metrics.getHeight();
          counterWidth = metrics.stringWidth("000");

          tracker = new MediaTracker(this);
    }

     ///////////////////////////////////////////////////
     // grabImage - pull an image off the server

     public void grabImage ()
     {
          imgCollected = false;

          if (img != null)
          {
               img.flush ();
               noImages = true;
          }

          try
          {
               imageURL = new URL (imageFile);
          }
          catch (MalformedURLException e)
          {
          }

          img = getImage(imageURL);
          tracker.addImage(img, 1);
     }

     ///////////////////////////////////////////////////
     // start

    public void start()
     {
          if (scroller == null)
          {
               scroller = new Thread (this);
               scroller.start ();
          }
    }

     ///////////////////////////////////////////////////
     // stop

    public void stop()
     {
           if (scroller != null)
               scroller.stop();

          scroller = null;
    }

     ///////////////////////////////////////////////////
     // run

    public void run()
     {
          // while we're running we sleep a bit and
          // then we repaint out message after repositioning
          // ourselves

          int seconds = 0;
          int tenthSeconds = 0;
          secondsLeft = 0;

          while(scroller != null)
          {
               try
               {
                    Thread.sleep(100);
               }
               catch (InterruptedException e)
               {}

               // keep track of time so we can refresh
               // our graphic at specified intervals
               if (tenthSeconds++ > 9)
               {
                    tenthSeconds = 0;
                    seconds++;
                    secondsLeft = timeout - seconds;
               }

               if (secondsLeft == 0)
               {
                    grabImage ();     // fetch the image
                    secondsLeft = timeout;
                    seconds = 0;
               }

               if (!imgCollected &&
                  (tracker.checkID(1,true) == true))
               {
                    imgCollected = true;
               }

               setcoord ();
               repaint();               // repaint our image
          }
    }

     ///////////////////////////////////////////////////
     // setcoord

     public void setcoord()
     {
          xpos = xpos-5;
          if(xpos < -textWidth)
          {
               xpos = size().width;
          }
     }

     ///////////////////////////////////////////////////
     // displayImage

     public void displayImage (Graphics g)
     {
          if (noImages)
          {
               // display a waiting message
Font font = new Font ("Helvetica",
                 Font.BOLD,20);

               g.setFont (font);

               FontMetrics metrics = g.getFontMetrics();
               String s = "Loading image...";
               int width = metrics.stringWidth(s);
               int height = metrics.getHeight();

               g.setColor(Color.red);
               g.drawString(s,
                    size().width/2 - width/2,
                    size().height/2 - height/2);
          }

          if (imgCollected)
          {
               g.drawImage (img, 0, 0, this);
               noImages = false;
          }
     }

     ///////////////////////////////////////////////////
     // displayScroller

     public void displayScroller (Graphics g)
     {
          // draw our scrolling message
          // ------------------------------------
          g.setFont(scrollerfont);
          g.setColor(scrollerColor);
          g.drawString(outputText,xpos,
               255 + (textHeight/2));
     }

     ///////////////////////////////////////////////////
     // displayCounter
     public void displayCounter (Graphics g)
     {
          String counterText = Integer.toString
               (secondsLeft);
          g.setColor (Color.white);
          g.drawString (counterText,
               size().width - counterWidth, textHeight);
     }

     ///////////////////////////////////////////////////
     // update

     public void update(Graphics g)
     {
          paint(g);
     }

     ///////////////////////////////////////////////////
     // paint

    public void paint(Graphics g)
     {
          paintOffscreen (offScrGC);
          g.drawImage (im, 0, 0, null);
     }

     ///////////////////////////////////////////////////
     // paintOffscreen

     public void paintOffscreen (Graphics g)
     {
          g.setColor(Color.black);
          g.fillRect(0,0, size().width, size().height);

          displayImage (g);
          displayScroller (g);
          displayCounter (g);
     }
}
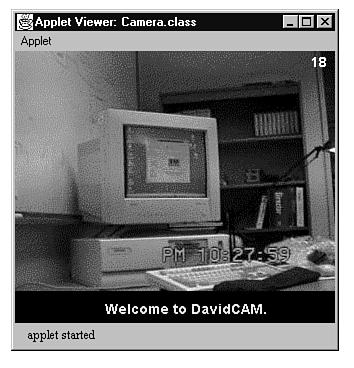
The Camera applet presented in this section and shown in figure 19.9 provides a mechanism for automatically refreshing a captured image and displaying a scrolling message line that you can customize. The applet was designed to be small (compiled, it's less than 5K) and easy to understand.
Figure 19.9 : The appletviewer program displays a Java applet.
After you begin programming with Java, you can extend the Camera applet to include additional features such as sound, automatic thumbnails, and more
By experimenting with Web servers and Web cameras, you can begin to see the many possibilities this form of communications offers. It's really true that images can sometimes convey more than words, and Web cams bring that point to life.
As with many things related to the Internet, you might not be able to cost-justify a project involving Web cams. You might not be able to find a compelling business reason to spend money on an image capture product, video camera, or a system to host a Web site. But if you do, you'll be rewarded by learning new and exciting techniques that will benefit you in many ways in other projects. And you'll also have a lot of fun! v