


by Bob Breedlove
The best way to learn to program in Perl is to program in Perl. This chapter gives you an opportunity to do just that. The application that you will develop is contained on the CD-ROM in its entirety. I encourage you to examine and modify it to meet your needs. Because there are many different ways to do things in Perl, I don't claim that the methods used in this application are best (whatever that means to you). But they do illustrate many common techniques that can be used to create Internet applications in Perl.
Before you start into the relatively complex GO application, look at a basic CGI shell. A basic CGI program is relatively simple and straightforward. Here is the basic shell:
#!/usr/bin/perl          #(1)


# Module which implements common CGI handling routines

require 'cgi-lib.pl';    #(2)

# Startup Code           #(3)

# Put any code here that you need to perform each time the

# program starts up.


                         #(4)

if (&MethGet()) {

#    Place the GET method code in this section

} elseif (&MethPut()) {

#    Place the PUT method code in this section


# Finalization Code      #(5)

# Place any common finalization code here


# Subroutines           #(6)


# End of Program
Let's take a quick look at this template program. The numbers refer to the numbers in parentheses after the comment operator (#).
The code in each of the sections can be very complex, but this simple template is the basis of most CGI programs. To illustrate, let's construct a slightly more complex hello world program. This is the basic Perl hello world program:
#!/usr/bin/perl


print "Hello World\n";
Here's one that puts out a Web page format and prints the "Hello World" line followed by a line feed. It uses the print-to-here format to print the form:
print <<EOF;

Content-type: text/html


<HTML>

<HEAD>

<TITLE>Hello World!</TITLE>

</HEAD>

<BODY>

Hello World!

</BODY>

</HTML>

EOF

;
The "to-here" version of the print statement prints everything between the line
print <<EOF;
and the corresponding
EOF
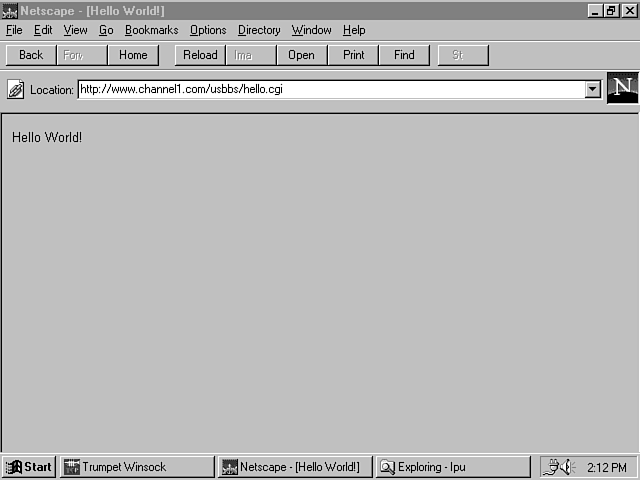
Notice that the here label must be the same as that following the << on the print line. The line must be terminated by a semicolon (;), so this is placed on the next line. For style, I like to place a Tab before the semicolon. It makes the terminating label a bit more obvious. Figure 15.1 shows the output of this simple program.
Figure 15.1 : The output of the "Hello World" page.
The same page can be implemented using the cgi-lib routines. Using a library can simplify the code in your main program. Here's the same page:
require 'cgi-lib.pl';


print &PrintHeader();


$title = 'Hello World!';  # Set title to be used by $HtmlTop

print &HtmlTop();


print "Hello World\n";


print &HtmlBot();
Let's take a quick look at each of the subroutines that make the main program easier to maintain. Each of these subroutines uses the return statement to return the text required to implement the function. Notice that the subroutines do not have to be typed.
# PrintHeader

# Returns the magic line which tells WWW that we're an HTML document

sub PrintHeader {

  return "Content-type: text/html\n\n";

}
The PrintHeader subroutine returns the Content-type line, which tells the Web server what type of document it should process. Notice the two line feeds (\n\n), which create the blank line required after the Content-type statement. The return sends the line back to the main program print routine for printing. It could just as easily have been returned to a routine that would write the line to a file for use later.
# HtmlTop

# Returns the <head> of a document and the beginning of the body

# with the title and a body <h1> header as specified by the parameter

sub HtmlTop

{

  local ($title) = @_;


  return <<END_OF_TEXT;

<html>

<head>

<title>$title</title>

</head>

<body>

<h1>$title</h1>

END_OF_TEXT

}
This subroutine returns the top part of the HTML template. The variable $title needs to be set prior to calling &HtmlTop. This can be done because variables, unless specified in a local() or my() statement, are global. After &HtmlTop, place statements for the body of your page.
# Html Bot

# Returns the </body>, </html> codes for the bottom of every HTML page


sub HtmlBot

{

   return "</body>\n</html>\n";

}
&HtmlBot sends the bottom of the Web page. The two line feeds are not strictly necessary, but they make the produced page more readable. This formatting can make debugging programs easier.
"Hello World" will be the same each time it is run. This isn't any better than a static Web page. The whole advantage of CGI is to create dynamic Web pages. Before examining the more complex go.cgi application, let's make the "Hello World" program put out a form to get your name and then say "hello" to you by name.
Here's the entire program:
#!/usr/bin/perl


# Module which implements common CGI handling routines

require 'cgi-lib.cgi';


$HtmlAction = 'hello.pl';


if (&MethGet()) {        # Send the form

    print &PrintHeader();

    $title = 'Hello World Interactive';

    print &HtmlTop;

    print <<EOT;

<FORM ACTION="$HtmlAction" METHOD=POST>

Please enter your first name:

<INPUT SIZE=20 NAME="fname"><P>

<INPUT TYPE=SUBMIT>

<INPUT TYPE=RESET>

</FORM>

EOT

    ;

    print &HtmlBot();

} elsif (&MethPost()) { # Process the form

    &ReadParse();


#    Output the form including the name

    print &PrintHeader();

    $title = 'Hello World Interactive';

    print &HtmlTop;

    print "Hello, $in{'fname'}!";

    print &HtmlBot();

}


# End of Program
There is some minimal initialization code in this program. The single line
$HtmlAction = 'hello.pl';
sets the $HtmlAction variable to the program to be activated when the form is submitted. The title of the program could be placed at the point where it is used, but initializing it here allows easier maintenance if you need to change the location of your page or the name of the script.
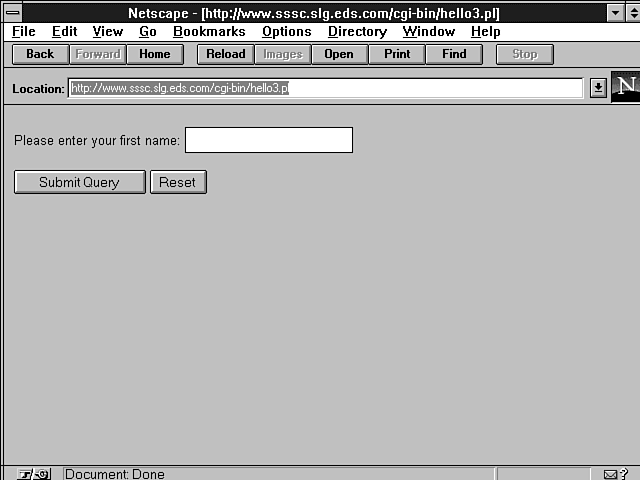
Figure 15.2 shows the form produced by this program. Because I don't like to reinvent the world, the program used cgi-lib.pl. When a link is clicked for this script, the Web server activates the script (hello.pl) with the GET method. This causes the first branch of the if() statement to be executed.
Figure 15.2 : The "Hello World, Interactive" form.
if (&MethGet()) {        # Send the form

    print &PrintHeader();

    $title = 'Hello World Interactive';

    print &HtmlTop;

    print <<EOT;

<FORM ACTION="$HtmlAction" METHOD=POST>

Please enter your first name:

<INPUT SIZE=20 NAME="fname"><P>

<INPUT TYPE=SUBMIT>

<INPUT TYPE=RESET>

</FORM>

EOT

    ;

    print &HtmlBot();
You've seen the subroutines &PrintHeader, &HtmlTop, and &HtmlBot before. The lines in the print to-here statement produce the form. There are few frills here. Because this book includes a chapter on HTML, I won't go into details on most of the statements. However, note that the <INPUT> statement includes a NAME= clause that sets the name to fname. This name will be returned when the form is submitted.
When a visitor fills out the form and presses the <SUBMIT> button, the information on the form is returned to hello.pl. This time, the method is POST, so the elsif branch of the if() statement is executed:
} elsif (&MethPost()) { # Process the form

    &ReadParse();


#   Output the form including the name

    print &PrintHeader();

    $title = 'Hello World Interactive';

    print &HtmlTop;

    print "Hello, $in{'fname'}!";

    print &HtmlBot();

}
The &ReadParse subroutine is called to parse the information received into an associative array. If no reference is passed to the subroutine, it parses the key/value pairs into %in. The page returned is much the same as the form page. However, note the line on which the name is printed:
print "Hello, $in{'fname'}!";
It uses the information from the form to get the actual name entered by the visitor. The line in the Web page is
<INPUT SIZE=20 NAME="fname">
The program matches the NAME= clause of the INPUT directive with the key for the %in associative array to return the information to the program.
I won't discuss the actual workings of &ReadParse here. You'll get into the techniques it uses in the discussion of the GO application, which follows. But before you leave this simple example to tackle the more complete GO application, you need to learn one other item. When the hello.pl script has sent the form back to the visitor, all connection with that visitor is lost. This is an important point to remember. The program does not know any information about any request sent to it unless the information is contained in the request from the visitor or can be retrieved from databases based on information received in the request.
Now that you've seen a simple example, you are able to do the following:
As simplistic as it sounds, this is the basis for all CGI programming. In the GO application, you'll also learn about some support/utility programs, but you have the basics for creating interactive Web pages and displaying them for your visitors using Perl. Let's move on to the more complex GO application.
You examine the GO application in detail in this section and see how it was programmed based on the template presented earlier. You examine techniques that you can use in your CGI programming and see interfaces to mail systems (sendmail) and text file processing. Variations of Perl are able to access databases, but this topic is beyond the scope of this chapter. The techniques you learn here will be applicable to whatever data storage/retrieval system you are using.
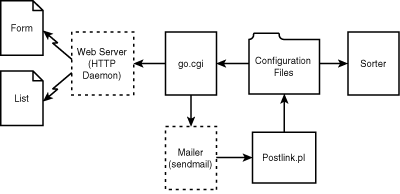
Figure 15.3 illustrates the template for the execution of the GO application.
Figure 15.3 : Overview of the GO application.
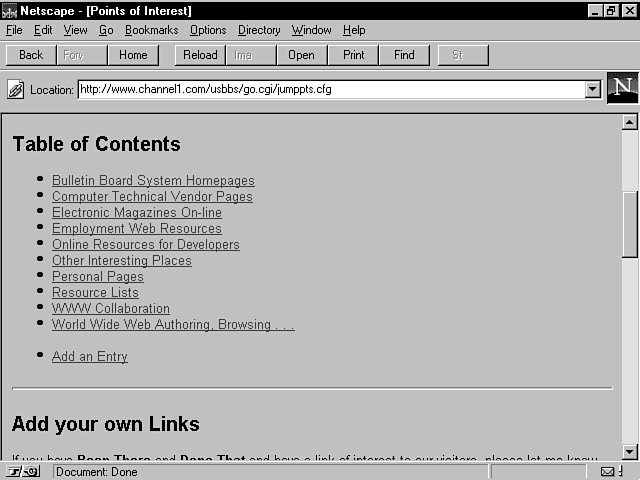
This application implements a simple index of links in various categories. It is in use as the "Been There, Done That" page of my home page (http://www.channel1.com/users/rbreed01/). It is located under the Links tab from the home page. The URL of the link page itself is http://www.channel1.com/usbbs/go.cgi/jumppts.cfg.
GO uses regular flat (text) files for its "database." It displays all entries in a category and does not do string searches. (These might be hints for enhancements to the GO application.)
The first page enables visitors to pick a category in which they are interested. The Webmaster defines categories that he wants to include on the page. Figure 15.4 shows the main screen of the application.
Figure 15.4 : The GO main category selection screen.
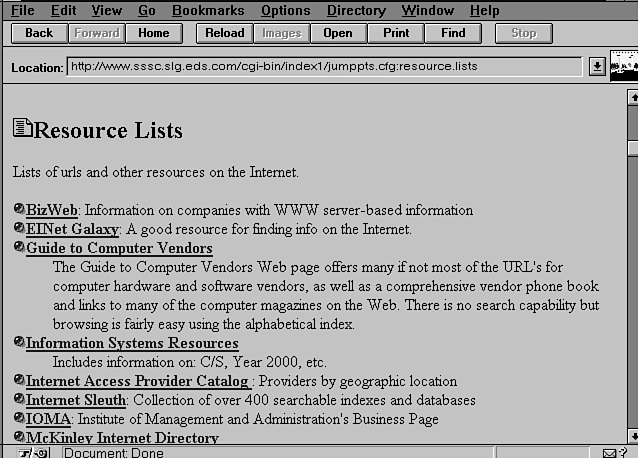
When visitors pick a category, all the links in this category are displayed for them. Figure 15.5 shows part of a link page.
This system is definitely not as sophisticated as the search engines on many pages, but it does allow links and descriptions from the home page for connections to pages of interest. In addition, GO allows visitors to request that their pages be listed under a category.
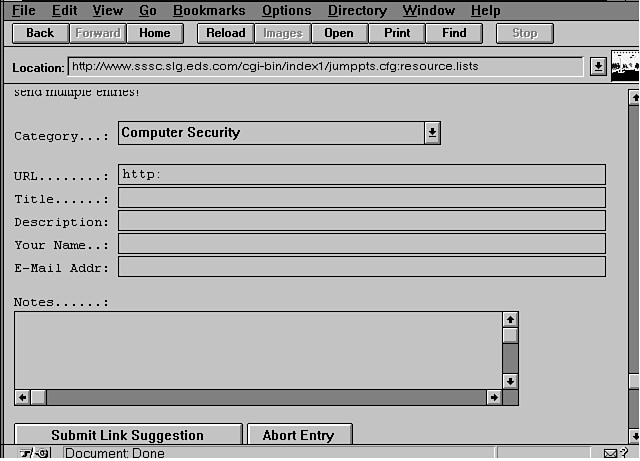
As shown in Figure 15.6, visitors can enter their link information in a form displayed on request.
Figure 15.6 : The GO add-a-link form.
This information is formatted and mailed to the Webmaster. After reviewing the link request, the Webmaster can mail it back for processing by the Mail Parser and addition to the home page in the correct category.
This leads to an interesting consideration about Web programming in general. When I first designed and implemented GO, the form would post the entry immediately. I blindly thought that visitors would be responsible enough to post their links in the proper categories. This trust was misplaced. I found many duplicate entries, others posted in the wrong categories, obscene entries, and other stupidity that led to the current design, which includes screening. It is unfortunate that this is the case, but it has led me to conclude that you can't trust anyone on the Internet and should take precautions to protect your reputation and avoid wasting time.
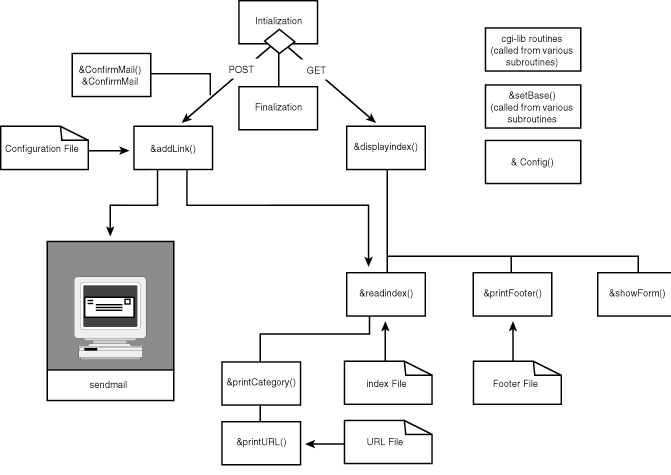
go.cgi is the heart of the CGI portion of the application. It displays the table of contents and the link pages, plus the input form. The program follows the basic CGI template demonstrated earlier in the "Hello World" program. Figure 15.7 shows the relationship of the major subroutines of go.cgi and the configuration files read by these routines.
Figure 15.7 : The go.cgi program logic showing major subroutines and configuration files.
As you can see, go.cgi has sections that handle initialization, the Get and Post methods, and finalization as does the basic template. I'll fill in the logic of the basic CGI template by examining the code in the subroutines that actually perform the work to illustrate techniques for Internet programming in Perl as you develop the program. However, before that, I need to say a word about a couple of important concepts: comments and subroutines.
Use comments liberally to annotate your code. Comments in Perl begin with a #, and the interpreter ignores the remainder of the line. Use comments throughout the code as a reminder of what a piece of code is doing and why it was coded a particular way. You'd be surprised at how soon you forget why you used a particular technique or what a particular subroutine is doing.
Use subroutines to organize your code. Perl code can be written in a straight line from the top of the program to the bottom. This might be the best way to do a "quick-and-dirty" utility or piece of one-use code. However, if you intend to maintain or enhance the application or reuse parts of the code in another application, some form of organization will be invaluable.
Subroutines should be logical and, in general, should perform a single function. Subroutines can also be used as organization points for logical processes by calling other subroutines. You will see subroutines used for both of these purposes throughout this chapter.
Let's examine go.cgi in detail. We start with the basic shell for a CGI script:
#!/usr/bin/perl

require 'cgi-lib.cgi';


# Initialization code goes here


if ($ENV{'REQUEST_METHOD'} eq 'GET') {  # Send them the form


#    GET Method code goes here


} elsif ($ENV{'REQUEST_METHOD'} eq 'POST') {  # Send them the form


#    POST Method code goes here


}    #POST


# Finalization Code goes here


# Subroutines go here


# End of Program
You can use the cgi-lib library to make your work easier. You might want to use another library, but cgi-lib provides all the routines for handling input/output that you will need. You'll be running this on a UNIX system, so the first line tells the shell where to find the Perl interpreter to process the script.
Because Perl starts at the top of the script, I will too. The initialization code for go.cgi, like most CGI programs, is relatively simple. Here it is in its entirety:
#!/usr/bin/perl

#############################################################################

# Produces a page of category titles and listings

# under those categories.

#

# Requires:

#

#  - Configuration File

#  - Directory set up for the index files and category

#    files.

#  - Index files

#  - Category files

############################################################################


require '/www/cgi-bin/cgi-lib.pl';


print &PrintHeader();


#########################################################

# Base Directory

#

# Substituted for B+ in configurations

# Do NOT end in trailing slash!

#

# Note, this directory can be reset in the config

# file by the "Base" directive

#########################################################


$baseDir = '/www/etc';


#########################################################

# Configuration File,

#

# The file looks for things between indicators.  The

# indicators are in the format:

# <xxxx> : The start of the section

# </xxxx>: The end of the section

#########################################################

($junk,$tag) = split(/\:/,$ENV{'PATH_INFO'});


$ScriptEdition = '5.0 beta';

$ScriptDate    = '10Apr96';


# The command required to active your mailer

$sendmail = "/usr/lib/sendmail -t -n";


# Leave this here.  For the PUT, you need the Configuration file

# name unexpanded since it will be expanded below.

$script_http = "/cgi-bin/go.cgi$junk";


$cfgFile = &setBase("B+$junk"); # name of the configuration file


#########################################################

# Check the Configuration File to see if it resets

# the base directory.

#########################################################

if (&Config("$cfgFile","Base") ) {

    $baseDir = $Cfg[0];  # Name of the index file

}


#########################################################

# The Category Index file

#

# The index file contains all the categories, their

# filenames

#

# Organized:

#      file=<filename>

#      name=title

#      gif=picture to show on title line

#      defgif=picture to show on each line by default

#      text

#      <end>

#

#    Filename: is the full pathname to the index file

#    Description: printed as heading

#    Gif: if present, displayed in the heading 2 description

#    Text: If present, printed under the heading.  The

#          <end> token must be present whether the text

#          is present or not.

#########################################################

if (&Config("$cfgFile","Index") ) {

    $indexFile = &setBase($Cfg[0]);  # Name of the index file

}


&ReadParse();


$referrer = "$ENV{'HTTP_REFERER'}";


# Set up the referrer field

if ($referrer =~ /go\.cgi/) {

    $referrer = $in{'home'};

}
Let's examine the components. First, add a couple of identifying variables:
$ScriptEdition = '5.0 beta';

$ScriptDate    = '10Apr96';
These variables can be displayed on the Web page as a reference for your visitors. For example, the code
print "GO: Version $ScriptEdition ($ScriptDate)<P>";
prints the following on your page:
GO: Version 1.0 (13Apr96)
This type of identification is often helpful to your visitors. When you place these variables at the top of the program, they can easily be changed as you modify the script.
You should keep the configuration files in a set of related subdirectories that might not be in the path used by your Web server. The statement
$baseDir = '/www/etc';
sets a variable that will be used to enable you to enter a simple URL and not have to provide this entire path. This technique can be used when your Internet service provider (ISP) places your directories at the end of a long path like the one that I have been assigned: /usr/homes/www/public_html/users/rbreed01/jumppts.
Next, set the command to run your "send mail" version:
# The command required to activate your mailer

$sendmail = "/usr/lib/sendmail -t -n";
You will see how this is used later.
You want to be able to use the GO application to display more than one set of links. To accomplish this, you'll use the URL to pass in the name of the Main Configuration file. Here is the URL for the "Been ThereÉ" implementation of GO:
http://www.channel1.com/users/rbreed01/go.cgi/jumppts.cfg[:{tag}]
/jumppts.cfg[:{tag}] is passed to the program in the PATH_INFO environment variable. :{tag} is optional. As you'll see, it identifies a specific index category to display. The statement
($junk,$tag) = split(/\:/,$ENV{'PATH_INFO'});
processes this information. Environment variables are passed to a Perl program in the %ENV associative array. The names of the variables form the keys to the array.
The split() function divides the line at the colon (/\:/). The backslash (\) escapes the colon to assure that it is interpreted as a colon and not as a special character. The program places the parts of the string into the scalar variables $junk and $tag. Note that if there had been more than one colon in the string, the remainder of the string after the second colon would have been lost.
Next, the program sets the $script_http variable:
# Leave this here.  For the PUT, you need the Configuration file

# name unexpanded since it will be expanded below.

$script_http = "/cgi-bin/go.cgi$junk";
The statement itself is very straightforward. It initializes a variable that will be used in the HTML <FORM> statement. However, the position of the assignment statement is important. Later in the initialization section, the name will be expanded.
The next statement calls a subroutine to set the expanded name of the configuration file:
$cfgFile = &setBase("B+$junk"); # name of the configuration file
Here is the setBase subroutine. You'll place it after the finalization code.
sub setBase {

    local($n) = $_[0];

    $n =~ s/B\+/$baseDir/;

    $n;

}
setBase adds a base directory path ($baseDir) to the filename in $junk to create the full configuration filename. setBase is called from several points in the program.
The parameters to a subroutine are passed in the array @_. The setBase subroutine moves the first element of @_ ($_[0]) to the local variable $n. It then uses the substitution operator (s///) to replace the B+ with $baseDir. The subroutine returns the modified value contained in $n. (Note that $n is localized with the local statement. Thus it is available only to the code block defined by the subroutine.)
You'll use the Main Configuration file at several points throughout the program. The GO application relies on several configuration and data files. You could have chosen any number of file structures (flat files, databases, index files, hashes, and so on) for these files. However, Perl is optimized to process text, and text files make excellent configuration files. Text files do not require any special programming or utilities to maintain. They can be created or maintained with any text editor.
The Main Configuration file contains information that will allow the GO application to control several different indexes of information. Let's take a look at this file before you examine the code to access it.
The Main Configuration file contains many of the values used by the program. The file is in the following format:
<label>

{value}

...

</label>
This format enables multiline values to be parsed from the file. The values can be parsed into an array by a subroutine.
Here is the basic configuration file for the "Been There, Done ThatÉ" implementation of go.cgi:
<Index>

B+/jumppts/00index

</Index>

<Title>

Points of Interest

Been There, Done That . . .

/users/rbreed01/world.gif

</Title>

<PageDesc>

Places of interest on the Internet.

<IMG SRC="/users/rbreed01/marble-g.gif"> Indicates a visitor contributed

link.

</PageDesc>

<PrintForm>

Yes

</PrintForm>

<FormIntro>

If you have <i>been there and done that</i>, and you know a link that

would be of interest to our visitors, please tell us about it.  If you

have problems with this feature, please contact

<A HREF="http://www.channel1.com/users/rbreed01/">Bob Breedlove</a>.

</FormIntro>

<UserLinkGif>

/users/rbreed01/marble-g.gif

</UserLinkGif>

<Footer>

B+/jumppts/footer

</Footer>
Several options could be used to access the information in this file. The most common is to read the entire file into memory in an associative array. However, to conserve memory and to illustrate the techniques, you have chosen to read the file each time the program needs a value from it. The subroutine Config() processes the file at various points in the program:
#

# Reads the $cfgFile and returns everything between <$_[0]> and

# </$_[0]> in the array @Cfg.

#

# NOTE: because @Cfg is kept in memory, you may wish to limit

#       the size of options!

#

sub Config {

#    Clear the array to initialize

    @Cfg = ();


#    Check to see if the configuration file exists.

    if (-e "$_[0]") {

        open(CFG, "$_[0]") || print "unable to open $cfgFile";

        while(<CFG>) {

            chop;

            last if (/<$_[1]>/);

        }        # while

        if (/<$_[1]>/) {

            while(<CFG>) {

                chop;

                last if (/<\/$_[1]>/);

                if (!/^\#/) { # skip comments

                    push(@Cfg,$_);

                }

            }    # while

        } else {

            return 0;

        }

        close(CFG);

        return 1;

    } else {

        print "Cannot find $cfgFile!<p>";

        return 0;

    }    # else

}    # Config
Config is called by passing the filename to read and specific topic tag to display as parameters. It sets the value of the configuration element into the array @Cfg. Remember that variables are global unless explicitly declared to be local. Config initializes the array by setting it to the empty set:
@Cfg = ();
It then checks to see whether the file exists before opening it:
if (-e "$_[0]") {

    ...

} else {

    print "Cannot find $cfgFile!<p>";

    return 0;

}    # else
You could have simply opened the file and then reacted to the open error, but the file tests are more efficient because they only have to go to the directory entries on most operating systems. Here, the logic will process normally in the TRUE branch of the if/else statement. If the file doesn't exist, you'll put out an error to the Web page and terminate the routine.
Config relies on two while{} loops to do its work. These statements use the <{filehandle}> operator to return records from the file. This operator returns the line into $_. Many operators work on $_ by default.
The first while{} loop searches for the opening tag and exits via the last statement when it finds the correct tag:
while(<CFG>) {

    chop;

    last if (/<$_[1]>/);

}    # while
The second while{} loop reads all lines until the terminating tag and stores them in the @Cfg array via the push function. If the tag is found and a value is returned, the subroutine returns 1 (TRUE). If the tag is not found for one reason or another, it returns 0 (FALSE).
The initialization code calls the &ReadParse() routine to parse out the variables from the Web browser into the %in associative array. The variable uses many of the routines discussed here, so I won't spend much time on it.
Next, the routine sets up a variable that you will use as a link to the calling page. This is obtained from the HTTP_REFERER variable passed to the program in the %ENV array. Note that you want the last page that is not part of the GO application. That is the calling page for the application. Therefore, you check for the phrase go.cgi to make sure you aren't coming from one of your own pages before setting this variable. Here is the code:
$referrer = "$ENV{'HTTP_REFERER'}";


# Set up the referrer field

if ($referrer =~ /go\.cgi/) {

    $referrer = $in{'home'};

}
Note that you had to escape the period in go.cgi. When the dot (.) is used in a regular expression such as this one, it indicates that any character can be at this location. If you had not placed the back slash (\) to "escape" this character, it would have taken on its special meaning, and the program would look for go{any character}cgi.
Next, you call &PrintHeader() to put out the document type for the Web server. You do this in initialization because this program only produces HTML pages. If you were to output multiple document types, you might have placed the call in the routines that determined the type of document to send.
Before you start on the main logic of the program, let's take a look at the other configuration files-the index files. There are two types of files:
The first value that go.cgi retrieves from the Main Configuration file is the name of the Index Directory for this particular implementation. This file contains information about the index files, which actually contain the information about the links in each category. The index file, too, is a text file and uses a very common format:
{tag}={value}
This format is often used for configuration files. For example, most of the *.ini files used by Microsoft Windows are in this format. Microsoft Windows *.ini files also use sections that can be located with the technique used in the Config subroutine mentioned earlier.
The 00index file is a bit more complex than a simple configuration file because it must also support a text field of some length for the description. You do this using another common technique. The file uses tags in the format <{start tag}>, <{end tag>. Specifically, the <desc> tag on a line by itself marks the beginning of the description. The <end> tag on a line by itself marks the end of the entire entry. This enables the script to read everything after the line containing the <desc> as part of the description and stop when it reaches the <end> line. Note that the <end> tag line indicates the end of an entry whether or not it contains a long description.
Here is part of the 00index file for the "Been thereÉ" installation:
file=B+/jumppts/resource.lists

title=Resource Lists

defgif=/users/rbreed01/marble-r.gif

<end>

file=B+/jumppts/technical

title=Technical/Vendor Pages

gif=/users/rbreed01/equip.gif

defgif=/users/rbreed01/marble-r.gif

<end>

file=B+/jumppts/develop

title=Online Resources for Developers

defgif=/users/rbreed01/marble-r.gif

<end>

...
This file is processed by the following code in the go.cgi program:
##################################################################

# Read the index file.

##################################################################

sub readIndex {

    $producePage = $_[0];

    if (-e "$indexFile") {

        open(NDX,"$indexFile") || die "Unable to open $indexFile\n";

        %index = ();

        while (<NDX>) {

            chop;

            if  ($_ eq '' || /^\#/) {

            } elsif (/\<end\>/) {

                @desc=();

                if (-e &setBase($index{'file'})) {

                    &printCategory();

                }

            } elsif (/\<desc\>/) {

                @desc = ();

                while (<NDX>) {

                    chop;

                    if ($_ eq '<end>') {

                        last;

                    }

                    push(@desc,$_);

                }    #while

                if (-e "$index{'file'}") {

                    &printCategory();

                }

            } else {

                @F = ();

                @F = split(/\=/);

                $index{$F[0]} = $F[1];

            }    #else

        }    # while

        close(NDX);

    } else {

        print "Unable to find $indexFile!";

    }    #else

}    #readIndex
This code is the main "driver" logic for the Web page creation. When the program needs to produce a Web page, it first calls this routine, which calls other subroutines to display the pages. You'll examine these later for the techniques that they use.
This logic is relatively straightforward, but it does use some techniques that allow it to perform multiple duties in the program. First, this routine is called to read the Index Directory, regardless of whether or not it needs to produce a Web page. This is necessary to get the values for the category pull-down on the form. The calling routine passes a flag to this routine indicating whether or not to produce the Web page. Like all subroutines, this is passed in @_. The program assigns the first value from this array to a variable:
$producePage = $_[0];
This is more for human use than it is valuable to the program. It makes the routine more readable and thus more maintainable. Also, like C/C++, arrays in Perl are zero-based (unless you have set them otherwise). You also could have set the global variable $producePage and then called the routine. But, passing the element on the call makes for a more readable program.
Next the routine checks for the existence of the Index Directory. Again, you could have simply attempted to open the file, but the file tests are more efficient and make for a more readable program.
The major work of the subroutine is performed in the while{} loops. The Index Directory is a combination of {tag}={value} lines and multiline entries similar to those seen in the Main Configuration file. Let's look at the basic structure again:
# {comment}


{tag}={value}

...

<desc>

...

<end>
Each entry consists of a series of {tag}={value} lines optionally followed by a description section marked with a <desc> line and terminated with an <end> line. Comment lines begin with the pound sign (#), like the Perl language itself. Blank lines are also allowed in the file.
&readIndex() reads the entire file, accumulating information on an entry into the %index associative array and, optionally, the @desc array until it finds the <end> line. It then calls &printCategory(), which you'll look at later.
The technique of accumulating information in a {tag}={value} format is useful, especially if you can't be sure in what order the information will be presented. The {tag} becomes the key to an associative array, and the {value} is the data in the array. Perl's capability to store all types of information into a variable makes this possible because you don't have to be concerned about the type of data until it is used.
The logic to do this is rather unremarkable. The subroutine uses nested while{} statements and if...elsif...else statements to do its work. Note the use of the last statement to break out of the inner loop, which collects description information into the @desc array:
@desc = ();

while (<NDX>) {

    chop;

    if ($_ eq '<end>') {

        last;

    }

push(@desc,$_);

}    #while
Note also that you have used the push() function to put the information into the @desc array. Later, you'll use the corresponding pop() function to get the information off the array.
The {tag}={value} information is placed in the %index associative array using the following code:
@F = ();

@F = split(/\=/);

$index{$F[0]} = $F[1];
The first line clears the @F array. The second line splits the line contained in $_ into @F. And the third line sets the %index associative array using the first element of @F as the key and the second element as the value. You know that there aren't any equal signs in your data. However, if you aren't sure, you can rewrite the code like this:
@F = ();

($key,@F) = split(/\=/);

$index{$key} = join(/=/,@F);
This splits the first element on the line into the variable $key and the remainder of the line into @F. The join() function reintegrates the line, tying it together with the equal sign, which was originally removed by the split() operation.
The GET method sends the index pages. When the program is activated with the REQUEST method environment variable set to GET, the program executes the &displayIndex() subroutine. Here it is:
##########################################################################

# Display the index page.  This is the main routine to display information

# for the user.

##########################################################################

sub displayIndex {

#################################################

# Categories maintains a list of categories which

# will be displayed if the user form is displayed

# it is loaded in printCategory

#################################################

%Category = ();

##################################################

# Title entry contains the title and the

# main heading for the page.  Also a GIF.

# NOTE, if you do not want a GIF, leave this entry

# blank, but include the line!

###################################################

if ( &Config("$cfgFile","Title") ) {

    $title = $Cfg[0];

    $heading = $Cfg[1];

    $mainGIF = &setBase($Cfg[2]);

} else {

    $title = "Places of Interest";

    $heading = "Been there, done that . . .";

    $mainGIF = '';

}    #else


print <<head1EOT;

<HTML>


<HEAD>


<TITLE>$title</TITLE>


</HEAD>


<H1><IMG SRC="$mainGIF">

$heading</H1>

head1EOT

    ;


###############################################################

# PageDesc: A paragraph printed for the page.  It can be

#           layed out as html and will be displayed exactly

#           as typed.

###############################################################

if (&Config("$cfgFile","PageDesc") ) {

    foreach(@Cfg) {

        print "$_ ";

    }    #foreach

}    #if


print "<hr>\n\n";


############################################

# Build the table of contents for the page.

############################################

&readIndex(0);

if ($tag eq '') {

    print "<A NAME=\"TOC\"></A>\n<H2>Table of Contents</H2>\n";

    print "<DL>\n";

    foreach $key (sort keys %Category) {

        @tagName = split(/\//,$Category{$key});

        print "<DT><IMG SRC=\"/users/rbreed01/icons/folder.gif\">

<A HREF=\"$script_http\:$tagName[$#tagName]\">$key</A>\n";

    }


    ############################################

    # look for the PrintForm option, if it is

    # Yes, then display entry for the form.

    ############################################

    if  (&Config("$cfgFile",'PrintForm')) {

        if  ($Cfg[0] eq 'Yes') {

            print "<P><DT><IMG SRC=\"/users/rbreed01/icons/image1.gif\"> ";

            print "<A HREF=\"#form\">Add an Entry</A>\n";

        }    #if

    }    #if


    print "</DL>\n<P>\n<HR>\n";

} else {

    &readIndex(1);

}


############################################

# look for the PrintForm option, if it is

# Yes, then show the form.

############################################

if  (&Config("$cfgFile",'PrintForm')) {

    if  ($Cfg[0] eq 'Yes') {

        &showForm();

    }    #if

}    #if


&printFooter();


print<<footEOT;


</BODY>

</HTML>


footEOT

    ;

}    #displayIndex
The routine first reads the Main Configuration file for the <Title> entry. This entry supplies the title, heading, and main image (GIF) for the pages. If it can't find this entry, it supplies default values for these page elements. This means that the visitor gets at least the skeleton of a page with meaningful elements, even if some error occurs.
The routine then prints the header for the page using the print to-here format of the print statement:
print <<head1EOT;

<HTML>


<HEAD>


<TITLE>$title</TITLE>


</HEAD>


<H1><IMG SRC="$mainGIF">

$heading</H1>

head1EOT

    ;
A couple of things should be pointed out about this statement. First, the to-here tag (headlEOT) must immediately follow the <<. Second, the line that terminates the printing must contain the tag exactly. Other than that, the lines are printed exactly as displayed with variable substitution.
Next, the routine builds and, if appropriate, prints the table of contents for the page.
############################################

# Build the table of contents for the page.

############################################

&readIndex(0);

if ($tag eq '') {

    print "<A NAME=\"TOC\"></A>\n<H2>Table of Contents</H2>\n";

    print "<DL>\n";

    foreach $key (sort keys %Category) {

        @tagName = split(/\//,$Category{$key});

        print "<DT><IMG SRC=\"/users/rbreed01/icons/folder.gif\">

<A HREF=\"$script_http\:$tagName[$#tagName]\">$key</A>\n";

    }

    print "</DL>\n<P>\n<HR>\n";

} else {

    &readIndex(1);

}
To build the table of contents, the routine calls &readIndex(0). You'll look at the routines called by &readIndex() in more detail in the sections, "Printing Categories" and "Printing URLs," which follow. Note the zero (0) passed to &readIndex(). Perl recognizes zero as FALSE and non-zero as TRUE. This value is set into the $producePage variable in &readIndex(). Among other things, the subroutines called by &readIndex() produce %Category. This associative array contains the descriptions and keys for the categories you have defined. These are used to create the table-of-contents page and the pull-down category selection on the index form.
The routine then checks the $tag passed in on the URL-that is, the part after the colon. If there is no $tag, the program assumes that the table of contents must be printed. A foreach loop is used to return the keys in sorted order. Notice that you've decided to print the categories sorted by key. This will put them in alphabetical order.
Each line in the table-of-contents page creates an HTML link. The routine builds this link dynamically from the pathname information in the Index Directory file. It uses the filename to create the URL. A split function is used to isolate the filename from the full pathname into the @tagName array:
@tagName = split(/\//,$Category{$key});
You can't predict how many subdirectories will be in the full pathname, so the $#tagName variable is used to index to the last element of the array ($tagName[$#tagName]).
This section uses simple print statements to print this part of the page. Notice that you have placed line-feed characters (\n) at the end of each line. These are not needed by the HTML page, but they make debugging easier by displaying the code for the page in a more readable format.
Let's take a look at the routines called by &readIndex(). The first is &printCategory().
The &printCategory() subroutine is used regardless of whether the categories are to be physically printed. This is because these categories are used in the pull-down form. Remember that this routine is called each time a complete index entry is found in the Index Directory file. The values are placed in the %index associative array. Here is the complete subroutine:
#######################################################################

# Print category heading

#######################################################################

sub printCategory {

#

#    Build the Category pull-down entries on the fly

#

    $Category{$index{'title'}} = &setBase($index{'file'});


#

#    This same code is used if the page is to be dislayed or

#    not.

#

#    Check the file against the requested tag.

    if ($index{'file'} !~ /$tag$/) {

    } elsif ($producePage) {

        @tagName = split(/\//,$index{'file'});

        print "<A NAME=\"$tagName[$#tagName]\">";

        print "<H2>";

        if  ($index{'gif'} ne '') {

            print "<IMG SRC=\"$index{'gif'}\" >";

        }    #if

        print "$index{'title'}</H2>\n";

        foreach (@desc) {

            print "$_\n";

        }    #foreach

        &printURLs("$index{'file'}");


        print "<P><A HREF=\"$script_http\">[Table of Contents]</A>\n";


        print "<hr>";

    }    #if

    %index = ();

}    #printCategory
This routine builds the %Category associative array, which is used for the pull-down menu and to print the table-of-contents page. It then checks to see whether this is the requested page. If it is, it then checks to see whether the page should be produced. Here is the if{} statement that does this:
if ($index{'file'} !~ /$tag$/) {

} elsif ($producePage) {
Notice that the if{} leg of the statement performs no logic. It also uses the not-like (!~) operator to check whether this is the requested tag (/$tag$/). This statement looks a little strange until you realize that the first dollar sign is part of the variable name ($tag). The second dollar sign (tag$) is part of the regular expression, indicating that the tag must be at the end of the line.
The elseif leg evaluates $producePage. Remember that it is set in &readIndex, but because variables in Perl are global unless explicitly set local, you can use it here. Also note that if $producePage evaluates to zero, it is FALSE. A non-zero value is TRUE.
Most of the routine uses statements that you have seen before. Note that the foreach statement that prints the description uses the default $_. This routine calls another subroutine to print the URLs.
The &printURLs() subroutine prints the URLs for each index page. Here it is in its entirety:
########################################################################

# Print the URLs contained in the file passed to the subroutine

########################################################################

sub printURLs {

     local($file) = &setBase($_[0]);

    local($error) = 0;

    open(URL,"$file") || die "unable to open $file\n";

    print "<DL>\n";

    %entry = ();

    while (<URL>) {

        chop;

        if (/\<desc\>/ || /\<end\>/) {

            print "<DT>";

            if ($entry{'gif'} eq '') {

                if  ($index{'defgif'} ne '') {

                    print "<IMG SRC=\"$index{'defgif'}\" >";

                }    #if

            } else {

                print "<IMG SRC=\"$entry{'gif'}\" > ";

            }

            print "<A HREF=\"$entry{'url'}\">";

            print "<b>$entry{'name'}</b></A>";

            if ($entry{'desc'} ne '') {

                print ": $entry{'desc'}\n";

            } else {

                print "\n";

            }

            if (/\<desc\>/) {

                print "<DD>";

                while (<URL>) {

                    chop;

                    last if (/\<end\>/);

                    print "$_\n";

                }    #while

            }    #if

            %entry = ();

        } else {

            ($key,@value) = split(/\=/);

            $entry{$key} = join('=',@value);

        }    #else

    }    #while

    print "</DL>";

    close(URL);

    0;

}    #printURLs
This subroutine uses many of the statements you've examined before. A couple of interesting things should be pointed out. First, &printURLs defines local variables for use exclusively by this routine. Note that these variables can be declared and set at the same time.
The {key}={value} pairs are split. But, because a visitor might have entered a statement with an equals sign, you have to put the {value} back together:
($key,@value) = split(/\=/);

$entry{$key} = join('=',@value);
Notice also that the @value array "sucked up" the remainder of the line ($_ by default) split by the statement. If you place another variable after @value, it will always be empty because @value uses everything from that point to the end of $_.
A bit about style: Notice that there are control statements such as if{} and while{} statements. These are aligned to make reading and debugging them easier.
Comments are also important for understanding a function when you have to maintain it. I like to place a comment block at the start of more complex subroutines and sections of a program. Also, statements such as
} #if

} #while

} #printURLs
are comments at the end of blocks. They help to document the flow and make following the logic easier. This can be especially helpful when blocks are long and extend more than a screen or page in length. Use whatever style makes sense to you, but do so consistently and use comments to help you understand your script when you come back to it.
The zero (0) on the last line of the subroutine is the return value. By default, Perl returns the result of the last line evaluated by a block.
So far, you've created Web pages that, although they are dynamically created, aren't really exciting. Now you come to the part of the application that interests most people-the creation and handling of forms.
Printing the form is relatively straightforward and amounts to little more than producing the rest of the page. It is accomplished as part of the GET method code. Here is the code that prints the form:
sub showForm {

    print "<A NAME=\"form\"></A>";

    print "<H2>Add your own Links</H2>";

    if  (&Config("$cfgFile",'FormIntro')) {

        foreach (@Cfg) {

            print "$_ ";

        }    #if

    }    #if


    print <<instEOT;

<H3>Entries are in the form</H3>

<B>Category</B><P>

<DL>

<DT>Title: Description

<DD>Notes

</DL><P>

The <B>Title</B> will become the link to your page.  Your link will

<B>NOT</B> become available

immediately.  It will be sent to the Webmaster for evaluation.<p>

If accepted, your suggestion will generally be posted within

hours.  Please be patient.  <B>DO NOT</B> send multiple entries!

instEOT

    ;


    print "<FORM ACTION=\"$script_http\" METHOD=POST>\n";

    print "<PPE>Category...: <SELECT NAME=\"cat\">\n";

#    sort the category names

    @keys = sort keys %Category;

    foreach (@keys) {

        print "<OPTION>$_\n";

    }

    print "</SELECT>\n";


    $notes = '';


print <<formEOT;


URL........: <INPUT VALUE="http:" SIZE=60 NAME="url">

Title......: <INPUT VALUE="" SIZE=60 NAME="title">

Description: <INPUT VALUE="" SIZE=60 NAME="desc">

Your Name..: <INPUT VALUE="" SIZE=60 NAME="fromname">

E-Mail Addr: <INPUT VALUE="" SIZE=60 NAME="fromaddr">


Notes......:

<TEXTAREA ROWS=5 COLS=60 NAME="notes">$notes</TEXTAREA></Pre>

<INPUT TYPE="hidden" VALUE="$referrer" NAME="home">

<INPUT TYPE="submit" VALUE="Submit Link Suggestion">

<INPUT TYPE="reset" VALUE="Abort Entry">

</FORM>

<HR>

formEOT

    ;

}    #showForm
This subroutine is called when the configuration variable is set to allow link creation:
if  (&Config("$cfgFile",'PrintForm')) {

    if  ($Cfg[0] eq 'Yes') {

        &showForm();

    }    #if

}    #if
&showForm() prints the form part of the page using the same techniques you learned for the remainder of the page. Figure 15.8 shows the form from the "Been ThereÉ" implementation. I won't get into the HTML that actually produces the form here. This is left for Chapter 25, "Hypertext Markup Language (HTML)." You need to examine a couple of techniques, however.
Figure 15.8 : The GO application form.
First, remember the %Category associative array that you collected in &printCategories()? Here you use it to create a pull-down box containing all the allowable categories:
print "<Pre>Category...: <SELECT NAME=\"cat\">\n";

#sort the category names

@keys = sort keys %Category;

foreach (@keys) {

    print "<OPTION>$_\n";

}

print "</SELECT>\n";
This code displays the categories in alphabetical order because of the sort keys clause in the assignment statement to @keys. It defaults to the first element returned by sort keys. If you want to default to another entry, you might implement code like this:
$selected = 'Select Item';

print "<Pre>Category...: <SELECT NAME=\"cat\">\n";

#sort the category names

@keys = sort keys %Category;

foreach (@keys) {

    if $_ = $selected {

        print "<SELECTEDOPTION>$_\n";

    } else {

        print "<OPTION>$_\n";

    }

}

print "</SELECT>\n";
Note also that you have included the $referrer variable that you assigned in the initialization code as a hidden variable:
<INPUT TYPE="hidden" VALUE="$referrer" NAME="home">
Again, I should emphasize that all information that must be retained between page sends must be kept on the page. It can be kept in a cookie or in a file/database from which it can be retrieved based on information returned by the browser.
That's about it for displaying forms. The program writes out the page footer, if any, after the form. Here is the footer code:
sub printFooter {

    if (&Config("$cfgFile","Footer")) {

        open(FOOT,&setBase($Cfg[0])) || die "Cannot open $footer";

        while(<FOOT>) {

            print "$_\n";

        }

        close(FOOT);

    }    #if

    if ($referrer ne "") {

    print <<EOR;

<hr>

<A HREF="$referrer"><IMG SRC="/usbbs/button.cgi/Return"></A>

Return to $referrer

EOR

    ;

    }


    print <<footEOT;

<hr>

<IMG SRC="/users/rbreed01/rfbsm.gif" ALIGN="left">

<FONT SIZE=-1>

<b>index</b> version $ScriptEdition by

<A HREF="/users/rbreed01/">Bob Breedlove</A>.<BR>

Last Modified $ScriptDate<BR CLEAR=LEFT>


footEOT

    ;

}    #printFooter
This code uses the same routines you have seen before. Note that you include a footer, which can be set from the configuration file. (In fact, the Main Configuration file contains the name of the text file that contains the page contents.) You also include a part fixed in the code. Here, you use the $ScriptEdition and $ScriptDate variables, which were set in the initialization code.
Now that you've displayed the form, you need to see how it is processed. The form information is returned when the visitor fills it out and presses the <SUBMIT> button. The code is contained in the POST method branch of the main if{} statement. Here is that branch:
if ($ENV{'REQUEST_METHOD'} eq 'POST') {  # Send them the form

    if (&addLink()) {

        &displayIndex();

    } else {

        print "<H1>ERRORS</H1>$errors";

    }

}    #POST
The logic first executes the &addLink() subroutine, which returns either TRUE (nonzero) or FALSE (zero). If all edits are passed and the information has been successfully processed (TRUE), the logic executes &displayIndex(). If there were errors, the logic prints a page with the errors, contained in the scalar $errors.
Let's look at each of the subroutines performed by this logic. The following is the &addLink() subroutine:
################################################################

# Send the new link request to the Webmaster

################################################################

sub addLink {

    &readIndex(0);


    if (&Config("$cfgFile","Webmaster") ) {

            $Webmaster = $Cfg[0];  # Name of the Webmaster

    }


    $errors = '';


    local($cat)   = $in{'cat'};

    local($file)  = &setBase($Category{$cat});

    local($url)   = $in{'url'};

    local($fromname) = $in{'fromname'};


    $Request = "$file: Test Request";


    if ($fromname eq '') {

        $errors .= "You <b>MUST</b> enter your name.<p>";

    }


    local($fromaddr) = $in{'fromaddr'};

    if ($fromaddr eq '') {

        $errors .= "You <b>MUST</b> enter a mailing address.<p>";

    }


    if ($url =~ /[A-Za-z0-9-_.]+\:\/\/[A-Za-z0-9-_.]*/) {

    } else {

        $errors .= "<b>$url</b> appears invalid, please re-enter<p>";

    }


    local($title) = $in{'title'};

    if ($title eq '') {

        $errors .= "You <b>MUST</b> enter a title.<p>";

    }

    local($desc)  = $in{'desc'};

    local($notes) = $in{'notes'};


    if ($errors ne '') {

        0;

    } elsif (-e "$file") {

            open(MAIL,"|$sendmail");

            print MAIL <<EOM;

From: $fromname <$fromaddr>

To: $Webmaster

Subject: $Request


url=$url

name=$title

faddr=$fromaddr

fname=$fromname

desc=$desc

EOM

    ;

        if (&Config("$cfgFile",'UserLinkGif')) {

            if ($Cfg[0] ne '') {

                print MAIL "gif=$Cfg[0]\n";

            }    #if

        }    #if

        if ($notes ne '') {

            print MAIL "<desc>\n";

            print MAIL "$notes\n";

        }

        print MAIL "<end>\n";

        close(MAIL);

        1;

    } else {

        1;

    }

}    #addLink
This is one of the longer routines in the script, but it really doesn't use anything you haven't seen already. It first performs &readIndex() to set the %Category associative array.
The routine edits the information to make sure that it is complete. If errors are found, the error message is added to the variable $errors. On return from &addLink(), $errors is tested and, if it is not null, the contents are displayed on the page and the information is not sent to the Webmaster. You haven't made these edits overly restrictive, but you want to ensure that the visitor has entered enough information to allow you to post a valid and meaningful link. The $errors scalar is first cleared by setting it to the null string:
$errors = '';
The subroutine then sets a number of local variables, which are used in the link request. Then you examine the values to make sure that they are valid and complete. Here is an example:
if ($fromname eq '') {

    $errors .= "You <b>MUST</b> enter your name.<p>";

}
The .= assignment operator appends the error message to the $errors scalar. Because these messages are displayed on the Web page, they contain HTML formatting. After checking for errors, the routine checks the $errors scalar:
if ($errors ne '') {

    0;
The 0; line will be the last statement executed in the subroutine as this leg of the if{} statement. return 0; is an equivalent line because a subroutine returns the value of the last line evaluated. Note that return 0; is safer if you think you might revise your subroutine in the future. This assures that the subroutine returns at that point even if there are other executable statements after this line.
If there are no errors, the subroutine opens a pipe to the mail program defined in $sendmail:
} elsif (-e "$file") {

        open(MAIL,"|$sendmail");
First, the program checks to make sure that the file for the requested category actually exists. This allows you to temporarily suspend posting to a category by removing the index file. Of course, it also means that you have to have a file for each category, even if it is empty. (Empty files can be created on UNIX systems by using the touch command.)
This version of the open() function creates a pipe to the program contained in the variable. It's the vertical bar (|) inside the parentheses that performs this magic. You must also be sure that your mailer allows input through STDIN. If it doesn't, you can modify this code to output a text file and then execute your mailer using the system() function.
The routine formats the mail message using a combination of print statements because certain lines vary depending upon the content of the variables returned from the form. The body of the message contains an entry exactly like those formatted for the index file.
The subroutine returns TRUE (1) whether the index file exists or not. This is a judgment call. You could also produce an error message if the posting is temporarily suspended or the index file is missing for some other reason. Again, return 1; could be used in place of the 1; statements.
After a nonzero (TRUE) &addLink() return, the program displays a confirmation message by executing the &ConfirmMail() subroutine. This type of confirmation display is important if you are using forms. It assures your visitors that their entry has been processed correctly. If you don't give visitors complete, positive feedback, they will have a tendency to use their <BACK> buttons to send multiple link requests for the same link.
Here is the &ConfirmMail() subroutine:
######################################################

# Sends page to confirm the mail which was sent

######################################################

sub ConfirmMail {

    print <<EOP;

<HTML>

<HEAD>

<TITLE>GO Mail Confirmation</TITLE>

</HEAD>

<BODY>

<H1><IMG SRC="$mainGIF">

Index Suggestion</H1>


Thank you for your index suggestion for:<P>


$in{'title'}<br>

$in{'url'}<P>


Your suggestion has been forwarded to the Webmaster.

It will be evaluated and, if accepted, will be posted

within 72 hours.<P>


<A HREF="$script_http">[Table of Contents]</A>

<P>

EOP

    ;

}    # ConfirmMail
The subroutine is a simple print <<to-here statement-which is nothing new. However, there are a couple of things to point out. First, give visitors enough information to assure them that the process has completed successfully. Here, you display the title and URL that the visitor entered.
You also give visitors information about when to expect that their entry will show up on the index page. Note that if you don't post their link for some reason, you might want to send mail to their $fromaddr. Just like when they use the <BACK> button on their browser, visitors might have a tendency to send another request if they don't see their link in what they feel is a reasonable length of time.
The last element for a successful confirmation page is to give visitors somewhere to go from this page. If their only alternative is their browser's <BACK> button, they might use it and enter another link request for the same link. They might also go elsewhere and miss the other features of your Web site. Here, you direct the user back to the table of contents by using the contents of the $script_http scalar as a link:
<A HREF="$script_http">[Table of Contents]</A>
There isn't a finalization section in go.cgi. But you might want to always display a common footer on your Web pages, write some log records, or perform some other common routines.
That's it for go.cgi. As you can see, HTML programming is essentially straightforward. But, the GO application consists of other programs as well. When visitors request the addition of a link, go.cgi mails a request to the Webmaster. You still have to get that request into the proper index file. To make this easier, I have designed a system that will allow you to mail an approved link, which will be added by an automated mail module-postlink.pl.
The go.cgi program displays the link pages and processes the link request form. As you have seen, the request is mailed to the Webmaster. The Webmaster checks the entry and forwards the request to the mailbox for the postlink program.
Of all the services that make up the set of tools commonly referred to as the Internet, mail is perhaps the most ubiquitous. Perl is an excellent language for processing mail messages on UNIX systems. After all, an SMTP mail message is simply a text stream. As you have seen, Perl is in its element when processing text streams.
postlink.pl takes advantage of the capability of sendmail and other mailer programs to pipe messages to other processes. Although you'll use it here to append approved links to the GO index files, the same techniques can be used to implement (among other things) an automated mailing list program. (I have implemented similar functionality in a program that maintains my "Diary" page. This page is a "what's new" type of page, which can be maintained by mail from a remote location.)
I have one caution as you examine postlink.pl. Sendmail is the most commonly used mailer on UNIX systems. Sendmail and its clones can pipe mail messages to other programs through STDIN. Your mailer might not have that capability or might function differently, especially if your operating system is not UNIX.
Figure 15.9 shows the basic processing of postlink.pl. As you'll see, postlink.pl can be attached to an existing mailbox and process only those messages matching the required subject line format.
Figure 15.9 : The basic flow of the postlink.pl module.
Before examining the code, take a brief look at SMTP messages. These are text streams in a specific format. postlink.pl takes advantage of this to determine whether the message is a link-post request coming from an authorized request. Here is a typical message:
From - Mon Apr 15 09:09:43 1996

Return-Path: <nobody@apps1.channel1.com>

Received: from apps1.channel1.com by mail5 (8.6.13/Netcom)

    id VAA01910; Fri, 12 Apr 1996 21:43:38 -0700

Received: (from nobody@localhost) by apps1.channel1.com (8.6.12/8.6.9)

  id AAA21390; Sat, 13 Apr 1996 00:42:43 -0400

Date: Sat, 13 Apr 1996 00:42:43 -0400

Message-Id: <199604130442.AAA21390@apps1.channel1.com>

From: breedlov@netcom.com

To: rbreed01@user1.channel1.com

Subject: POSTLINK|/jumppts.cfg|Bulletin Board System Homepages

X-Mail-Gateway: USBBS Update Script

X-Mozilla-Status: 0001


url=http://www.channel1.com/usbbs/

name=The USBBS List Homepage

faddr=breedlov@netcom.com

fname=Bob Breedlove

desc=MS-DOS Based BBS List

gif=/users/rbreed01/images/usbbssm.gif

<desc>

Contains over 4,500 entries for BBS systems throughout

the US and some from other countries.  Add your own

entry to this excellent resource.

<end>
The header information starts at the beginning of the message and extends line by line until reaching a blank line (two consecutive line feeds). The message starts after that blank line and continues to the end of the message. Because you will probably forward the approved request, your message can contain the header from the original message.
postlink.pl ignores this additional information. When the message has been verified by checking the Subject: and From: lines, the program searches for the url=... line and processes all information until the <end> line.
Much of the program processing is straightforward. It uses many of the same techniques that you saw in go.cgi. This section examines the parts of the program to point out techniques that will be helpful in this and other mail processing programs. But first, a note about implementing postlink.pl.
Ideally, you should set up a special mailbox for the postlink program. But, like me, you might be in a situation where this is impossible or too costly to do. You can implement this program on your existing mailbox. The exact method may vary by system, but on a UNIX system, you can typically create a .forward file in your home directory. Place in the file a line that looks like this: |{path}/postlink.pl. This executes postlink.pl each time a message is received. The message is piped to the program through standard input. If you want to receive other messages, you also have to place your login name in the file on a separate line. Otherwise, all messages are passed to postlink.pl exclusively, and you do not receive your mail.
Here is an example. Suppose your logon is myname. In order to assure that you received all your other mail, your .forward file would have to look like this:
myname

| {path}/postlink.pl
If you did not include your login name, the mail would be sent to the postlink.pl program, and you would never see it.
This section starts the postlink.pl program. It performs what little initialization is necessary in this program.
#!/usr/bin/perl

########################################################

# PostItem, reads mail and adds to a GO category file

# from selected E-mails.

#

# E-mails must come from an authorized source and the

# subject line must be in the format:

#

#    PostItem|{Config File}|{Category}

#

# where {Config file} is one of the GO subject files and

# {Category} is the category title.

#

# The contents starting at the url= line will be

# appended to the subject file and ending with the

# <end> line.

#=======================================================

# Base Directory

#

# Substituted for B+ in configurations

# Do NOT end in trailing slash!

#

# Note, this directory can be reset in the config

# file by the "Base" directive

#########################################################

$baseDir = '/www/etc';
PostLink is "lean and mean." Programs that process mail should, as a rule, do the job without a lot of extra processing because they are called each time you receive a piece of mail and do not process the majority of it. PostLink doesn't require extensive initialization. In fact, the only line is the assignment of $baseDir. This will be used to find the configuration file. (Remember that this value was passed to the go.cgi program. PostLink will have to know this information.) Keep the base directory information in synch with the remainder of the GO application programs.
You might want to log the operation of postlink.pl. You could put statements in the initialization section to record the start of the program, including date and time.
The main processing of postlink.pl reads the standard input data stream and processes it one line at a time. The main loop is a while loop:
########################################################

# Main loop, assumes standard input.

########################################################

while(<>) {

    chop;


    # Get the from line

    &getFrom if (/^From:/);


    # Check subject line to see if it is for us

    &postMessage if (/^Subject:/);


}    # main loop
The chop command removes the line feed from the line. Two lines call subroutines when the program finds lines that it recognizes. The program assumes that the From: line will occur before the Subject: line. Both are used to determine whether this is a link-post request from a valid source.
You'll learn about the processing of these lines when you look at the subroutines. Here, note that the loop checks $_ (the default). The ^ indicates the start of the line.
The &getFrom() subroutine gets the information from the From: line. Here it is:
########################################################

# Get the from field.  This will be used to verify that

# the message is from a trusted source.

########################################################

sub getFrom {

    ($junk, $from) = split(/\:\s+/);

}    # getFrom
At this point, you're probably wondering why you would create a subroutine for a single line that does nothing more than split the input line. Sometimes you might want to design for anticipated future enhancements. For example, at this point, if you were logging the processing, you might want to add code that would record the information from the From: line.
When the program finds the Subject: line in the input stream, it can start processing the message. Here is the postMessage subroutine. It determines whether the message should be processed by parsing the Subject: line to make sure it is valid.
########################################################

# Check to see that the message is in the correct

# format.  If it is, post it to the page.

########################################################

sub postMessage {

    ($junk, $subject) = split(/\:\s+/);

    return if ($subject !~ /^POSTLINK/);

    ($junk,$cFile,$Category) = split(/\|/,$subject);


    # name of the configuration file (includes leading slash)

    $cfgFile = &setBase("B+$cFile");


    #########################################################

    # Check the Configuration File to see if it resets

    # the base directory.

    #########################################################

    if (&Config("$cfgFile","Base") ) {

        $baseDir = $Cfg[0];  # Name of the index file

    }


    return if (!&checkFrom());


    if (&Config("$cfgFile","Index") ) {

        $indexFile = &setBase($Cfg[0]);  # Name of the index file

    }


    &readIndex();


    while(<>) {

        chop;

            &processPage() if (/^url\=/);

    }


}    # postMessage
First, the subroutine splits the Subject: line to eliminate the Subject: and then checks to make sure it is a valid line:
($junk, $subject) = split(/\:\s+/);

return if ($subject !~ /^POSTLINK/);
postMessage processes the default $_ variable. You have seen the use of the split command before. The routine returns immediately if the command line does not match the expected pattern (!~). Note that this implementation uses a relatively simple test. This check can be as complex as needed for your purposes.
If the Subject: line is valid, the program now has enough information to find the configuration file.
($junk,$cFile,$Category) = split(/\|/,$subject);


# name of the configuration file (includes leading slash)

$cfgFile = &setBase("B+$cFile");


#########################################################

# Check the Configuration File to see if it resets

# the base directory.

#########################################################

if (&Config("$cfgFile","Base") ) {

    $baseDir = $Cfg[0];  # Name of the index file

}
PostLink uses the same &setBase() routine as go.cgi to expand the path of the configuration file. It then checks the configuration file to make sure that it doesn't alter the base directory.
When the routine has the configuration file, it can check the sender information (From:) to make sure that this request is from an authorized sender. If the sender is not authorized, the routine exits.
return if (!&checkFrom());
You'll look at the &checkFrom() subroutine later. Note that the return from &checkFrom is negated using the bang (!). The use of the bang is common in C programming; however, it can be confusing when debugging or enhancing programs. You might find that maintenance will be easier if you use an alternative form:
return if (&checkFrom() eq 0);
Before writing the link information to the file, the program has to get the information about the indexes. It does this by checking the configuration file and reading the index file for this implementation:
if (&Config("$cfgFile","Index") ) {

    $indexFile = &setBase($Cfg[0]);  # Name of the index file

}


&readIndex();
This is the same logic that you saw in the go.cgi program. The &readIndex() routine has been stripped down to simply produce the %Category associative array.
Now the program can continue to process the input stream. It needs to skip over any other lines in the message and searches for the url=... line using a while loop:
while(<>) {

    chop;

         &processPage() if (/^url\=/);

}
When the url=... line is found, &processPage() is called to actually write the link file. This is a good place to discuss a style issue-the use of subroutines. This entire program could have been written with all the processing code within a single while{} loop with a set of nested if statements. This would have done the job and not required the overhead of processing subroutines.
Straight-line programming is efficient for small utility programs. After all, subroutines do take some processing cycles to implement. But, if you are programming anything that you hope to maintain or enhance in the future, straight-line programming can be very difficult.
Well-named, organized subroutines can make maintenance and enhancement much easier. Plan subroutines so that they perform only one or two functions. Name subroutines logically, preferably after the function that they perform.
The &processPage() subroutine writes the index file. Here it is:
########################################################

# Process the page and add the message.

########################################################

sub processPage {


    $file = $Category{"$Category"};


    $file = &setBase($file);


    open(OUT,">>$file") || die "Unable to open $file.\n";


    # Print out the url= line which has already been read

    # NOTE: The newline is needed because we have chopped it.

    print OUT "$_\n";


    # Append the remainder of the entry.

    while(<>) {

        print OUT "$_";

        last if (/^\<end\>/);

    }


    # Print out a trailing blank line to make things easier to

    # read.

    print OUT "\n";


    close(OUT);


}    # processPage
First, this routine gets the file corresponding to the category from the Subject: line. It then opens the file to append the link information to the end of the file.
$file = $Category{"$Category"};


$file = &setBase($file);


open(OUT,">>$file") || die "Unable to open $file.\n";
The >> causes the open() statement to open the file and places the insertion point at the end of the file. Note also that the program will stop processing if the file can't be opened. This is accomplished by the die command and the || operator.
Note, here, that you have used the longer category description. This description is easier for people to read and evaluate. When the Webmaster is determining whether to allow this link, the use of a more detailed category description can be easier to evaluate than a possibly obscure filename associated with the description.
When the file is opened, the program simply reads the standard input text stream into the default $_ variable and uses print statements to write out the output file:
# Print out the url= line which has already been read

# NOTE: The newline is needed because we have chopped it.

print OUT "$_\n";


# Append the remainder of the entry.

while(<>) {

    print OUT "$_";

      last if (/^\<end\>/);

}


# Print out a trailing blank line to make things easier to

# read.

print OUT "\n";


close(OUT);


}    # processPage
You have to remember to print out the url=... line that you have already read. You had to add the line feed to the end because you stripped it with the chop command before evaluating the line. Also, you have included a comment to remind a maintenance/enhancement programmer about this unusual situation.
Another while{} loop is used to read and write out the lines from the url=... line and to close with the <end> line. The last statement is used to exit the while{} loop when the <end> line is found. This statement is evaluated after the line has been written.
Before closing the file, the program adds a blank line after the entry. This makes the index file easier to read if you are going to view it with a text editor. Again, you have used a comment to tell why this extra line is added to the program.
The last routine that you'll look at ensures that the message is coming from an authorized source. The security implemented in this routine is minimal. It is not intended as an example of a truly effective security routine. If you are concerned about security at your site, you should modify this routine to also include password checking or other security functions. Here is the routine:
########################################################

# Find the configuration entry for this page and

# check the sender to make sure this is a valid

# id.

#

# ID's are contained in the configuration file one

# per line in the <PostLink> section.

########################################################

sub checkFrom {

    if (!&Config("$cfgFile","PostLink") ) {

        return 0; # Can't authorize

    }


    foreach $auth (@Cfg) {

        if ($from =~ /$auth/) {

            return 1;

            last;

        }

    }    # foreach


    # If we're here, it's not authorized

    return 0;

}    # checkFrom
The <PostLink> section in the configuration file contains the information for each authorized Webmaster. The &Config() subroutine returns an array (@Cfg) containing all these lines. Notice that the routine will fail if the <PostLink> section is not found.
&checkFrom() uses a foreach loop to check the From: line against each line.
foreach $auth (@Cfg) {

    if ($from =~ /$auth/) {

        return 1;

    }

}    # foreach
The foreach loop returns elements from @Cfg into $auth in a seemingly random order. The loop terminates when all the values have been returned. If the From: line contains $auth exactly, the routine returns 1 (TRUE).
If none of the authorization strings are found, the loop terminates after returning all the values. The subroutine falls through to the next statement:
# If we're here, it's not authorized

return 0;
Notice, again, the well-placed comment to tell you how you got here and why you're returning a zero (FALSE) value.
There isn't a finalization section; the program simply terminates after the entire standard input stream has been processed. The finalization section is also a good place to put logging code. For example, you might want to log elements of the link posting to a file.
You might also want to send a message to the originator of the link request, telling that person his or her link has been posted. The faddr=... line contains the mail address of the requester. The same routines used in go.cgi to send the link request message can be modified to send the confirmation.
go.cgi and postlink.pl form the heart of the GO application. They illustrate Perl's capability to process Web pages and mail messages. These are two of the most common processing jobs on the Internet today.
However, an application might require utility programs, which perform routine maintenance and organization of the application's data. Perl is also excellent for these programs. After all, Perl was originally designed as a general-purpose utility language.
go.cgi requires that the link files exist before they can be used. This means that you must have a file for each category, even if there are no entries in that file. In a dynamic system, it can get annoying to have to place the entries in the index file and then create each of the empty link files corresponding to the new entries.
The answer is a routine that will read through the index file and create the empty files-SetIndex. SetIndex is a very straightforward, unremarkable program, but it illustrates a couple of techniques. Here's the entire program:
#!/usr/local/bin/perl

#

# Automatically set files for CGI indexes by reading the

# 00index file in the current directory.

#

$index = "00index";

if (@ARGV) {

        $baseDir = shift @ARGV;

} else {

        $baseDir = "..";

}


if (-f "$index") {

    open (INDEX, "$index") || die "Can not open $index\n";

} else {

    die "$index does not exist or is not a plain text file\n";

}


while (<INDEX>) {

    chop;

    ($key, $value) = split(/=/);

    if ($key eq "file") {

        $value = &setBase($value);

        if (-f $value) {

            print "$value exists\n";

        } else {

            print "processing $value\n";

            system("touch $value");

            system("chmod 666 $value");

            system("chgrp guest $value");

        }

    }

}


close(INDEX);


sub setBase {

        local($n) = $_[0];

        $n =~ s/B\+/$baseDir/;

        $n;

}
SetIndex is written in a straight-line fashion. It contains only a single subroutine that you've seen before: &setBase(). The program reads through the Index Directory file, which it assumes to be named 00index. (As an enhancement to SetIndex, you might want to make it read the configuration file to get the name of the index file.)
SetIndex also takes some of its configuration information from command-line arguments, if they are entered. This is the first time you've examined the way Perl reads arguments from the command line. In CGI programs, you really can't use the command line to pass in arguments. And, although postlink.pl could have used command-line arguments, it didn't.
You decided to pass in some information from the command line because SetIndex is a simple, seldom-used utility and should be kept that way. SetIndex can be started in one of two ways. The first is by simply using the command name:
SetIndex
When started like this, the utility assumes that the 00Index file is in the current subdirectory, meaning the same directory in which SetIndex is started.
SetIndex can also be started by placing the base directory on the command line:
SetIndex {base directory}
The check-for command-line parameters are handled in the following if statement:
if (@ARGV) {

        $baseDir = shift @ARGV;

} else {

        $baseDir = "..";

}
Perl parses the command-line arguments into the array @ARGV, where they are available to the program. In general, you will have two types of command-line variables-positional and parameterized. Many programs use both types of arguments.
Positional parameters can use simple if statements like those in SetIndex to access the array. This if statement first checks to see whether there are any parameters. An array used in a scalar context (such as an if statement) returns the number of elements it contains. Remember that Perl, like C, assumes nonzero values are TRUE and zero values are FALSE.
If the user has entered command-line arguments, the first one is assumed to be the $baseDir argument. The remainder are ignored.
If there are no command-line arguments, the $baseDir is assumed to be the parent directory of the current directory. To understand this, you have to know that I place all the index files for GO implementations under a common directory structure like this:
base directory

    implementation

        index directory file

        index files

    implementation

        index directory file

        index files
Next, the program checks to see whether the index directory file exists. It uses the -f file test:
if (-f "$index") {

    open (INDEX, "$index") || die "Can not open $index\n";

} else {

    die "$index does not exist or is not a plain text file\n";

}
The -f tests to ensure that the file is a plain text file. This is a bit safer than the -e file test, which simply tests to ensure that the file (of whatever type) exists. The file is opened and assigned to the filehandle INDEX. If the file exists but can't be opened, the program terminates with an error message by using the die command.
Here's a chance to reiterate that there are often many ways to do the same thing in Perl. Many times your choice will be a matter of style or personal choice. In this case, I have chosen a style that is easily readable and familiar to programmers in many languages, including C/C++. Here's code that does the same thing in two lines:
die "$index does not exist or is not a plain text file\n" if (!-f "$index");

open (INDEX, "$index") || die "Can not open $index\n";
This works because the program exits when the die command is executed. The die command exits with the error value in $! (errno).
SetIndex does its main work in the while statement:
while (<INDEX>) {

    chop;

    ($key, $value) = split(/=/);

    if ($key eq "file") {

        $value = &setBase($value);

        if (-f $value) {

            print "$value exists\n";

        } else {

            print "processing $value\n";

            system("touch $value");

            system("chmod 666 $value");

            system("chgrp guest $value");

        }

    }

}
The loop reads the INDEX filehandle using the <INDEX> command. The lines are split on the equal sign into a $key/$value pair. If $key is equal to file, the program expands the filename into a full pathname by calling &setBase().
If the file exists and is a text file, the program has nothing to do. It notifies the user and continues processing the index directory file.
If the file doesn't exist or is not a plain text file, the program notifies the user and then uses a series of system() commands to create the empty file. I won't go into the UNIX commands executed because they will vary by operating system.
That's it. Not really much of a program, but it does illustrate that useful utilities can be written quickly in Perl to support the main programs in your application.
Humans like to see things in some sort of order. This usually means some variation of alphanumeric sequence or time sequence. The Index pages are best sorted in alphanumeric sequence. But because you can't guarantee that visitors will enter link requests in alphanumeric order, you must have a way to sort the links on the page.
If you are using a database or some indexed file system, the entries can be ordered automatically. Because you're using text files, however, you have to manage the files yourself.
I have chosen to provide a maintenance program that can be run periodically against the index files. It is only slightly more complex than the SetIndex program. Here it is in its entirety:
#!/usr/bin/perl

######################################################

# Utility to sort an index from index.pl

######################################################

# USE: sortindex {full index file name}

######################################################

print "Index File Sort Utility\n\n";


$index = shift @ARGV;

if (@ARGV) {

    $baseDir = shift @ARGV;

} else {

    $baseDir = "../";

}


if (-e "$index") {

    print "  Index: $index\n";

} else {

    print "$index does not exist\n";

    exit(1);

}


open(INDEX,"$index") || die "Unable to open $index\n";


# Search for the "file=" token and process each of

# the files in sequence

while (<INDEX>) {

    chop;

    if (/^file\=/) {

        ($junk, $file) = split(/\=/);

        $file = &setBase($file);

        &sortFile();

    }

}    #while

close(INDEX);


sub sortFile {

    if (-e "$file") {

        print "    Processing: $file\n";

    } else {

        print "    $file does not exist\n";

        return;

    }


    $outfile = $file . ".NEW";


    open(IN, "$file");

    open(OUT, ">$outfile");


    $entry = '';

    @index = ();


    while(<IN>) {

        $entry .= "$_";

        if (/^name\=/) {

            chop;

            ($junk, $name) = split(/\=/);

            $name =~ tr/A-Z/a-z/;

            $entry = "$name|$entry";

        } elsif (/\<end\>/) {

            push(@index,$entry);

            $entry = '';

        }

    }    #while

    close(IN);


    foreach (sort @index) {

        ($junk, $e) = split(/\|/);

        print OUT "$e";

    }

    close(OUT);


    system("mv $file $file.OLD");

    system("mv $outfile $file");

    system("chmod 666 $file");

    system("chgrp wheel $file");


}    # sortFile


sub setBase {

        local($n) = $_[0];

        $n =~ s/B\+/$baseDir/;

        $n;

}
SortIndex uses the same technique as SetIndex to read the command-line arguments, if any. This time, however, you assume that there are two positional arguments:
$index = shift @ARGV;

if (@ARGV) {

    $baseDir = shift @ARGV;

} else {

    $baseDir = "../";

}
The first line shifts the name of the index file into $index. Then, if there are any remaining command-line arguments, the first one is assumed to be the base directory ($baseDir). Note that after the first variable had been shifted off the array, the remainder of the array can be dealt with as if the first element didn't exist.
Next, the program checks to see whether the requested index file exists:
if (-e "$index") {

    print "  Index: $index\n";

} else {

    print "$index does not exist\n";

    exit(1);

}
Here, you see a different technique for exiting the program if the file doesn't exist. The program prints a message on the first line of the else leg of the if/else command. The exit command terminates the program with the value (1). This technique might not be as elegant as the die command, but it might be more readable, especially to new Perl programmers who might be familiar with C or Pascal.
The first while loop reads through the Index Directory file and processes each of the files it encounters:
# Search for the "file=" token and process each of

# the files in sequence

while (<INDEX>) {

    chop;

    if (/^file\=/) {

        ($junk, $file) = split(/\=/);

        $file = &setBase($file);

        &sortFile();

    }

}    #while
The file= line is read, the full pathname of the Index file is constructed, and the &sortFile() function is called to do the work.
The major work of SortIndex is performed in the &sortfile() following function:
$outfile = $file . ".NEW";


open(IN, "$file");

open(OUT, ">$outfile");


$entry = '';

@index = ();


while(<IN>) {

    $entry .= "$_";

    if (/^name\=/) {

        chop;

        ($junk, $name) = split(/\=/);

        $name =~ tr/A-Z/a-z/;

        $entry = "$name|$entry";

    } elsif (/\<end\>/) {

        push(@index,$entry);

        $entry = '';

    }

}    #while

close(IN);
SortIndex reads from the current Index file and writes to a file with the same filename postfixed with .NEW. It opens the original Index file and assigns it to the filehandle IN. It opens the new file and assigns it to the OUT filehandle. The > parameter causes the program to open the file and clear the contents, if any.
This program also uses a set of while statements to do its work. The first constructs an array, @index, which will be sorted. The index files are typical of configuration files. The set of lines for an entry are in the following format:
url={url}

name={title}

faddr={mail address}

fname={from name}

desc={single line description}

gif=$Cfg

[<desc>

{optional multi-line description}]

<end>
You can't use a simple text file sort on this type of file. The first chore is to create a structure that can be sorted. SortIndex takes advantage of the fact that strings can be of any length in Perl to create an array of strings that can be sorted.
The while loop appends the lines for each entry to the scalar $entry using the .= operator. If it finds the name= entry, it adds the value of that tag to the front of the line for sorting. You've seen the split operator, which creates the $name value. It then uses the tr/// operator to translate all characters to lowercase.
SortIndex then prepends the resulting string to the $entry scalar. Note also that you have prepended the vertical bar (|). This will be used later to split this sort string from the remainder of the line.
After the routine recognizes the <end> line, it pushes the $entry scalar onto the @index array and clears the $entry scalar. The push operator places the $entry strings onto the array in a "last in, first out" (lifo) order if the corresponding pop operator is used. However, you will be using the sort operator to extract the entries in alphanumeric order.
After all the entries have been read from the Index file, the @index array is processed in sorted order by the following foreach loop:
foreach (sort @index) {

    ($junk, $e) = split(/\|/);

    print OUT "$e";

}
Because you have prepended the name entry to the front of the string, the sort will return the strings in alphanumeric order. The name entry is split from the remainder of the entry and the entire entry is written to the output file. Notice that you did not chop the line feeds from the input records. Thus when the entries are rewritten, their original line feeds are present, resulting in the same number of lines as the original file.
After processing the full @index array, the program closes the output file and then performs a set of system() calls to rename the files and set the ownership and permissions. Note that you have chosen to use system() calls. Much of this could have been accomplished with internal Perl commands. This is just another example of the capability of Perl to do things in many different ways.
One note about the way that SetIndex and SortIndex operate: Perl is capable of writing a file in-place, meaning that it overwrites the original file with the new information, but this is very dangerous. I recommend that you use techniques similar to those here. That is, write to a new file, rename the original file, and then rename the new file to the required name. This assures that, if something happens, the original file can be restored.
That's the GO application. The source code for the complete application is included on the CD-ROM. This is a relatively simple application. Perl is quite capable of supporting much more complex applications, including its own socket connections, handling databases, and more. I encourage you to explore options by modifying the GO application to your purposes. Perl is especially suited to exploration because it is interpreted. You can install small, incremental changes and test them in your application with ease. Programming Perl is best learned by programming Perl. Go for it.