


by Dan Joshi
What makes Java such a powerful tool for Internet development? Can Java can be used outside of the Internet? The answer to both of these questions is yes. Java is a fully functional, object-oriented programming language. With new features included in it, Java has definitely defined a niche for itself on the Internet. This chapter describes Java in the Internet environment.
Every exercise in this chapter can also be used on a Java-compliant browser (such as Netscape 2.0 or later). More important, the topics described here include tables of methods and constants available to Java applets and programs. This chapter not only gives an introduction to Java applets, it also serves as a reference as you develop new applets. Note that due to the limited space and time, the tables include only the methods most useful to the programmer. Some methods are either not used or are rarely used by the programmer; these have been removed from the tables to keep only the most useful methods at your disposal. This chapter assumes that you have a complete understanding of the HTML environment and that you have a Java-compliant Netscape browser version 2.0 or higher. It also assumes that you are familiar with the basic Java structure and objects that you learn in Chapter 7 "Introduction to Java."
The first level that any Java programmer (or HTML programmer) needs to understand is how to put an applet in your HTML page. This is the first and often most frustrating major challenge for most people new to the Java environment. It is so frustrating primarily because it is simple, and the browsers are very forgiving when it comes to incorrect HTML code. You might not see an error message, but your applet still won't be loaded on the screen. Your first step is to design a sample HTML page. Assume that you have a newly created Java applet called MyClass.class. All of the HTML attributes pertaining to a Java applet must be placed between the <APPLET> and </APPLET> tags. The following segment of HTML code shows how to put the applet on the home page:
<APPLET CODE=MyClass.class WIDTH=300 HEIGHT=300>

</APPLET>
| NOTE |
A common mistake that new programmers make is forgetting to put the </APPLET> tag at the end of the applet section on their HTML page. Consequently, the browser does not load the applet. It is not always correct to assume that when an applet does not show up on the HTML page, there is a problem with the applet. |
Note that in this case you must have the file MyClass.class in the same directory as the HTML file.
Next, you will develop a sample applet to learn how to use an applet on the Internet (and more specifically, on a Netscape browser). Listing 8.1, which appears on the accompanying CD, shows the first applet you will create, which says "Hello World." Create a file called HelloWorldC.java and type in Listing 8.1.
Listing 8.1. The "Hello World" program.
import java.awt.Graphics;


public class HelloWorldC extends java.applet.Applet {

    public void paint(Graphics g) {

        g.drawString("Hello World", 5, 50);

    }

}
Just to refresh your memory on how to compile programs using the Java Development Kit (JDK), make sure that the Java compiler and the HelloWorldC.java program are in the same directory. Then type the following:
javac HelloWorldC.java
The next step is to create an HTML file called index.html. Listing 8.2 shows you how your index.html file should look.
Listing 8.2. The index.html program.
<HTML>

<APPLET CODE=HelloWorldC.class WIDTH=200 HEIGHT=100>

</APPLET>

</HTML>
| NOTE |
Probably the first thing to note about the HTML code in Listing 8.2 is the attribute CODE. This attribute is not optional. It passes the name of the Java applet file that will be loaded. |
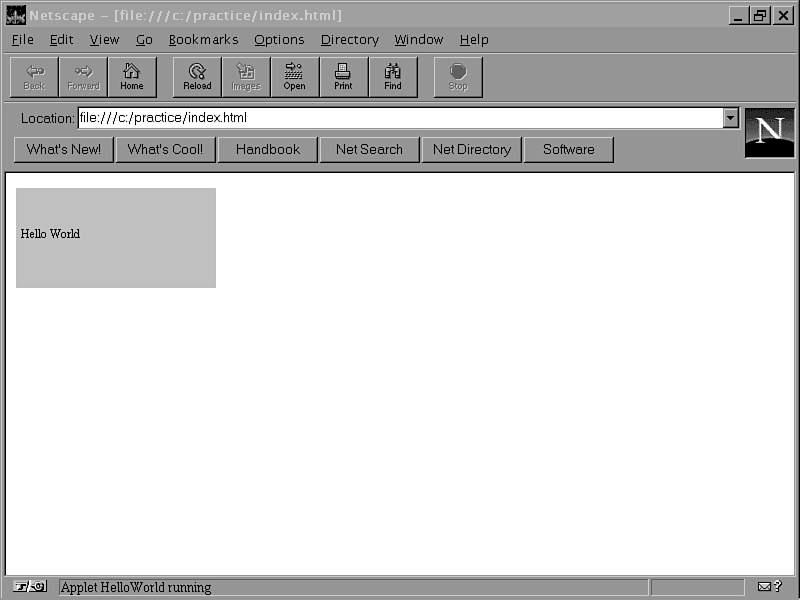
The final step is to put all the files in the same directory, load Netscape, and open the file index.html in the browser. Figure 8.1 shows you the output on your screen.
Note that not all Internet travelers will have Java-compliant browsers, and for many professional sites it is important to have a site that will anticipate the capabilities of all the browsers that view the page. With that in mind, another HTML example with the fictitious applet MyClass.class follows. If the browser that loads this HTML page is not Java-compliant, the screen will display a comment to the users.
<APPLET CODE=MyClass.class WIDTH=300 HEIGHT=300>

It is time to upgrade your browser to a Java powered one. <P>

</APPLET>
In addition to that, an alt attribute can display a statement if the Internet surfer has a Java-compliant browser but for some other reason cannot view the applet. Technically, the alt attribute will be displayed if that browser understands the <APPLET> tag but still cannot view the applet. The following example uses alt with the applet MyClass.class:
<APPLET CODE=MyClass.class WIDTH=300 HEIGHT=300>

ALT= "Applet could not be loaded"

It is time to upgrade your browser to a Java powered one. <P>

</APPLET>
Other HTML code sets various display attributes for Java applets. Two attributes you have already used are the width and the height properties, which are fairly self-explanatory to the browser. By using these two attributes, you can set the size at which the Java applet will be displayed.
Also in this chapter, you have a chance to get hands-on experience in passing parameters from the HTML page to the Java applet. Imagine that the applet MyClass.class has a parameter of color. An example of how to pass red to the parameter of color in the HTML page follows:
<APPLET CODE=MyClass.class WIDTH=300 HEIGHT=300>

<PARAM NAME=Color VALUE="red">

ALT= "Applet could not be loaded"

It is time to upgrade your browser to a Java powered one. <P>

</APPLET>
| NOTE |
You can pass more than one parameter to an applet as long as the applet is programmed to accept them. |
Another optional, yet very useful, attribute is CODEBASE.
When you set the HTML site in Listing 8.2, you see that the class
file and HTML file are in the same directory. In reality, Web
sites with numerous files in them can become very confusing and
unorganized when you throw everything into the root. You might
want to create a special directory for your Java applets and use
the CODEBASE to reference it. The CODEBASE accepts
full and partial URLs.
| NOTE |
Uniform Resource Locator (URL) is what users specify to their Web browsers to connect to a particular document or resource. A Web browser can act as an FTP, Gopher, and Telnet client. Table 8.1 shows a breakdown of the URL, http://home.netscape.com. |
| URL part | Explanation |
| http:// | Protocol |
| home. | Machine |
| netscape. | Network |
| com | Domain |
The following code is an example of several possible formats for the attribute CODEBASE:
CODEBASE = "http://www.myserver.com/homepage/applets/MyClass.class"

CODEBASE = "http://www.myserver.com/homepage/applets/"

CODEBASE = "/applets/"

CODEBASE = "applet/"
Notice that the preceding examples point to the same relative location (www.myserver.com/homepage/applets/MyClass.class). Extending the example of the HTML code for the fictitious class MyClass.class is another example of using CODEBASE:
<APPLET CODE=MyClass.class CODEBASE = "applet/" WIDTH=300 HEIGHT=300>

<PARAM NAME=Color VALUE="red">

ALT= "Applet could not be loaded"

It is time to upgrade your browser to a Java powered one. <P>

</APPLET>
In Netscape, you can also specify how to align the Java applet.
| NOTE |
The align attribute in the <APPLET> tag follows the same pretense as the align attribute in the <IMG> tag. |
Table 8.2 shows the various states in which align can
be and the meanings of those states as interpreted by the browser.
| Attribute | Explanation |
| align = texttop | Aligns the applet to the tallest text in the line. |
| align = top | Aligns to the top item in the line. |
| align = absmiddle | Aligns to the middle of the largest item in the line. |
| align = middle | Aligns the middle of the applet to the middle of the baseline. |
| align = baseline | Aligns with the baseline of the line. |
| align = bottom | Same as align = baseline. |
| align = absbottom | Aligns the bottom of the applet to the bottom of the line. |
The last two parameters that you learn briefly are hspace, for horizontal space, and vspace, for vertical space. These attributes specify the amount of space (in pixels) between the applet and other elements in the HTML page. You will not use these attributes very often, so they aren't mentioned again in this chapter.
As time goes on, Java will have more proprietary environments in which to develop and test programs and applets, but this chapter uses the JDK 1.0.1 or the JDK 1.0, which is also compatible. If you do not have the JDK, you can download it from the following site:
http://java.sun.com/download.html
In Chapter 7 you used the Java interpreter (that is, java.exe)
to work with your classes. However, the HelloWorldC.class
applet is not designed to run through the Java interpreter because
the method main is not defined.
| NOTE |
One major difference between Java applets and programs is that applets do not need the method main to load the applet on a Java-compliant browser. |
The JDK comes with a program called the appletviewer, which lets you view Java applets. The syntax for using the appletviewer follows:
appletviewer URL
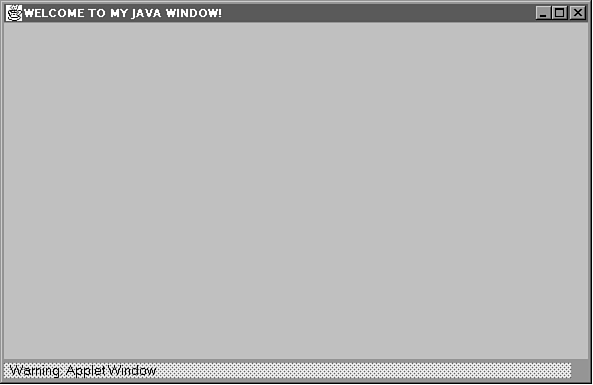
The URL stands for the file path and name for loading the HTML file. You use this handy tool to test and learn about the applets in the rest of this chapter. The following is an example of testing the appletviewer with your HTML page index.html from Listing 8.2:
appletviewer practice/index.html
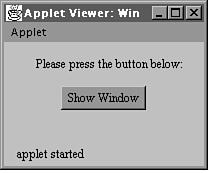
My file index.html is located in the practice subdirectory of my computer, so what you type might be different if your file is in a different location. Regardless, your end result should be a window on your screen, as shown in Figure 8.2.
Figure 8.1 : The output of your first Java program.
Now that you have seen an introduction to the interaction between applets and browsers and the tools you will use (that is, the appletviewer) to test and develop your applications, you will learn about built-in classes. The first built-in class you learn is the applet object.
As mentioned in Chapter 5 "Java and the Internet,"
Java applets are slightly mutated Java programs. Now that you
have enough understanding of Java and enough of an introduction
to how Java interacts with the browser, you can appreciate exactly
what mutations need to take place before you can call a Java program
an applet. First, all applets are extended from a class called
java.applet.Applet, which comes with the Java language.
| NOTE |
The root of every built-in Java class (and inherited user-defined Java class, for that matter) always has a root of java.lang.Object. |
When you develop an applet, always start by extending your class
from the java.applet.Applet class. Table 8.3 shows you
a list of methods available to you from the Applet class.
| Method | Explanation |
| destroy() | A life cycle method that cleans up any resources that are still being held by the applet (the last life cycle method to be called). |
| getAudioClip(URL url) | Retrieves an audio clip. |
| getAudioClip(URL, String name) | An overloaded method that also enables you to specify the name of the audio clip you want to retrieve. |
| getCodeBase() | Returns a URL of where the applet resides. |
| getDocumentBase() | Returns the URL of the HTML page where the applet is embedded. |
| getImage(URL url) | Retrieves an image at the specified URL. |
| getImage(URL url, String name) | An overloaded method that also enables you to specify the name of the audio clip you want to retrieve. |
| getParameter(String name) | Returns a parameter from the HTML page in the form of a string. |
| getParameterInfo() | Returns an array of strings that enable you to retrieve more than one parameter to the applet. |
| init() | A life cycle method that initializes the object. |
| isActive() | Returns a Boolean response based on the evaluation of whether the applet is active. |
| play(URL, url) | Plays an audio clip. |
| play(URL url, String name) | An overloaded method that plays an audio clip. |
| resize(int width, int height) | Resizes the applet. |
| resize(Dimension d) | An overloaded method that also resizes the applet. |
| showStatus(String msg) | Prints a message on the appletviewer's status bar or a browser's panel. |
| start() | A life cycle method called to start the applet (this method is called after init()). |
| stop() | A life cycle method called to stop the applet. |
You will not be able to work with all of the methods that are listed in Table 8.3, but this table should provide you with a reference. This section gives you a chance to work with some of the more frequently used methods in Table 8.3.
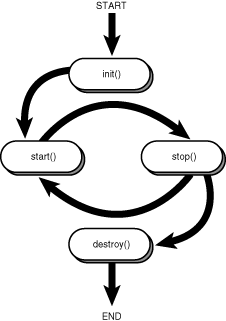
Probably the easiest way to understand some of the important methods in the applet is to learn them in a little more detail and then use them in a real-life situation. First, you learn the applet life cycle (that is, the methods that constitute the applet life cycle). Figure 8.3 provides an overview of the applet life cycle.
Figure 8.2 : Example of using the appletviewer.
As shown in Figure 8.3, init() is the first method called when an applet is loaded. Use this method to get parameters and to initialize and prepare to officially start the applet. The next method, start(), starts the applet. The major difference between the init() and start() methods is that you can call the method start() again in the same life cycle. For example, when a client leaves the HTML page and then returns, the applet won't be discarded completely from memory, so the applet will simply restart, skipping the init() method and calling the start() method again. If the applet is completely destroyed, you will have to physically reload the applet again, which will start the life cycle all over again, initially calling init() again.
The stop() method is called when the user leaves the HTML page that contains the applet or if the applet is physically unloaded. In either case, the stop() method is always called. Like the relationship between init() and start(), stop() can be called more than once in one life cycle. The destroy() method is the last method called in the applet life cycle. This method causes the applet to clean up after itself by freeing any memory, resources, and so on.
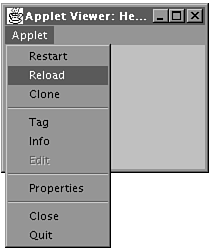
When you work with the appletviewer, you can use the menu bar (see Figure 8.4) to perform several operations. The appletviewer's menu bar has the commands Reload and Restart, which you can use to restart or reload your applet.
Figure 8.3 : Drawing of the applet life cycle.
Now that you understand how applets live and die on the Internet continuum, let's briefly digress and discuss some new objects in HelloWorldC.class that you haven't officially learned. Listing 8.1 presents the idea of packaging. Look at the following line of code excerpted from Listing 8.1:
import java.awt.Graphics;
A package is a kind of class library in Java. Java organizes its built-in classes into packages based on common relationships between the objects. Your primary focus is to understand how to import packages to your classes (or, more precisely, how to import built-in classes that come with the JDK), but note that you can also create your own packages. In the preceding code, you import the object Graphics to your class. As with any type of class porting, the class itself must be declared public to receive maximum exposure to other classes. Another way you could port the class Graphics to your class HelloWorldC.java follows:
import java.awt.*;
| NOTE |
You can create your own packages by using the keyword package. |
The asterisk in the preceding code has the same function as in any DOS-based environment, which means that it acts as a wildcard in Java to include all public classes and packages in this importation. At this point, you might ask yourself why you imported Graphics to the applet in the first place. The answer: Graphics is the base class for all graphic contexts in Java; you work with this abstract class in the coming sections. By importing that class, you were able to use the following method:
public void paint(Graphics g) {
You were able to use this method because it takes the object Graphics
as an input object, which is why you need to import it into the
program in Listing 8.1.
| NOTE |
When you use Java to display all kinds of things in your applet, the paint method is called. In order for you to paint just about anything on the screen, you need to override this method in your program. Think of it in terms of what the main method does for a Java application. |
Now that you have learned the applet object, its life
cycles, and an introduction to drawing objects on the screen,
let's compile a program to exemplify some of this material. Create
a file called cycle.java and type in Listing 8.3.
| NOTE |
You are not required to override any of the life cycle methods. In fact, in Listing 8.1, the HelloWorldC.class applet did not need to use any of these methods. Later in the chapter, however, you work with animation, which gives you a chance to see these methods in action. |
Listing 8.3. Applet life cycle.
public class cycle extends java.applet.Applet {

    public void init() {


        // Display the this statement at the bottom of the Window

        showStatus("The applet is initializing...");


        // Pause for a period of time

        for (int i = 1; i < 1000000; i++);

    }

    public void start() {


        showStatus("The applet is starting...");


        for (int i = 1; i < 1000000; i++);

    }

    public void stop() {


        showStatus("The applet is stopping...");


        for(int i = 1; i < 1000000; i++);

    }


   public void destroy() {


      showStatus("The applet is being destroyed...");


      for(int i = 1; i < 1000000; i++);

    }

}
Only the showStatus method might be new to you. Table 8.3 shows that the showStatus method is located in the object java.applet.Applet, so this method is inherited from the object applet. Its primary function is to display text at the bottom of the window in the appletviewer or at the status bar on a Java-compliant browser.
In the same directory, create the HTML document cycle.html and type in Listing 8.4.
Listing 8.4. The cycle.html document listing.
<applet code=cycle width=200 height=200>

</applet>
Now run the appletviewer and see what happens. Focus on the status bar at the bottom of the screen, which will display the stage of the applet in its life cycle. Then go to the menu bar applet, click Restart, and watch the status bar cycle through, stopping and destroying the applet. After that, click Reload and watch the status bar as the applet cycles through. Work with the Java applet in Listing 8.3 to better understand the applet life cycle.
Let's take a closer look at the method paint in HelloWorldC.class in Listing 8.1.
public void paint(Graphics g) {

        g.drawString("Hello World", 5, 50);

    }
As you just learned, the paint method creates a Graphics object g. Therefore, for the duration of the method paint, you can use any of the methods from Graphics as long as you reference them to g. Looking at the preceding code, you see that you have done just that. Notice that drawString has three input parameters: The first is the string that actually will be printed, and the second and third parameters are the x and y coordinates on the applet pane where the text will be located. Figure 8.5 shows the Applet coordinate system. The origin is located at the top-left corner. In the method drawString, you specified the origin to be five units to the right of the y-axis origin, and, based on the third variable, you specified the origin to be 50 units down from the x-axis.
Figure 8.4 : The appletviewer drop-down list of commands.
| NOTE |
The Java coordinate system is not similar to the Cartesian coordinate system by default (see Figure 8.4), but you can translate the origin using the method translate in the java.awt.Graphics. |
For the next several sections you will build and improve on a logo applet. Along the way you learn various methods, variables, and techniques that you can use in Java. Finally, you finish by building an applet that uses multiple threads.
The best feature you can give to your HTML page is a logo. In this case, you will build a logo applet as part of the workshop, so let's discuss how to make the applet responsive to input from the browser by receiving parameters. As you remember from the previous section, you know how to build an HTML page to send a parameter to an applet. What you need to understand is how the applet can accept the parameter being passed, and you will do this by building your first version of the logo applet, which is shown in Listing 8.5.
Listing 8.5. The Logo version 1.0 revision 1.
// Logo version 1.0 rev


import java.awt.Graphics;


public class logo extends java.applet.Applet{

    // Declare the object variable array StrLine with 3 values.

    String StrLine[] = new String[1];


    public void init() {

        // Get the value for the

        String att = getParameter("Text");

        StrLine[0] = (att == null) ? "Please Enter Something

        in the parameter Text!" : att;

    }


    public void paint(Graphics g) {

        // Display the variable on the screen

        g.drawString(StrLine[0], 5, 50);

    }


}
As you can see in Listing 8.5, you are overriding one of the life cycle methods init() to accept parameters from the browser. The actual excerpted code of the overridden method follows:
// Get the value for the

        String att = getParameter("Text");

        StrLine[0] = (att == null) ? "Please Enter Something

in the parameter Text!" : att;
In the code in Listing 8.5, you see that the format to get a parameter relies on the fact that you are using a temporary variable (in this case, att) to accept input from the getParameter method that was made available to you from the class java.applet.Applet (see Table 8.3). The string inside the method getParameter specifies the default value if att comes back empty. The last line of code in this method exemplifies the use of the ternary operator (described in Chap-ter 7), and with it, you are able to test whether the att is null (that is, that no value was returned from the getParameter call). If the evaluation is false, then the default string "Please Enter Something in the parameter Text!" will be placed on the applet instead. If a value was returned from the call, then the evaluation will return true, and the value in the temporary variable will be passed on to the applet by passing it to the variable StrLine[0]. (An array is used because in later versions of this applet, you will accept more than one string.)
Referring to Listing 8.5, you see that the variable StrLine[0]
is the drawString method's first input. Now the user
will be able to input a variable in the HTML page and pass it
to the applet (which in this case will eventually be passed to
the drawString method and be printed on the applet).
The advantage of passing parameters is that you can more easily
customize your applet, and each time you might want to change
the string, you will not need to recompile the Java applet.
| NOTE |
The format shown in Listing 8.5 for passing parameters to an applet is the standard used in some example applets that come with the JDK and is the same format that can be used to pass other types of parameters. |
Your next step is to create your HTML page (see Listing 8.6) called logo.html.
Listing 8.6. The logo.html page.
<applet code=logo width=500 height=100>

<param name=Text value="Welcome to my Java powered page!">

</applet>
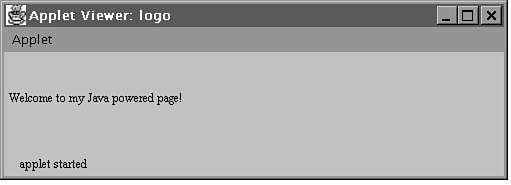
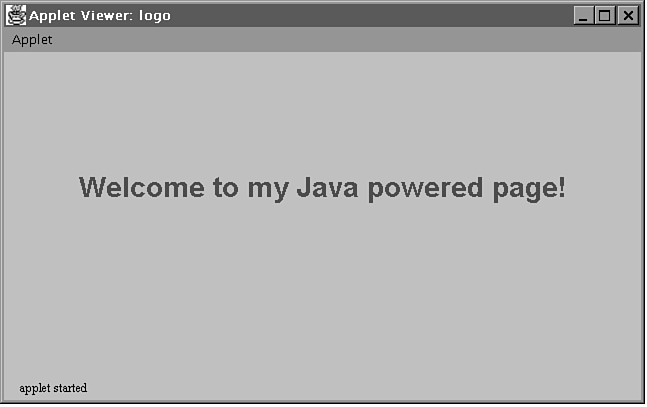
The last step is to run the appletviewer pointing to logo.html. If all goes well, your screen should be similar to Figure 8.6.
Figure 8.5 : The Applet coordinate system.
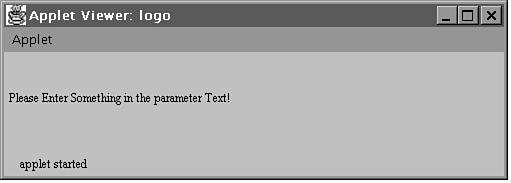
Go to the HTML page logo.html in Listing 8.6, and delete the line that passes the parameter to the applet as shown here:
<param name=Text value="Welcome to my Java powered page!">
Then execute the appletviewer again. Your screen should resemble Figure 8.7, which shows the appletviewer displaying the default string that was hard coded in your applet.
Figure 8.6 : The logo version 1.0, revision 1.
The logo program definitely offers the customizing versatility that enables you to decide what to print in the applet. This section focuses on how to manipulate what is being printed on the screen by using Java's various font classes. To work with fonts, you need to understand the first and most basic font object in Java, the java.awt.Font class.
In the paint method, you can change the font attributes so that the Graphics object g will display your text in all shapes and sizes. Java naturally uses a Font object to handle the display and manipulation of text. For that reason, Listing 8.7 is a revised version of the Logo applet. Make the changes as shown in Listing 8.7.
Listing 8.7. The Logo version 1.0, revision 2.
// Logo version 1.0 rev


import java.awt.Graphics;

import java.awt.Font;


public class logo extends java.applet.Applet{

    // Declare the object variable array StrLine with 3 values.

    String StrLine[] = new String[1];


    //Declare the Font object called appFont.

    Font appFont;


    public void init() {

        // Get the value for the

        String att = getParameter("Text");

        StrLine[0] = (att == null) ? "Please Enter Something

in the parameter Text!" : att;


        //Construct the font with the following attributes:

        //                 Font       attrib     Size

        appFont = new Font("Helvetica", Font.BOLD, 28);


    }


    public void paint(Graphics g) {

        //Set the Font for object g

        g.setFont(appFont);

        // Display the variable on the screen

        g.drawString(StrLine[0], 5, 50);

    }


}
Listing 8.7 helps incorporate more methods in the class java.awt.Graphics. First notice that in Listing 8.7 you had to import the object Font to your class to use in this class. Also notice the following lines of code before the init() method:
//Declare the Font object called appFont.

Font appFont;
This declares that you can use an instance of Font called appFont by any method in the class Logo. The following shows the constructor of your font appFont:
//Construct the font with the following attributes:

//                 Font       attrib     Size

appFont = new Font("Helvetica", Font.BOLD, 28);
In the preceding code, you are able to customize all the various types of fonts, sizes, and styles for your appFont object. The first input variable is a string with which you can specify the font you want to use. The following list shows all the fonts currently available for the Font object in Java:
The next input variable in the Font constructor is an input variable referenced by a constant (specifically, an integer). The following list shows all the available attributes for how you want the text in appFont displayed:
The third and final input variable is an integer that represents font size. The preceding lists, tables, and explanations can assist you in finding any font that you want to display in Java applets or programs.
Finally, the last new line of code that you should understand in Listing 8.7 follows:
//Set the Font for object g

g.setFont(appFont);
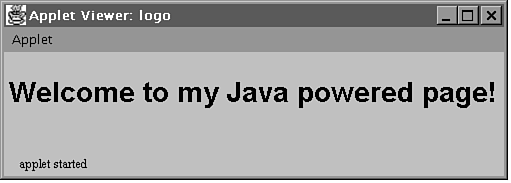
This piece of code from Listing 8.7 is located in the paint method and uses the built-in method of setFont that was given to you in Graphics. For the Graphics object g, you have set the font to the object of appFont. Now show your results on the screen. Compile the updated version of Logo in Listing 8.7. Use the same HTML page to display Logo that you used for the first version, located in Listing 8.6. The resulting output should look like Figure 8.8.
Figure 8.7 : The Logo applet version 1.0, revision 1, with the default output.
In Figure 8.8, the text in the applet stands out much more than in the original version of the Logo applet. Your next step when dealing with fonts is to introduce the class java.awt.FontMetrics. You can use this built-in class to give you information about the size attributes of the current font, and with that information you can better decide how to place text on varying sizes of windows and applets.
With java.awt.FontMetrics you can measure the current font and place it in the center of the applet. You will use the object FontMetrics in the next revision of the Logo applet.
The next class you need to learn is java.awt.Color. In Java, you can work with all colors, and as in any other development language, you have several methods strictly related to color manipulation. Because of Java's advanced object design, these variables and attributes are all housed in one object class called color. You can work with several constructors in the color object. The object color also follows the RGB format for applying color on the screen. Finally, the color class comes with a set of built-in variables with which you can specify the major colors.
Although most professional programs require exact colors (that is, you must specify an RGB value), for your program, you will use the built-in variables that define a set of standard colors. For example:
Color MyColor;

MyColor.red;
This piece of code specifies the standard color red without having to know any RGB values for the instance MyColor. The next revision to your logo class will be to create a dynamic algorithm to center the string on the screen based on the applet size (see Listing 8.8).
Listing 8.8. The Logo applet version 1.0, revision 3.
// Logo version 1.0 rev


import java.awt.Graphics;

import java.awt.Font;

import java.awt.FontMetrics;

import java.awt.Rectangle;

import java.awt.Color;


public class logo extends java.applet.Applet{

    // Declare the object variable array StrLine with 3 values.

    String StrLine[] = new String[1];


    //Declare the Font object called appFont.

    Font appFont;


    public void init() {

        // Get the value for the

        String att = getParameter("Text");

        StrLine[0] = (att == null) ? "Please Enter Something

in the parameter Text!" : att;


        //Construct the font with the following attributes:

        //                 Font       attrib     Size

        appFont = new Font("Helvetica", Font.BOLD, 28);


    }


public void paint(Graphics g) {

        //Create an instance of the object FontMetrics called fm.

        FontMetrics fm;


        // Set the fonts metrics for the object g

        fm = g.getFontMetrics(appFont);


        // Create an instance of the object Rectangle and give it

        // the specs for the applet.

        Rectangle r = bounds();


        // Change the color of the graphics printed to red.

        g.setColor(Color.red);


        //Set the Font for object g

        g.setFont(appFont);


        // Display the variable on the screen with a dynamic setting

        // to ensure that it is centered on the applet.

        g.drawString(StrLine[0],  (r.width - fm.stringWidth(StrLine[0])) / 2,

 (r.height - fm.getHeight()) /2);

    }


}
The code in Listing 8.8 is the next revision for your logo applet. First, notice that you imported a few objects, some that you have not yet learned. Next, you created an instance of the FontMetrics class, and then used the instance fm to get the various specs for the font appFont:
// Set the fonts metrics for the object g

fm = g.getFontMetrics(appFont);
As you can see, you used the method getFontMetrics, which is available to you from java.awt.Graphics. With the preceding line of code, you can now use the methods contained in the class FontMetrics. With these methods, you can find the width and height of the text, which is crucial to aligning the text properly. The next line of code that you need to recognize and understand follows:
// Create an instance of the object Rectangle and give it

// the specs for the applet.

Rectangle r = bounds();
The preceding code includes a new object that you have not directly dealt with, the rectangle object. At this point, you are only using the rectangle object (more specifically, java.awt.Rectangle) to find the boundaries of your applet. Also you are using a method called bounds(), which comes from java.awt.Component, a very large object. Calling the bounds() method will retrieve the boundary of the applet in the form of a rectangle object. With that information, you can use the variables that come with the object rectangle, which are r.width and r.height (knowing the width and height of the applet is crucial to centering the text). The following is the code from Listing 8.8 that shows everything that you just learned:
g.drawString(StrLine[0],  (r.width - fm.stringWidth(StrLine[0])) / 2,

(r.height - fm.getHeight()) /2);
Reviewing the preceding code, you are taking the total width of the applet (r.width) and subtracting that value from the total width of the text to be printed (fm.stringWidth(StrLine[0]), then dividing the resulting value to center the text in the applet. The text will remain in the center regardless of what size the text or applet pane becomes. The same process follows for the height, for which you use the variable r.height and the method fm.getHeight().
The final line of code you'll learn before you compile and run the program follows:
// Change the color of the graphics printed to red.

g.setColor(Color.red);
This code uses the method setColor from java.awt.Graphics. As mentioned earlier, instead of using the RGB format, you will simply use a built-in color variable that comes with the object java.awt.Color. The following list gives you all the built-in color variables:
black
blue
cyan
darkGray
gray
green
lightGray
magenta
orange
pink
red
white
yellow
Now that you have learned the new features of Logo revision 3 (see Listing 8.8), compile the applet. You will use the same HTML page that you used in Listing 8.6 to view this applet (see Figure 8.9).
Figure 8.8 : The Logo applet version 1.0, revision 2.
Now you will unleash the power of all that you've learned about centering text. With the applet loaded as in Figure 8.9, move your mouse to the border and the mouse pointer will change to a resize mouse icon. Change the size of the applet; the applet will call the paint method again, and the method will use the new information about the applet's size to fit the text in the middle of the applet. Figure 8.10 provides an example where the applet size was increased arbitrarily.
Figure 8.9 : The Logo applet version 1.0, revision 3.
| NOTE |
If you look closely at Figures 8.9 and 8.10, you will notice that the vertical placement of the text appears to be off center. This is because the method bounds(), which was called to give the applet the boundaries, includes the menu bar and title bar as part of the height. When you measure for the height of the applet, make sure you include all elements of the page for the height. |
Now that you have a well-developed background on how to display text in an applet, it is time to learn about animation and how you can take advantage of the multithreaded power of Java to build more dynamic applications. This will require a definition of animation, especially because it is one of the newest and fastest growing industries in the computer realm.
Before you jump into animating your Logo applet, start by understanding the theoretical aspects of animation. First, it is reasonable to assume that you do not have to be a film studies major to recognize the concepts behind how animation works. At a very basic level, animation is nothing more than a series of related frames (that is, pictures) that give the appearance of smooth, natural motion when shown in a particular order.
Another form of animation is moving a fixed object very slowly across a background while taking a series of pictures at regular intervals. When the pictures are played back, the object appears to be animated. No doubt these forms of animation are closely related. You already have an example of the first type of animation in the demo section of the JDK, which exemplifies how quickly you should project a series of well-timed frames to give the appearance of animation. Not only that, but you can customize the animation demo by using your own pictures. As a result, you can work with the demo applet with the JDK. Here, though, you will focus on the second form of animation. Your fixed object will be three lines of text in your Logo applet.
The field of multimedia (animation in particular) is a fairly young technology. In fact, it is probably safe to say that if you were to go back about four years, the whole industry of PC multimedia would be virtually nonexistent. However, in this industry, time is definitely warped (more like warp 8), and now not only do you have full-blown multimedia, you also have completely interactive virtual worlds. One can only wonder about the future with technologies such as VRML, where Internet surfers will be able to interact with Web-based virtual worlds.
But back to animation. With the advent of multithreaded programming environments such as Java, you are bringing multimedia to a new level. In the not-too-distant past, PCs were showcased in a single-threaded environment, where running animation would stop all responsiveness from the computer as well as any other programs running in the background. Without the power of CPU, animation more than 100Mhz faced CPU time deprivation. There are two reasons for this: The CPU was simply not powerful enough to handle the computations involved, and the compression algorithms used on the animation itself were not as sophisticated as they are today (that is, not as efficient). As a result, the animation locked the system while displaying a piece of animation about one-eighth the size of the screen.
Time and technology have changed from that form of multimedia.
Today, not only has animation improved, but programming languages
such as Java have brought animation to the Internet.
| NOTE |
One element that makes Java such a powerful tool for programming multimedia is the fact that it is a multithreaded programming environment. |
At the technical level, you will be creating an animation of text that will be displayed in an applet on the screen. One of Java's newer technologies is programming in multiple threads. (Refer to Chapter 5for a high-level discussion on threads if you need to review.) With Java, the programmer can handle threads by using objects. More precisely, Java uses the java.lang.Thread object class.
In the Java programming format, you create an instance of the object Thread and implement the built-in interface runnable, resulting in overriding the method run(). The method run() is where the action code in your program will be placed. Update the Logo applet to incorporate the input, and use the three strings that will be animated (see Listing 8.9). Because this is a new version of the logo class and not just a revision, you will make a lot of changes to the original code to focus on only the topics discussed in this section. Create a new file anilogo.java and type in Listing 8.9.
Listing 8.9. The aniLogo applet revision 1.
// aniLogo rev


import java.awt.*;


public class anilogo extends java.applet.Applet implements Runnable {

    Rectangle r;


    // Declare the object variable array StrLine with 3 values.

    String StrLine[] = new String[3];


    Font appFont;


    // Create a Thread object called myThread

    Thread myThread = null;


    // declare width array

    int width[] = new int[3];


    public void init() {


        // A for loop to find the three lines of text.

        for (int i = 0; i < 3; i++) {

            String att = getParameter("Text" + i);

            StrLine[i] = (att == null) ? ("Please put a parameter

in Text" + i) : att;


        }


        appFont = new Font("Helvetica", Font.BOLD, 28);

        //Set r = to the bounds of the applet

        r = bounds();

    }


    // Override this method from the interface Runnable

    public void run() {

        //Set the current Threads priority.

       Thread.currentThread().setPriority(Thread.NORM_PRIORITY - 1);


        // Initialize the locations of the two lines of text to be

        // of the screen.

        width[1] = 2000;

        width[2] = 2000;

        repaint();


        // Algorithm to send the first line of Text across the screen.

        for ( int i = - 50; i < r.width/2; i += 7) {

            width[0] = i;

            repaint();

            // Rest

            Rest(1);

        }


        // Algorithm to send the second line of text across the screen.

        for (int i = r.width + 20; i > r.width/2; i -= 7) {

            width[1] = i;

            repaint();

            Rest(1);

        }


        //Algorithm to send the third line of text across the screen

        for ( int i = - 90; i < r.width/2; i += 7) {

            width[2] = i;

            repaint();

            // Rest

            Rest(1);

        }

    }


    void Rest(int r) {

        //Rest for a period of time

        try {

            myThread.sleep(100 * r);

        } catch (InterruptedException e) {

            return;

        }

    }


    public void start() {

        if (myThread == null) {

            myThread = new Thread(this);

            myThread.start();

        }

    }


    public void stop() {

        if (myThread != null) {

            myThread.stop();

            myThread = null;

        }

    }


    public void paint(Graphics g) {

        g.setColor(Color.red);


        g.setFont(appFont);


        for (int i = 0; i < 3; i++) {

            g.drawString(StrLine[i],  width[i] + (10 * i), 30 + (25 * i));

        }

    }


}
Listing 8.9 contains a lot of new material that you should go over. First notice that in the declaration of the applet, you are using the wildcard * to import a whole group of classes:
import java.awt.*;
Next, notice that you are implementing the interface of runnable in the applet:
public class anilogo extends java.applet.Applet implements Runnable {
As you can see in the compiled Java applet file anilogo.class in Listing 8.9, you have declared the arrays of strings to house your text. However, the line of code that is important to you is the following:
// Create a Thread object called myThread

    Thread myThread = null;
Here you declare the object myThread to be an instance of Thread, and you initialize it to be equal to null. The object myThread will be a key new feature in your applet. As you can see in the anilogo class, you made some changes to the life cycle method init(). In this version, the two important things that the method init() brings to the applet are the passing of three-string parameters from the HTML page and the specification of the rectangle r that was declared earlier to be equal to the bounds of the applet. The next excerpt of code that you learn follows:
// Overide this method from the interface Runnable

    public void run() {

        //Set the current Threads priority.

       Thread.currentThread().setPriority(Thread.NORM_PRIORITY - 1);
With the preceding code, you declare the method run() that was given to you in the interface runnable to be overridden. You will use the first lines of code inside this method to set the priority of the current object, using two methods, currentThread() and setPriority. currentThread() returns the currently running thread while with the method setPriority-which was also given to you from the class Thread-you can change the priority of the currently running thread. The priority you have set it to is NORM_PRIORITY -1. The NORM_PRIORITY constant comes with the object Thread. The following list shows the other available integer constants in addition to NORM_PRIORITY:
MAX_PRIORITY
MIN_PRIORITY
NORM_PRIORITY
By setting the currently running thread to a value of NORM_PRIORITY -1, you are one step below giving the currently running thread a normal priority. Farther along in the method, the next three for loops are used to loop through and update the integer array width. You start the applet by initializing the three values for the array to set the lines of text completely off the screen:
// Initialize the locations of the two lines of text to be

        // off the screen.

        width[1] = 2000;

        width[2] = 2000;

repaint();
The repaint() method comes from the java.awt.Component and completely clears and then repaints the screen by calling the paint method. Referencing the preceding code, you have now initialized the screen to be clear of everything. The next step is to learn the first for loop.
// Algorithm to send the first line of Text across the screen.

        for ( int i = - 50; i < r.width/2; i += 7) {

            width[0] = i;

            repaint();

            // Rest

            Rest(1);

        }
All you want to focus on right now in the preceding code is the fact that the integer i loops from -50 to the middle of the applet. Each time the integer loops, it updates the integer array width. Then it calls the repaint method, which is the program's queue to update the frame in the animation. Then the integer calls the method rest, which is a built-in method that pauses the thread for a period of time (you learn this later in the chapter). The other for loops are the same by design but different by implementation. The major difference between the first and second for loops is that the second has been reversed so that the line of text moves in from the right side of the screen. The third for loop updates the width of the third line of text; it is essentially the same as the first for loop in every other aspect. To help you tie everything together, look at the method paint.
public void paint(Graphics g) {

        g.setColor(Color.red);


        g.setFont(appFont);


        for (int i = 0; i < 3; i++) {

            g.drawString(StrLine[i],  width[i] + (10 * i), 30 + (25 * i));

        }

    }
In the preceding code, you see that the method paint has been changed from the previous version of the Logo applet by adding a for loop. This for loop will cause drawString to update all three lines of text. Each call from the repaint() method will update the three lines of text. The tricky part of the drawString method is that it has some abstruse statements for placing the x and y coordinates. Starting with the x coordinate, you have the statement width[i] + (10 * i). This code updates the location of the x coordinate for the applet. In the method run(), you have the same integer array variable width that is continually incremented with a new value. The (10 * i) gives the appearance of stepping. In other words, each line of text will be shifted a little farther to the right; in essence, that is how the animation will take place.
Next, let's look at the Rest method and learn a little more about exception handling in the Java language.
void Rest(int r) {

        //Rest for a period of time

        try {

            myThread.sleep(100 * r);

        } catch (InterruptedException e) {

            return;

        }

    }
The preceding snippet of code has new keywords that deal specifically with exception handling. The method sleep will throw the exception InterrruptedException. Simply stated, when a method has a throwable exception (that is, InterrruptedException), the applet or method that calls the method must have a way to catch the exception that belongs to the method, which is done by using the keywords try and catch. Any code between try and catch will be executed. If an exception is raised during program execution of the block of code in try, the code in the block catch will be fired. In other words, the exception will be caught, and the block related to catch will handle the exception that was raised. The following is an example:
try {

    //Code that may throw an exception Exception

catch (Exception e) {

    //Code to handle the exception and/or display

    //messages e describing the exception that was

    //raised.
While you are on this topic, you need to learn about the keyword finally. The finally keyword specifies the block of code to be fired regardless of whether an exception was raised. The comments in the following code illustrates this:
try {

    //Code that may throw an exception Exception

catch (Exception e) {

    //Code to handle the exception and/or display

    //messages e describing the exception that was

    //raised.

finally {

    //Run some code here to clean up whether

    //an exception was raised or not

}
| NOTE |
You can catch only methods that have throwable exceptions declared in them (using the keyword throws). For example, in the anilogo applet in the class Thread, you use the method sleep to pause the applet. However, this method is declared to have a throwable exception InterruptedException: public static void sleep(long millisec, int nanosec) throws InterruptedException Because this method is declared to throw InterruptedException, you are able to catch an exception with this method. |
Now that you have briefly learned about exceptions in Java, let's continue with the explanation of the aniLogo code. Consider the following:
public void start() {

        if (myThread == null) {

            myThread = new Thread(this);

            myThread.start();

        }

    }
In the preceding code, you have overridden another of the life cycle methods, start(). Very simply, this code performs an evaluation. If you find that the myThread thread is null, then you build a new thread by creating an instance of the thread. Part of the declaration includes a new keyword, this. The this keyword is a kind of object reference to the current thread. The keyword this is a read-only object variable. By using this special keyword, you can pass a reference of an object to itself or to another method.
The last method to discuss in the aniLogo example is the overridden life cycle method, stop, as shown in the following code:
public void stop() {

        if (myThread != null) {

            myThread.stop();

            myThread = null;

        }

    }
In the stop() method, you are simply evaluating whether the object thread myThread has been made equal to null. If it has not, then you will use the method provided by Thread to stop the thread and set it equal to null.
Your final step is to update your HTML page logo.html (for a copy of logo.html, see Listing 8.6). Listing 8.10 is the updated HTML page that you will use with the appletviewer to exemplify your class anilogo.
Listing 8.10. The logo.html file.
<applet code=anilogo width=500 height=100>

<param name=Text0 value="The">

<param name=Text1 value="Widget">

<param name=Text2 value="Corp">

</applet>
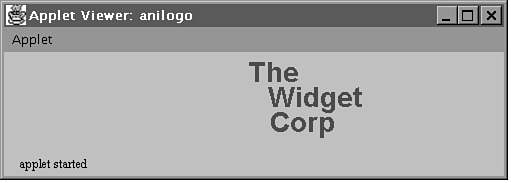
Now that you have learned everything in the example applet, compile and run the applet. When the applet starts, nothing should be on the screen, and then the text should scroll across to the middle of the applet (see Figure 8.11).
In this section, you learn ways to make animation in Java more efficient. As you can tell from the applet anilogo.class in Listing 8.9, every time you make a change to one graphic, it repaints the entire applet pane, causing all the text (moving or not) to flicker because it is continually being redrawn. However, you can minimize the flickering that the applet undergoes every time the repaint method is called. So that the applet doesn't repaint the entire screen every time it needs to update the screen, you will use an overloaded method of repaint to enable you to input four points on the applet, specifying a rectangle. Only graphics inside that rectangle will be updated. The format for using the overloaded method repaint with four input variables follows:
//Repaints  starting point extending the length and width specified.

    repaint(int x, int y, int width, int height)
With that in mind, create a revision to your applet anilogo.class (see Listing 8.11).
Listing 8.11. The AniLogo applet, revision 2.
// aniLogo rev


import java.awt.*;


public class anilogo extends java.applet.Applet implements Runnable {

    Rectangle r;

    // Declare the object variable array StrLine with 3 values.

    String StrLine[] = new String[3];


    Font appFont;


    // Create a Thread object called myThread

    Thread myThread = null;


    // declare width array

    int width[] = new int[3];


    public void init() {


        // A for loop to find the three lines of text.

        for (int i = 0; i < 3; i++) {

            String att = getParameter("Text" + i);

            StrLine[i] = (att == null) ? ("Please put a parameter in

            Text" + i) : att;


        }


        appFont = new Font("Helvetica", Font.BOLD, 28);

        r = bounds();


    }


    // Overide this method from the interface Runnable

    public void run() {

        //Set the current Threads priority.

       Thread.currentThread().setPriority(Thread.NORM_PRIORITY - 1);


        // Initialize the locations of the two lines of text to be

        // off the screen.

        width[1] = 2000;

        width[2] = 2000;

        // Repaint the entire screen

        repaint();


        // Algorithm to send the first line of Text across the screen.

        for ( int i = - 50; i < r.width/2; i += 7) {

            width[0] = i;

            // repaint the entire screen since this is the first line

            // of text currently being drawn.

            repaint();

            // Rest

            Rest(1);

        }


        // Algorithm to send the second line of text across the screen.

        for (int i = r.width + 20; i > r.width/2; i -= 7) {

            width[1] = i;

            // repaint only part of the screen where line two resides

            repaint(0, 30, r.width, 35);

            Rest(1);

        }


        //Algorithm to send the third line of text across the screen

        for ( int i = - 90; i < r.width/2; i += 7) {

            width[2] = i;

            // repaint only part of the screen where line three resides

            repaint(0, 60, r.width, 30);

            // Rest

            Rest(1);

        }


    }


    void Rest(int r) {

        //Rest for a period of time

        try {

            myThread.sleep(100 * r);

        } catch (InterruptedException e) {

            return;

        }

    }


    public void start() {

        if (myThread == null) {

            myThread = new Thread(this);

            myThread.start();

        }

    }


    public void stop() {

        if (myThread != null) {

            myThread.stop();

            myThread = null;

        }

    }


    public void paint(Graphics g) {

        g.setColor(Color.red);


        g.setFont(appFont);


        for (int i = 0; i < 3; i++) {

            g.drawString(StrLine[i],  width[i] + (10 * i), 30 + (25 * i));

        }

    }


}
As you can see in Listing 8.11, the only changes you made were changing the repaint method in the second and third for loops. The following excerpt shows the code that was changed inside the first for loop:
// repaint only part of the screen where line two resides

            repaint(0, 30, r.width, 35);
The preceding code shows that you have specified a rectangle that is the width of the applet, only the height of the second line of text, and placed exactly where line two is located. The changes for the third line of text follow:
// repaint only part of the screen where line three resides

            repaint(0, 60, r.width, 30);
Compile this new revision of the applet anilogo.java, and you can use the same HTML site logo.html to run the new applet. The end result will look the same as Figure 8.11, but the animation will appear to be much smoother. Performing little tricks like this will make your applet better than the rest.
This section describes the ins and outs of designing a user interface (UI) in Java. You will be working with many built-in classes in Java, and you will have a chance to work with the functionality that comes with using Java in UI applications on the Internet. There are many figures to give you plenty of examples of front-end work in Java.
No doubt the first place you need to start is with the command button. The command button is a button on the computer screen that, when pushed, will fire code. A line of code that initializes a command button in Java follows:
Button mycommand = new Button("OK");
The preceding constructor creates a command button with the label OK. Table 8.4 provides an index of all available methods for the object java.awt.Button. Figure 8.12 shows how a command button looks.
Figure 8.11 : The anilogo.java version 1.0, revision 1.
| Method | Explanation |
| getLabel() | Returns a string containing the label of the button. |
| setLabel(String name) | Sets the label for the button using the input variable name. |
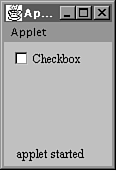
Check boxes set a statement of true or false, typically based on user preference. Check boxes are best implemented when the user can toggle an option on or off. An example of how to declare a check box follows:
Chekbox mycheck = new Checkbox("Checkbox");

add(mycheck);
Table 8.5 lists all the currently available methods for the Java object java.awt.Checkbox. Figure 8.13 shows how a check box looks in Java.
Figure 8.12 : A command button.
| Method | Explanation |
| getCheckboxGroup() | Returns the group to which this check box belongs in the form of the object CheckboxGroup. |
| getLabel() | Returns a string containing the label of this check box. |
| getState() | Returns a Boolean value representing whether the check box is checked (that is, true or false). |
| setCheckboxGroup(CheckboxGroup g) | Changes the CheckboxGroup to which this check box belongs to the specified CheckboxGroup. |
| setLabel(String) | Sets this check box's label. |
| setState(boolean state) | Changes the state of this check box to the specified state. |
| NOTE |
The default value for a check box is false. |
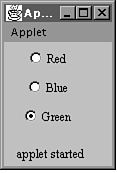
Table 8.5 in the Checkbox class shows several of the methods that deal with the class CheckboxGroup. A CheckboxGroup is a group of check boxes that are grouped. The CheckboxGroup class enables you to associate several check boxes with only one check box that has the ability to be true (that is, checked) at any one time. For example:
CheckboxGroup colors = new CheckboxGroup();
With the constructor in the class Checkbox, you can specify the group and the state for the check box. This is good when there is a finite number of options but only one option that can be active at any one time. The following is the declaration of three colors between which you will be able to toggle:
Checkbox chboxRed = new Checkbox("Red", colors, false);

Checkbox chboxBlue = new Checkbox("Blue", colors, false);

Checkbox chboxGreen = new Checkbox("Green", colors, true)

add(chboxRed);

add(chboxBlue);

add(chboxGreen);
In the preceding code, you created three check boxes. Figure 8.14 shows how this looks in Java. Note that only one is toggled true. Also notice that their appearance is slightly different than traditional check boxes.
| NOTE |
The only two constructors (besides the default) for creating a check box follow: Checkbox chbox1 = new Checkbox("MyCheckbox"); If you want to create a check box that is not part of a group but would automatically toggle to true at startup, use the setState method to change the state of the check box when you construct it. Another way is to construct a check box using the second constructor format but specifying the group to be null: Checkbox chbox3 = new Checkbox("Label", null, true); This will construct a check box that is not related to any group and that will default to a value of true. |
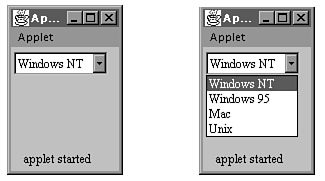
With the Choice component, also known as a combo box in other programming languages, you can create a drop-down list of items from which the user can choose. The Choice component doesn't take up as much space as a list, though, because it can hide its drop-down list. The following code illustrates the only other constructor for the Choice object:
Choice c = new Choice();
After you have created a Choice, you will need to populate it with a list of choices. A Choice cannot be populated when it is constructed; it must be populated afterward, using the method addItem in Table 8.6. An example of how to populate a Choice using the method in addItem follows:
c.addItem("Windows NT");

c.addItem("Windows 95");

c.addItem("Mac");

c.addItem("Unix");

add[c];
This code populates the Choice menu c that you constructed earlier. Figure 8.15 shows how the Choice box looks in the Java environment, based on the preceding code. The box on the right in Figure 8.15 shows the Choice open, exposing its drop-down list.
Figure 8.14 : Check box groups.
| Method | Explanation |
| addItem(String item) | Adds an item to this Choice. |
| CountItems() | Returns the number of items in this Choice. |
| getItem(int index) | Returns a string that represents the specified index value in this Choice. |
| getSelectedIndex() | Returns an integer value representing the index of the currently selected item. |
| getSelectedItem() | Returns a string that represents the currently selected item in this Choice. |
| select(int index) | Selects the item in this Choice based on the integer value specified. |
| select(String value) | An overloaded method that selects the item in this Choice based on the string specified. |
Labels are strings of text displayed on the screen. Labels are like using the drawString method, but you can attach labels to other UI components and put them in containers, resulting in a much more versatile user interface. Two ways to construct labels follow:
Label l = new Label("Hello World");

Label l2 = new Label ("Hello again", Label.LEFT);
You can construct a label by including an input for the text that
will be printed on the applet screen or by introducing another
variable to accept an integer type to specify the alignment of
the label, as shown in the following list:
| CENTER | Specifies the center alignment (integer value of 0). |
| LEFT | Specifies the left alignment (integer value of 1). |
| RIGHT | Specifies the right alignment (integer value of 2). |
Table 8.7 also lists all of the available methods for the class java.awt.Label. To see a Java label, look at Figure 8.16.
| Method | Explanation |
| getAlignment() | Returns an integer specifying the alignment for this label (see the preceding discussion of alignment options). |
| getText() | Returns a string specifying the label. |
| setAlignment(int align) | Sets the alignment for this label based on the integer value (see the preceding discussion of alignment options) for this label. |
| setText(String label) | Changes the text to be displayed for this label based on the specified string. |
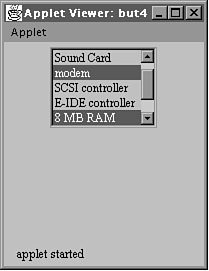
Lists, also known as list boxes, are designed to display a list of items in a scrolling format. Lists function similarly to Choice, though in this case, the list always works as a drop-down menu. Although Choice takes up less space and provides the same function as the list, you can configure the list object to have more than one selection in one box. If you have a list of choices and want the user to choose more than one item at a time, implementing a list is your best bet. The following code shows the format for constructing a list:
List mylist = new List(5, true);
In this syntax, the first input variable for this constructor accepts an integer that specifies the number of rows that should be shown in this list. The second input is a Boolean value that toggles whether this list should support multiple selections. Table 8.8 breaks down the available methods for the object java.awt.List. Using the following code as a guide, add items to your list that correspond to the Choice using the method addItem in Table 8.8:
mylist.addItem("CD-ROM");

mylist.addItem("Sound Card");

mylist.addItem("modem");

mylist.addItem("SCSI controller");

mylist.addItem("E-IDE controller");

mylist.addItem("8 MB RAM");

mylist.addItem("16 MB RAM");

mylist.addItem("32 MB RAM");

add(mylist);
Figure 8.17 shows how this list would look in the Java environment.
Figure 8.16 : An example of a label displaying "Hello World."
| Method | Explanation |
| addItem(String item) | Adds to the end of this list the string specified. |
| addItem(String item, int index) | An overloaded method that adds the string to this list based on specifying the location and passing the integer value. |
| allowsMultipleSelections() | Returns a Boolean value representing whether this list can have multiple selections. |
| clear() | Clears the list. |
| countItems() | Returns an integer value representing the number of items in this list. |
| delItem(int index) | Removes the item specified by the integer value being passed from the list. |
| delItems(int startIndex, | An overloaded method with which you can |
| int endIndex) | specify multiple deletions from this list. |
| deselect(int index) | Deselects the item at the specified location. |
| getItem(int index) | Returns a string representing the item that was selected based on the integer value specified. |
| getRows() | Returns an integer value representing the number of lines visible in this list. |
| getSelectedIndex() | Returns an integer value representing the selected item (-1 if no item was selected). |
| getSelectedIndexs() | An overloaded method that returns an array of integers representing the selected items for this list. |
| getSelectedItem() | Returns a string containing the selected item. |
| getSelectedItems() | An overloaded method that returns an array of strings that contains all of the selected items in this list. |
| getVisibleIndex() | Returns an integer representing the index value for the last item that was made visible by the method makeVisible. |
| isSelected(int index) | Returns a Boolean value based on whether the specified item is selected. |
| makeVisible(int index) | Makes the specified item visible. |
| minimumSize() | Returns the object dimension that contains the minimum dimensions needed for this list. |
| minimumSize(int numofRows) | An overloaded method that returns the object dimension that holds the minimum dimensions needed for a list with the specified number of items. |
| paramString() | Returns a string that contains the parameter of this list. |
| preferredSize() | Returns the object dimension that holds the preferred dimensions needed for this list. |
| preferredSize(int numofRows) | An overloaded method that returns the object dimension that holds the preferred dimensions needed for this list, with the specified number of rows. |
| replaceItem(string, int) | Replaces the item at the specified location with the specified string. |
| select(int index) | Selects the item at the specified location. |
| setMulipleSelections(boolean bool) | Changes whether this list should allow multiple selections based on the value for the Boolean value being passed. |
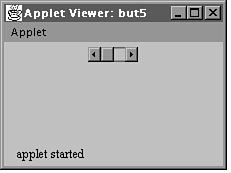
A scrollbar is a horizontal or vertical object that enables the user to scroll through a set of predetermined values. The type of scrollbar talked about in this section is typically used in a stand-alone format. You can construct scrollbars in several ways; one format follows:
Scrollbar myscroll1 = new Scrollbar(Scrollbar.HORIZONTAL);
The scrollbar accepts one input value, which is an integer constant that specifies one of two states: horizontal or vertical. Another more recondite constructor for the scrollbar follows:
//                                  orientation, default value,

paging area, min, max

Scrollbar myscroll2 = new Scrollbar(Scrollbar.VERTICAL, 50, 5, 1, 100);
In the preceding constructor, five integer parameters specify the following, in this order: orientation (that is, vertical or horizontal), which is the default value for the scrollbar; incremental and decremental size, for when the user clicks on the paging area (that is, the area between the thumb and arrows); and the last two input variables specify the minimum and maximum values for the entire scrollbar (1 and 100 in the preceding example). See a sample of the scroll-bar in Figure 8.18. Also for reference, see Table 8.9 for a list of methods that come with java.awt.Scrollbar.
Figure 8.17 : An example of java.awt.List with more than one item selected.
| Method | Explanation |
| getLineIncrement() | Returns an integer value for the increment of the scrollbar. |
| getMaximum() | Returns an integer that represents the maximum value for the scrollbar. |
| getMinimum() | Returns an integer that represents the minimum value for the scrollbar. |
| GetOrientation() | Returns an integer value representing the scrollbar's orientation. |
| GetPageIncrement() | Returns an integer value for the page increment (or decrement) of the scrollbar. This value is fired when the user clicks the area between the thumb and arrows. |
| getValue() | Returns an integer representation for the value of the scrollbar. |
| getVisible() | Returns an integer representation that represents the visible amount of the scrollbar. |
| SetLineIncrement(int value) | Sets the line increment (or decrement) for the scrollbar when using the arrows. |
| SetPageIncrement(int value) | Changes the page increment (or decrement) for the scrollbar. This value is fired when the user clicks the area between the thumb and arrows. |
| setValue(int value) | Sets the value of this scrollbar to the specified value. |
| setValues(int value,
int visible, int minimum, int maximum) | Changes the values for the scrollbar to those specified. |
A text field is a class that represents an area into which the user can enter data. Think of a text field as a label you can edit and design to accept data input. With a text field, you have a maximum of one row to enter information. The width of that row is determined by the number of columns you assign it, as shown in the following listing:
TextField myfield = new TextField(20);

TextField myfield = new TextField("This is my TextField!");

TextField myfield = new TextField ("This is my TextField!", 20);
As you can see in the preceding examples, you construct a TextField in three different ways. The first input specifies the number of columns that this text field can have, the second constructor example constructs a text field with the specified string as default text to be typed in it, and the third constructor shows how to implement a combination of the first two constructs for maximum extendibility. Table 8.10 shows a list of available methods for the class java.awt.TextField, and Figure 8.19 shows an example of a text field.
Figure 8.18 : An example of java.awt.Scrollbar.
| Method | Explanation |
| echoCharIsSet() | Returns a Boolean value based on whether the text field is set for echoing. |
| getColumns() | Returns an integer that represents the number of columns in the text field. |
| getEchoChar() | Returns the character that is echoing for the text field. |
| minimumSize() | Returns the object dimension that contains the minimum dimensions for the text field. |
| minimumSize(int cols) | An overloaded method that returns the object dimension that contains the minimum dimensions for a text field with the specified number of columns. |
| preferredSize() | Returns the object dimension that contains the preferred dimensions for the text field. |
| preferredSize(int cols) | An overloaded method that returns the object dimension that contains the dimensions for a text field with the specified number of columns. |
| setEchoCharacter(char c) | Changes the echo character for the text field. |
| NOTE |
Table 8.10 lists several methods that mention echoing characters. With echoing characters, you can build TextField objects that will not show what the user prints in them. Instead, a specified character will print (or in this case, echo) to represent a placeholder for what the user really typed. Probably the most common example of an echoed TextField is the text field in which you type your password when you are at a login prompt in a Windows interface. |
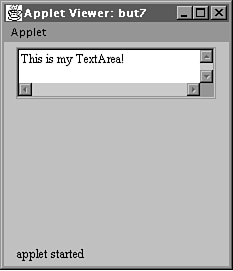
A text area is another form of TextField that enables user input. The only difference is that a text area can have more than one row for inputting information. You can use three constructors to create a text area; see the following listing:
//First                   rows, cols

TextArea t = new TextArea(10, 50);

//Second                   String to put in TextArea

TextArea t2 = new TextArea("This is my TextArea!");

//Third                   String to put in TxtArea, rows, cols

TextArea t3 = new TextArea("This is my TextArea!", 20, 50);


add(t1);

add(t2);

add(t3);
With these three constructors for TextArea, you have
the flexibility to create a text area best suited to your needs.
In fact, the constructs for TextArea are fairly similar
to those for TextField except that in a TextArea,
one more input variable specifies the number of rows. Table 8.11
lists all the methods available to the object java.awt.TextArea.
| Method | Explanation |
| appendText(String text) | Adds the specified text to the end. |
| getColumns() | Returns an integer that represents the number of columns in the text area. |
| getRows() | Returns an integer that represents the number of rows in the text area. |
| insertText(String text, int pos) | Inserts the specified text at the specified point. |
| minimumSize() | Returns the object dimension that contains the minimum dimensions for the text area. |
| minimumSize(int rows, | An overloaded method that returns the object |
| int cols) | paramString(). |
| preferredSize() | Returns the object dimension that contains the preferred dimensions for the text area. |
| preferredSize(int rows, | An overloaded method that returns the object dimension |
| int cols) | that contains the TextArea dimensions with the specified number of columns. |
| replaceText(String text, | Replaces text from the indicated start to end position, |
| int start, int end) | specifying the new text. |
Figure 8.20 shows an example of a text area with the words This is my TextArea! displayed on the screen.
Figure 8.19 : An example of a text field.
| NOTE |
All of the UI components that you have learned have a default constructor that hasn't been shown. This default constructor accepts no parameters. For example: |
Button b = new Button();
One new feature that really helps to make Java shine is its interface called LayoutManager. With this, you can structure components relative to other components in the applet, providing the most flexibility especially because it is very hard to anticipate all the screen formats for all of the environments on which users could potentially run your applet. You can use several layouts when you develop UIs. When you are dealing with any of the UI components discussed in the last section, you will need to form some structure to define how to put them on the screen. The paradigm behind the LayoutManager is that it implements containers into which to put your UI components. In Java, you cannot specify a pixel-by-pixel coordinate to place a UI component on the screen simply because different types of screens and environments will use this same program. Instead, Java utilizes containers, which are built-in objects that hold the UI components in a relative format. You learn four containers in this section, BorderLayout, CardLayout, FlowLayout, and GridLayout.
Use the first container, BorderLayout, as a base container for setting up user interfaces. The logic behind the BorderLayout format is that UI components are described in terms of geographical locations on the applet (that is, "North", "South", "East", "West", and "Center"). See the following listing:
//  Location,  constructor for UI object

add("North", new Button("OK"));
The end result in using BorderLayout is that it orients UI components on relative geographical locations in the container.
The second container, CardLayout, is different from any of the other layout objects because it is the only container that does not show all the UI components on the screen at any one time. An easy way to understand CardLayout is to think of a stack of cards. Only one is on top at any one time, though many others that you can call to the top (that is, show) are underneath.
The FlowLayout container is the easiest to use. As this container displays information, it acts as a typewriter moving left to right, laying out UI components until it runs to the border of the container, and then simply continues on the left side of the next line. The FlowLayout wraps the UI components around the container. The following listing provides an example of how to declare and use the FlowLayout:
setLayout(new FlowLayout());

TextField f = new TextField("My Field", 20);

add(f);
Looking at the preceding code, the setLayout method is what you use to set the type of layout. The next line constructs your components (in this case, a text field), and the last line adds it using the add() method. Note that both setLayout and add come from the java.awt.Component class.
Table 8.12 shows a list of the available methods for FlowLayout.
| Method | Explanation |
| layoutContainer(Container) | Lays out the container. |
| minimumLayoutSize(Container comp) | Returns the object Dimension that contains the minimum dimensions for the container. |
| preferredLayoutSize(Container comp) | Returns the object Dimension that contains the preferred dimensions for the container. |
| toString() | Returns a string of the FlowLayout's values. |
Only with the container GridLayout will you have the most control over placing your components. When you construct a GridLayout, you specify rows and columns in which to place your UI components. You can build a GridLayout that will have three components on each row for five rows. The following code provides one way to construct a GridLayout, where you will place two components on two lines:
// Construct a GridLayout with 2 cols and 2 rows.

setLayout(new GridLayout(2, 2));

// Components to be placed on the first row

add(new Label("First"));

add(new TextField(10));


// Components to be placed on the second row

add(new Button("OK"));

add(new Button("Cancel"));
In this section you create the first version of a UI program. Although you won't be able to build every component you learn in this section, at least you will have an opportunity to work with a few of them to appreciate the general structure of how all UI components are used in Java. Create a file called Win.java and enter the code from Listing 8.12.
Listing 8.12. Win version 1.0, revision 1.
// Win version 1.0 rev


import java.awt.*;


public class Win extends java.applet.Applet {

    public void init() {

        // Set the Layout to FlowLayout

        setLayout(new FlowLayout(FlowLayout.CENTER, 10, 10));


        // Add a Label and a Button

        add( new Label("Please press the button below:"));

        Button show = new Button("Show Window");

        add(show);

    }

}
Notice a couple of things about this applet, beginning with the following line of code:
setLayout(new FlowLayout(FlowLayout.CENTER, 10, 10));
This line of code centers each UI component on the screen. You can also specify two other variables, left and right. The second and third input variables will put 10 horizontal and vertical spaces between each component. Now create your HTML page, call it Windows.html, and type in the HTML code from Listing 8.13.
Listing 8.13. The Windows.html file.
<applet code=Win width=200 height=100>

</applet>
Now compile and run the applet through the appletviewer and you should see Figure 8.21.
Figure 8.20 : An example of TextArea.
However, if you click on the button in Figure 8.21, you see that
nothing happens because you do not have code to handle any event
for the action in this applet. Also, you do not have code under
the button to create a Java window. You learn these topics as
well as see an improved version of the Win applet in
the next section.
| NOTE |
A new frame or dialog box is always invisible until you call the method show(). |
As in any Windows-type environment, you might need to display a separate window to present information to the user. Java recognizes that need and has a built-in class that enables you to create a separate window quite painlessly. With this class, java.awt.Frame (see Table 8.13), you can create a separate window (or, more precisely, frame). Like almost everything else you have constructed in this chapter, you can create a frame by using the new operator to construct an instance of it; see the following:
Frame myframe = new(Frame("WELCOME TO MY JAVA WINDOW!"));
The preceding code constructs myFrame to have a label
of "WELCOME TO MY JAVA WINDOW!".
| dispose() | Removes and frees any resources used by the frame. |
| getCursorType() | Returns an integer that represents the frame's cursor. |
| getIconImage() | Returns the object image that represents the icon image for the frame. |
| getMenuBar() | Returns the object MenuBar that represents the frame's menu bar. |
| getTitle() | Returns a string that represents the title for the frame. |
| isResizable() | Returns a Boolean value based on whether the frame is resizable. |
| remove(MenuComponent menu) | Removes the specified menu bar from the frame. |
| setCursor(int cursorType) | Sets the cursor for the frame to the specified integer constant that represents a set of predefined cursor types. |
| setIconImage(Image icon) | Sets the image icon for the frame. |
| setMenuBar(MenuBar menub) | Sets the Menubar for the frame based on the specified menu bar. |
| setResizable(boolean resizable) | Sets the resizablity of the frame based on the specified Boolean. |
| setTitle(String title) | Sets the title for the frame based on the specified string. |
Figure 8.22 shows how a frame looks.
Figure 8.21 : Show version 1.0.
As you can see in Figure 8.22, nothing is in the frame. Also notice the yellow status bar at the bottom that displays the security level for this frame. Because Netscape has the most stringent level of security on Java, the screen displays something to the effect of "Untrusted Applet Window."
In this final workshop, you will make an improvement to the Win applet that you created earlier. First, see Listing 8.14 to make the appropriate changes to Win.java.
Listing 8.14. Win version 2.0, revision 1.
// Windows version 2.0 rev


import java.awt.*;


public class Win extends java.applet.Applet {

    Frame myFrame = new Frame();


    public void init() {


        // Setup for the applet

        setLayout(new FlowLayout(FlowLayout.CENTER, 10, 10));


        add( new Label("Please press the button below:"));

        Button show = new Button("Show Window");

        add(show);

        add( new Button("Close Window"));


        // Setup info for the Frame

        myFrame.setLayout(new FlowLayout(FlowLayout.LEFT, 10, 10));

        myFrame.setTitle("Welcome to My First Window!");

        myFrame.add(new Label("Please Enter your name in the test box:"));

        TextField textName = new TextField(40);

        myFrame.add(textName);

     }


     public boolean action(Event e, Object arg) {

            if (((Button)e.target).getLabel() == "Close Window") {

                myFrame.dispose();

            }   else if (((Button)e.target).getLabel() == "Show Window") {

                myFrame.show();

                myFrame.resize(300, 175);

            }

            // Return required at the end of this method

            return true;

    }

}
Now that you have updated your program, look at the code in Listing 8.14 to understand what changes you have made and why. First notice that you imported the object event. The action method needs the object java.awt.Event to handle events (such as a mouse click). In Java, action is a method that will be called any time one of the components (for example, text area) is the focus of an event. The following excerpt of code shows the action method:
public boolean action(Event e, Object arg) {

            if (((Button)e.target).getLabel() == "Close Window") {

                myFrame.dispose();

            }   else if (((Button)e.target).getLabel() == "Show Window") {

                myFrame.show();

                myFrame.resize(300, 175);

            }

            // Return required at the end of this method

            return true;

    }
In the preceding code, you are checking your if statement to see whether the target of any action was on a button labeled Close Window. If that statement returns true, then the code will be called to dispose the frame myFrame. The next evaluation is to see whether the Show Window button was selected. If this is true, then the frame will show, resized. Now com-pile this applet and, using the same HTML page, run the appletviewer on the HTML page Windows.html (see Listing 8.13). If all goes well, you should see the applet. This time, click the button Show Window and another window should pop up (see Figure 8.23).
Figure 8.22 : An example of java.awt.Frame.
If you click Close Window, the window will disappear because in doing so, you called the dispose method. Now click the button Show Window again, and the window should pop up. A good question to ask yourself is whether the window is being destroyed and re-created each time you click these buttons, causing the window to appear and disappear. (This question would be good to test whether someone is a true Java programmer.) Let's find out. Type your name in the text field and close the frame. Now show the frame again (that is, click the Show Window button) and look at the text field. Your name should still be in the text field. Answer yes or no, and dispose() releases all of the graphical resources held; when you call the frame to show, dispose() must reallocate them. The object textName will still exist. Note that you did not program other ways to close the window, so this is the only way you will be able to close it.
In this chapter, you have only scratched the surface of Java's built-in classes. Advanced event handling, networking, and working with streams were not covered. Hopefully, this chapter has sparked your interest in continuing to work with Java. For more on Java, reference the "JavaScript" section in this book for a chance to work with some other methods that are presented in the tables but not officially discussed. If you want to plow into newer, more exciting frontiers with Java, try the book Teach Yourself Java in 21 Days from Sams.net Publishing. Based on the material covered in this chapter, you should be able to skim through at least the first 10 days. After that, though, you'll get to work with some really great objects, such as streams. Finally, for an advanced look at Java programming, try Java Unleashed from Sams Publishing.
Although Java is in its infancy, it still has the potential of bringing more to the computer industry than was ever hoped.