


by Robert Niles
This chapter looks at some of the methods available to send information securely across the Net. I know a lot of you are thinking about how to sell a product or service over the Web. Your customers most likely will be thinking about how safe it is to send information such as credit-card numbers to your site. Therefore, this chapter covers some of the security measures being implemented by businesses to safeguard their products and help alleviate some fears that customers face when doing electronic commerce over the Internet.
This chapter also discusses how to configure your server to use CGI and analyzes one of the common mailing scripts, showing you how you can customize the script to suit your business needs. You'll also learn how to control access to some of your pages. Maybe you have an online magazine in which you want to provide access only to users who have "subscribed" to your services. Possibly you want to control access to upgrades of the software you developed. Servers can use CGI to help you control the information vital to the success of your business adventure.
When you finish this chapter, you should see that CGI can open up many doors. With CGI, you no longer just display your information to the users who visit your Web pages, but you can make your Web site more interactive.
By the end of this chapter, you'll know how to
You don't want to leave your credit-card receipts laying around for anyone to come along and steal that information for their own "good" use. You really don't want that same information flying around the Internet with the chance that someone out there with bad intentions will intercept that information-and neither do your customers. How does a customer know that your site is a legitimate business, with legitimate services? How can the customer provide information to buy an item without having to worry that someone will intercept confidential information, such as a credit-card number? There are ways to protect yourself and your customers.
With most client/server programs on the Net today (especially the Web), the information being passed across is in plain text. Anyone with the time and resources can intercept this information and use it for his own malicious means. Lately, security on the Internet has been a hot topic. Most likely, you've read about it in various publications. With the rapid growth of the Net, it has become an important issue-to you and to your customers.
Netscape Communications Corporation provides an RSA encryption
system with its Commerce Server called the Secure Sockets Layer.
SSL-written by Alan O. Freier and Philip L. Karlton of Netscape
Communications, along with Paul C. Kocher-provides a mechanism
in which a client may connect to a server and transmit information
securely without any need to contact and manually configure a
secure method of transport beforehand.
| NOTE |
RSA Data Security Inc. has created data encryption and authentication technologies that have become a standard for use with businesses, financial institutions, and other organizations. RSA provides developer kits and consumer products, and consults with organizations that need methods in which confidential information is secured. For more information on RSA, check out its Web site at http://www.rsa.com/. |
SSL uses a special "handshake" protocol that allows the server and client to authenticate each other and develop an encryption algorithm and cryptographic keys. This protocol accomplishes three things:
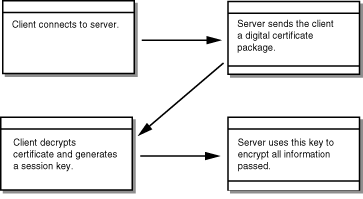
For example, figure 7.1 shows a client requesting to connect to a server. The server then sends a signed digital certificate. The client then decrypts the digital signature and matches it with the certificate. If the signature and the certificate are valid, they're authenticated.
Figure 7.1 : The Netscape server and the client use SSL to establish secure communications.
Next, the client generates a session key and encrypts it with the public key sent with the certificate, and then sends the session key back to the server. The server then uses that key to encrypt and send data back and forth. Of course, there's no guarantee that a client is who it says it is. By using a digital certificate, you're guaranteed that the business using the server is who it says it is, but there's no such requirement for the client.
Future versions of Netscape and Microsoft's Internet Explorer will allow the user to obtain a digital ID to alleviate some of these problems, but even then the chance still exists that someone else will come along and use the client program that belongs to another user.
Netscape has been working to standardize SSL with the Internet
Engineering Task Force (IETF) to ensure an open standard so that
SSL can be incorporated into other applications that want a method
of secure communications.
| NOTE |
Both the Netscape Commerce Server and Secure HTTP Server require a signed digital certificate issued by a Certification Authority (CA), which issues the signed digital certificate that's comprised of two parts, which makes authentication possible. VeriSign, an RSA spin-off, handles the distribution of digital certificates for a fee. An initial one-year certificate costs $290 for the first server, $95 for each additional server in an organization. It costs $75 per year for each server after that. For additional information on VeriSign, see http://www.verisign.com. |
Secure HyperText Transfer Protocol (S-HTTP) is another system to ensure the privacy of the data being transferred across the Internet. S-HTTP was developed by Enterprise Integration Technologies (EIT), RSA Data Security, and the National Center for Supercomputing Applications (NCSA), whose goal was to create a system that's compatible with existing clients and servers.
S-HTTP provides the security of information in which the client and the server use a combination of signatures, authentication, and encryption methods. Each client and server can choose various methods of encryption and authentication, which allow for a variety of standards. S-HTTP secures the transmission at the application level, where SSL sends information at the connection level.
Both methods secure information well, but SSL seems to be the leader-most likely because of the success of Netscape, who, along with CompuServe and IBM, has been investing in Theresa Systems. Even so, it's hard to say what the future will bring. A new specification, called Secure Electronic Transactions (SET), was introduced in February 1996 by VISA and MasterCard, along with Microsoft, Netscape, Theresa Systems, and VeriSign, that will secure bank-card information on the Internet. SET seems to be the protocol that will have the most impact with users as it deals only with financial transactions. Because SET is to be used with finance, it will be allowed outside the United States as well.
CGI 1.1 with the NCSA servers allows for two methods in which to activate scripts on your server: the ScriptAlias directive and the AddType directive.
The ScriptAlias directive tells the server that all files in the directory are scripts or programs to be executed by the server as CGI files. This method ensures that your CGI programs are in specific locations. The cgi-bin directory found in the server root directory is a good example.
The AddType directive allows you to tell the server that any file with the suffix designated is an executable. This directive is useful if you want CGI programs to be placed anywhere within the server.
Both lines are placed in the srm.conf file, which typically is
located in the conf directory in your server root directory. Two
other config files in the conf directory need to be configured
to operate the server as well. An explanation of srm.conf and
the other configuration files can be found at http://hoohoo.ncsa.uiuc.edu/docs/setup/Configure.html.
| NOTE |
ServerRoot is the top-level directory, defined by the server administrator, that the server can access. Use the default server root, which is /usr/local/etc/httpd/. |
The ScriptAlias directive is located in the Server Resource Map file (srm.conf), which listing 7.1 shows. (This file is available through the NCSA http server, which is on the CD-ROM accompanying this book.) The srm.conf file enables you to configure the http server to you and your system's needs. It will allow you to tell the server where the user home pages are, which documents in a directory will be the index document, what picture files will be loaded to indicate the type of file if no index file exists, and so forth.
Listing 7.1 srm.conf: A File That Helps You Configure the http Server
DocumentRoot /usr/local/etc/httpd/htdocs
UserDir public_html
Redirect /HTTPd/ http://hoohoo.ncsa.uiuc.edu/
Alias /icons/ /usr/local/etc/httpd/icons/
ScriptAlias /cgi-bin/ /usr/local/etc/httpd/cgi-bin/
DirectoryIndex index.html index.shtml index.cgi
IndexOptions FancyIndexing
AddIconByType (TXT,/icons/text.gif) text/*
AddIconByType (IMG,/icons/image.gif) image/*
AddIconByType (SND,/icons/sound.gif) audio/*
AddIcon /icons/movie.gif .mpg .qt
AddIcon /icons/binary.gif .bin
AddIcon /icons/back.xbm ..
AddIcon /icons/menu.gif
AddIcon /icons/blank.xbm
DefaultIcon /icons/unknown.xbm
ReadmeName README
HeaderName HEADER
IndexIgnore */.??* *~ *# */HEADER* */README*
DefaultType text/plain
AccessFileName .htaccess
ErrorDocument 403 /errors/forbidden.html
Note the following line from listing 7.1:
ScriptAlias /cgi-bin/ /usr/local/etc/httpd/cgi-bin/
Any URL that references /cgi-bin/ will tell the server to look in the absolute path /usr/local/etc/httpd/cgi-bin/ for the file specified and treat that file as an executable. For example, if a form uses the line
<FORM METHOD = "POST" ACTION = "/cgi-bin/formmail.pl">
the server will look in /usr/local/etc/httpd/cgi-bin and execute the script formmail.pl. The ScriptAlias directive tells the server the full path to the file without letting the end user know how your file system's tree is set up.
The AddType directive is another way to enable CGI programs by adding the following line to the srm.conf file:
AddType application/x-httpd-cgi .cgi
By configuring your system with this directive, any file with the extension .cgi within the server's control will be executed as a CGI program rather than be read as text. This means anywhere! A user can create a script in his or her personal directory and be able to execute it. If the script hasn't been written properly, it could allow the mischievous types access to your file system, password files, and such. It would be nice to allow users the flexibility that CGI programs can create in the development of their Web pages, but the headaches might not be worth it. It would be best simply to provide a wide array of programs that you feel confident about, which the user can access and, if desired, add to their pages. The option is there, and I've seen many cases where it has been necessary.
For example, you may have a server that's shared between two or three departments. Of course, the departments would like to have control over their own CGI applications. It would be up to you to talk with the other departments and figure out a solution that would benefit everyone. One way to go about this would be to create a cgi-bin using ScriptAlias to create a dept1-bin, dept2-bin, and so forth, with each department having control over its own directories. This means that you could be giving up security for convenience. You, as the server administrator, will have to decide how to balance your concern over the security of your server and the needs of other individuals or departments within your organization.
The AddType directive can be expanded to allow programs with extensions other than .cgi to be executed as well. You'll often see scripts ending with .pl (the generally accepted extension for Perl scripts) or .sh (the generally accepted extension for a Bourne shell script). To enable programs with other extensions, simply add them to the AddType directive, as in the following:
AddType application/x-httpd-cgi .cgi .pl .sh
You are by no means limited to these three examples-you can add any extension you see fit. But these are the generally accepted standards and, unless you have a really good reason, I suggest sticking with them.
You have to add one more directive to enable the execution of CGI programs. In the ServerRoot/conf directory is a configuration file called access.conf. This file allows you to set global limitations on how each directory under the ServerRoot can be accessed. It even allows you to control which sites can access these directories. Listing 7.2 shows an example of access.conf.
Listing 7.2 Controlling Access to Certain Portions of Your Server
<Directory /usr/local/etc/httpd/cgi-bin>
Options Indexes ExecCGI
</Directory>

<Directory /usr/local/etc/httpd/htdocs>
Options Indexes FollowSymLinks
AllowOverride All
<Limit GET>
order allow,deny
allow from all
</Limit>
</Directory>
The first line, <Directory /usr/local/etc/httpd/cgi-bin>, is the opening directive, not unlike what you see in writing HTML. It tells the server that everything between it and the closing directive, </Directory>, pertains to /usr/local/etc/httpd/cgi-bin. The second line, which uses ExecCGI, allows for the execution of CGI scripts within that directory.
The second directory, /usr/local/etc/httpd/htdocs, shows some other directives that help control access to the documents directory.
The line Options Indexes FollowSymLinks
tells the server that indexing (showing the contents of a folder)
is allowed, as is the capability to follow symbolic links. This
means that a file outside your ServerRoot can be accessed. FollowSymLinks
(which means "follow symbolic links") is another command
that you might want to be aware of due to the potential problems
that it could create. A symbolic link or symlink is
a "pointer" file that you can create to point to the
location of the actual file. This is often convenient for referencing
a directory or file from more than one location. For example,
some Webmasters put symlinks for each user within the Web server's
document root.
| Caution |
You need to be wary of using symlinks. They can lead to disastrous results, enabling a user to link an innocent-sounding file to your system's format command. |
The AllowOverride directive lets you decide which directives can be overridden by a directory's .htaccess file. (Later, the section "Web Site Subscriptions" covers the .htaccess file in more detail.)
The opening directive, <Limit GET>, sets the limit for how the GET method will be allowed in that directory. With HTTPd, the options to the <Limit> sectioning directive are GET, POST, and PUT (PUT isn't implemented at this time).
The contents between the <Limit> opening directive and the </Limit> closing directive are a set of subdirectives that allow you to control which sites can access your pages or files. The line order allow,deny tells the server to first look at the allow line before looking at the deny line. The next line tells the server to allow all sites to access the pages within that directory. Or you can change the order to deny,allow, which will tell the server to look at the deny line first.
For example, if you have a directory /docs/meetings/ with a set of pages in which you would like only users of the domain name shoe.store.com to access, you can change the <Limit> section to read
<Directory /docs/meetings/>
Options Indexes

 <Limit GET POST>
 order deny,allow
 deny from all
 allow from shoe.store.com
 </Limit>

</Directory>
| Tip |
For more information on the access.conf file and the directives available, see http://hoohoo.ncsa.uiuc.edu/docs/setup/access/access.conf.txt. |
The CERN HTTP server (also called the W3C HTTP server) contains two scripting interfaces. The original interface was written for inclusion in version 1.3 of the W3C HTTP server distribution to provide an easy way to implement CGI programs for use with the server. In later versions, the official CGI was incorporated into the server. For compatibility, it's recommended that you use the official interface so that the programs developed will work with the official Common Gateway Interface.
The CERN server requires only that you edit the /etc/httpd.conf file to enable the use of CGI programs within the server. The directive is quite close to the one used by the NCSA server:
Exec /url-prefix/* /physical-path/*
/url-prefix/ defines the path as seen by the client,
and /physical-path/ is the actual path to the directory
that contains the scripts. For example, Exec /cgi-bin/*
/usr/local/web/cgi-bin/* tells the server that if it
receives the URL http://shoe.store.com/cgi-bin/size_it.cgi, it
should look in the absolute path, /usr/local/web/cgi-bin/, for
the program size_it.cgi.
| NOTE |
When defining the paths for the execution of scripts-with the CERN server and with the NCSA server-the executable directory doesn't have to be /cgi-bin/; it can be any directory you choose. The directory /cgi-bin/ is just the most common place to put CGI scripts. Most Webmasters understand that the contents are indeed CGI applications. |
The Netscape server comes in two flavors: the Communications Server and the Commerce Server (the latter providing secure communications, as described earlier in the section "Introduction to SSL"). There's no difference between the two as far as configuring the server to use CGI. Both come with a convenient point-and-click interface to configure the entire system using the Netscape client (see fig. 7.2).
To make changes to the Netscape server's configuration files,
you need to start the administration server. First, go to the
ServerRoot/admserv directory while logged on as root
and type ./start-admin. This will open up a secure port
in which you can make the desired changes. Load a Netscape client
and connect. Then use the Administration Manager to load up the
Server Manager for the server in which you want to enable CGI.
| CAUTION |
Make sure that you have the administration server up and running only while you want to make changes to the configuration. Leaving the administration server running all the time can seriously compromise the security of your system by allowing someone the chance to invade your system. After you finish with your changes, type stop-admin in the ServerRoot/admserv/ directory to shut down the administration server. |
Next, tell the manager in which directories you would like to have CGI scripts enabled. On the Netscape admin page, click the line Select URL Mapping; from the popup window, select Map a URL to a Local Directory. Then click the line Select CGI and Server Parsed HTML; from the popup window, select Activate CGI as a File Type. Now click Browse Files and select the directory you want activated. After you select the directory, click I'd Like to Activate CGI as a File Type. In the ServerRoot you'll see the following line added to the obj.conf configuration file in the conf directory:
NameTrans from="/cgi-bin" fn="pfx2dir" dir="/usr/local/web/cgi-bin" name="cgi"
This tells the server that /cgi-bin/ is a prefix to the directory /usr/local/web/cgi-bin (much like the ScriptAlias directive with the NCSA server). Any calls to /cgi-bin will automatically be sent to the physical path specified in the dir field. The name=cgi calls on the following lines:
<Object name="cgi">
ObjectType fn="force-type" type="magnus-internal/cgi"
Service fn="send-cgi"
</Object>
This tells the server that this is a CGI directory, and all files within it are to be executed using the internal CGI provided by Netscape.
After you finish configuring the server, submit the form. The server will then provide a link to a script to restart the server so that the changes you made will take effect.
Due to the variety of server software, configuring a server for Windows NT or Windows 95 varies greatly. Although reading the documentation that accompanies the server software will help immensely, most come with an easy-to-use graphics interface to help with installation and access control. Here are a few of the commonly available servers for Windows NT and Windows 95 that use CGI applications:
| NOTE |
Writing CGI scripts for Windows NT and Windows 95 varies a bit with each server package. Most of the common HTTP servers for Windows NT and Windows 95 use a Common Gateway Interface much like their UNIX counterparts. It's suggested that you look at the Windows CGI 1.3 Interface white pages available at http://website.ora.com/wsdocs/32demo/windows-cgi.html. |
As stated earlier, one thing that CGI can do is automate certain aspects of your business. So far, your pages let potential customers know what you have to offer. How can you now let them buy an item or service?
Suppose that you want to sell this book over the Web. First, you
create the pages that tell my customers what the book is about.
You let them see a few excerpts and add other tidbits of information
that let them know what the book is about, and give them a reason
why this book would be useful to them. You've lured them in, and
now they're sitting there, drooling, and thinking, "I have
to have this book!" Okay, now you simply give them a way
to get it.
| TIP |
The first thing you need to do is decide what information you need from the customer. Most likely, you need his or her name, address, and possibly his or her e-mail address and home phone number. The next thing you need to do is let the customer choose what items he or she wants to order (most likely, you aren't selling just one product). Finally, you want to know how the customer is going to pay for the product. Should he or she be mailing the money to your business? Maybe the customer should use a credit card in hopes that the transaction would be faster, or perhaps the customer has already established an account with your business.
Next, you need to decide what you want to do with that information. A good idea is to simply have the information that the user gave you in the form sent via e-mail to someone in the sales department. That department can take that information and finalize the sale. You'll use a CGI script written in Perl that will accomplish this for you. It will take the information and e-mail it to you. All the customer will have to do is complete the form and click Submit.
Now that you know what information you want from the customer, all you have to do is create the form, whose code is shown in listing 7.3. This form is just an example of how to sell this book (see the above tip for more information on how to obtain this book or others by Macmillan Publishing).
Listing 7.3 order.htm: Creating an Order Form for Use with formmail.pl
<HTML>
<HEAD>
<TITLE>Order QUE Books ONLINE</TITLE>
</HEAD>

<BODY>
<H1>Order QUE Books Online</H1>
<p>
<hr>
<H2>Customer Information</H2>

<FORM ACTION="formmail.pl" METHOD="POST">
<INPUT TYPE="hidden" NAME="subject" VALUE="Book Order">
<INPUT TYPE="hidden" NAME="recipient" VALUE="sales@que.books.com">

<pre>
          Name:<INPUT TYPE="text" NAME="realname">
         Email:<INPUT TYPE="text" NAME="email">

<b>Postal Address:</b>
Street (line1):<INPUT TYPE="text" NAME="street1">
Street (line2):<INPUT TYPE="text" NAME="street2">
          City:<INPUT TYPE="text" NAME="city">
         State:<INPUT TYPE="text" NAME="state" SIZE=12>
       Country:<INPUT TYPE="text" NAME="country" SIZE=12>
      ZIP Code:<INPUT TYPE="text" NAME="zip" SIZE=6>

  Phone Number:<INPUT TYPE="text" NAME="phone" SIZE=13>

</pre>
<p>
<hr>
<H2>Product Information</h2>
<p>
<pre>

<INPUT TYPE="checkbox" NAME="SP_Using_CGI" VALUE="order">Special Edition: Using CGI
Quantity:<INPUT TYPE="text" NAME="qnty_CGI" SIZE=4>

<INPUT TYPE="checkbox" NAME="SP_Using_HTML" VALUE="order">Special Edition: Using HTML
Quantity:<INPUT TYPE="text" NAME="qnty_HTML" SIZE=4>

If you would like additional information on other products, or on
bulk purchasing arrangements, please leave us a note:
<TEXTAREA NAME="Comments" ROWS=6 COLS=60> </TEXTAREA>

</pre>
<p>

<H2>Payment information</H2>
<p>
<pre>

Would you like to pay with:<br>

<INPUT TYPE="radio" NAME="CreditCard" VALUE="Visa"> Visa
<INPUT TYPE="radio" NAME="CreditCard" VALUE="MasterCard"> Master Card
<INPUT TYPE="radio" NAME="CreditCard" VALUE="A_Express"> American Express
<INPUT TYPE="radio" NAME="CreditCard" VALUE="Discover"> Discover

Name on credit card:<INPUT TYPE="text" NAME="Full_Name" SIZE=60>
 Credit Card Number:<INPUT TYPE="text" NAME="cc_number" SIZE=19>
    Expiration Date:<INPUT TYPE="text" NAME="expires" SIZE=7>
</pre>
<p>
<INPUT TYPE="submit" VALUE="Process Order">
or
<INPUT TYPE="reset" VALUE="Clear Form">
<p>
</FORM>

</BODY>
</HTML>
Look at figure 7.5. As you see, you have a simple, easy-to-understand interface in which the potential customer can buy the book. As it stands, it's quite plain. You can doctor it up to suit the taste of your company.
You've already learned how to create forms in Chapter 5 "Using HTML and CGI as a User Interface," so I'm not going to go over every detail again. Instead, I'll quickly go over the parts specific to the goal: to sell the book.
You've created your header, which includes the title. The next important step is to tell the server what to do with the information that the user will fill in by using the following line:
<FORM ACTION="/cgi-bin/formmail.pl" METHOD="POST">
When the Submit button is clicked, the information will be sent to the server. The server stores this information into a buffer and then executes formmail.pl from the cgi-bin directory, using the POST method.
You want all the information entered into the form to go to someone in the sales department. For this example, assume that the customer has an account on the system called "sales." The lines
<INPUT TYPE="hidden" NAME="subject" VALUE="Book Order">
<INPUT TYPE="hidden" NAME="recipient" VALUE="sales@que.books.com">
set the TYPE variable as hidden. By doing so,
you can specify to whom this form will be mailed, without users
being able to change it. In other words, they won't even get to
see this field at all.
| TIP |
There's one way in which the user can see these fields. Most browsers let you view the HTML source. Although this varies from browser to browser, in Netscape 2.0, choose Document Source from the View menu. A window will appear to let you see the HTML code for the page. This is a very good way to learn how Web pages have been written. |
The subject field is set to hidden as well. This way, when the sales department gets the message, the staff quickly knows what the message is about. For this reason, you should keep the subject field the same for all book orders; you don't want the customer to change this.
Now you have an interface for the customer that's easy to use.
The example in this chapter will use formmail.pl, a simple script that takes the information from the customer and sends it to the sales department via e-mail. Many other public-domain scripts out there also could accomplish this task. You'll have to take a look at each of these and decide for yourself which would be best for your project.
The formmail.pl script is quite easy to customize to give you the results you want. Listing 7.4 shows formmail.pl in its entirety.
Listing 7.4 formmail.pl: An Easily Configurable CGI Mail Script
#!/usr/bin/perl

#-----------------------------------------------------------
# Form-mail.pl, by Reuven M. Lerner
# (reuven@thetech.mit.edu).
# This package is Copyright 1994 by The Tech.
# Packaged Modified to mail any form to you by Matt Wright
# (mattw@misha.net)
# FormMail is free software; you can redistribute it and/or
# modify it under the terms of the GNU General Public
# License as published by the Free Software Foundation;
# either version 2, or (at your option) any later version.

# FormMail is distributed in the hope that it will be
# useful, but WITHOUT ANY WARRANTY; without even the implied
# warranty of MERCHANTABILITY or FITNESS FOR A PARTICULAR
# PURPOSE.  See the GNU General Public License for more
# details.

# Write the Free Software Foundation, 675 Mass Ave,
# Cambridge, MA 02139, USA.
# If you would like to obtain a copy of the GNU GPL.
# ----------------------------------------------------------

####################################################
# FormMail
# Created by Matt Wright
# Created 6/9/95                Last Modified 9/23/95
# Version 1.2
# I can be reached at:          mattw@misha.net
# Scripts Archive a
#     http://www.worldwidemart.com/scripts/

# Define Variables
$mailprog = '/usr/lib/sendmail';
$date = `/usr/bin/date`; chop($date);

# Get the input
read(STDIN, $buffer, $ENV{'CONTENT_LENGTH'});

# Split the name-value pairs
@pairs = split(/&/, $buffer);

foreach $pair (@pairs){
   ($name, $value) = split(/=/, $pair);

   $value =~ tr/+/ /;
   $value =~ s/%([a-fA-F0-9][a-fA-F0-9])/pack("C", hex($1))/eg;
   $name =~ tr/+/ /;
   $name =~ s/%([a-fA-F0-9][a-fA-F0-9])/pack("C", hex($1))/eg;

   $FORM{$name} = $value;
}

if ($FORM{'redirect'}) {
   print "Location: $FORM{'redirect'}\n\n";
}
else {
   # Print Return HTML
   print "Content-type: text/html\n\n";
   print "<html><head><title>Thank You</title></head>\n";
   print "<body><h1>Thank You For Filling Out This Form</h1>\n";
   print "Thank you for taking the time to fill out my feedback form. ";
   print "Below is what you submitted to $FORM{'recipient'} on ";
   print "$date<hr>\n";
}

# Open The Mail
open(MAIL, "|$mailprog -t") || die "Can't open $mailprog!\n";
print MAIL "To: $FORM{'recipient'}\n";
print MAIL "From: $FORM{'email'} ($FORM{'realname'})\n";
if ($FORM{'subject'}) {
   print MAIL "Subject: $FORM{'subject'}\n\n";
}
else {
   print MAIL "Subject: WWW Form Submission\n\n";
}
print MAIL "Below is the result of your feedback form.  It was\n";
print MAIL "submitted by $FORM{'realname'} ($FORM{'email'}) on $date\n";
print MAIL "---------------------------------------------------------\n";

foreach $pair (@pairs) {
   ($name, $value) = split(/=/, $pair);

   $value =~ tr/+/ /;
   $value =~ s/%([a-fA-F0-9][a-fA-F0-9])/pack("C", hex($1))/eg;
   $name =~ tr/+/ /;
   $name =~ s/%([a-fA-F0-9][a-fA-F0-9])/pack("C", hex($1))/eg;

   $FORM{$name} = $value;
   unless ($name eq 'recipient' || $name eq 'subject' || $name eq 'email'
    || $name eq 'realname' || $name eq 'redirect')
      {
      # Print the MAIL for each name value pair
      if ($value ne "") {
         print MAIL "$name:  $value\n";
         print MAIL "____________________________________________\n\n";
      }

      unless ($FORM{'redirect'}) {
         if ($value ne "") {
            print "$name = $value<hr>\n";
         }
      }
   }
}
close (MAIL);

unless ($FORM{'redirect'}) {
   print "</body></html>";
}
The first line starts with a # and isn't executed as part of the script. It's required, however, because it tells the system where the script can find the Perl interpreter:
#!/usr/bin/perl
The path most likely will vary from system to system, so you may
have to edit this to point to where Perl is installed on your
system.
| TIP |
UNIX provides the commands which and whereis to help you find a program. At the UNIX prompt, type which perl or whereis perl for the path of the Perl interpreter. (Systems vary-if one doesn't work, try the other.) |
After the creator's introductory comments to the script, you have the following line:
$mailprog = '/usr/lib/sendmail';
$mailprog is a variable for use within the script. If you look at the script, you'll see that it's called in other lines. Having this here accomplishes two things:
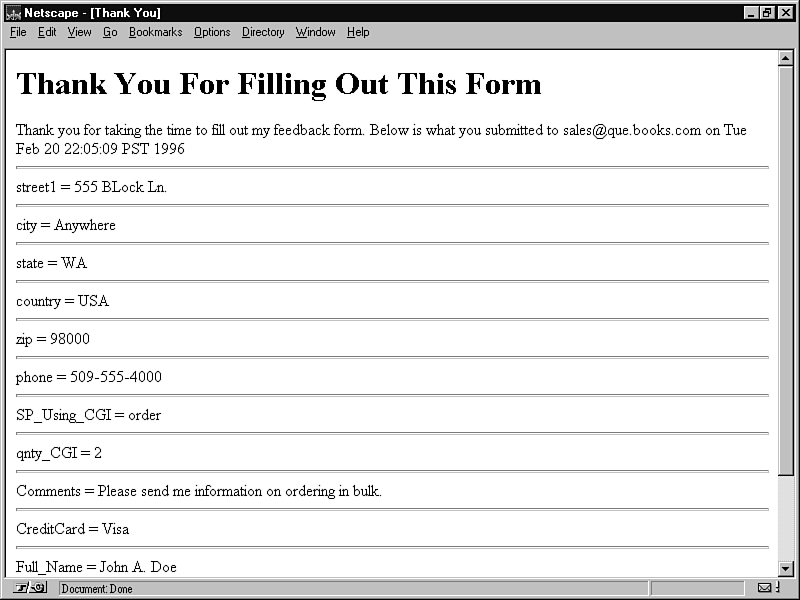
I ran the script and decided the output for the e-mail wasn't exactly to my liking. Listing 7.5 shows what it gave me.
Listing 7.5 Example of the Output Mailed to Sales
Subject: Book OrderDate: Sat, 20 Jan 1996 15:05:50 -0800From:
jdoe@ez.access.com (John Doe)To: sales@que.books.com
Below is the result of your feedback form.  It was submitted by John
Doe (jdoe@ez.access.com) on Sat Jan 20 15:05:50 PST 1996----------------
-----------------------------------------
street1:  555 Block Ln.____________________________________________
city:  Anywhere____________________________________________
state:  WA____________________________________________
country:  USA____________________________________________
phone:  509-555-4000____________________________________________
SP_Using_CGI:  order____________________________________________
qnty_CGI:  2____________________________________________
Comments:   Please send me information on ordering
in bulk.____________________________________________
CreditCard:  Visa___________________________________________
Full_Name:  John A. Doe___________________________________________
cc_number:  345-6743-334-3445____________________________________________
expires:  01/2001___________________________________________
I simply decided that I would like the information together, without the dividing lines. To do this, all I had to do is simply take out the line
print MAIL"________________________________________\n\n";
to give me something like the following:
street1:  555 Block Ln.city:  Anywherestate:  WAcountry:  USAphone:
509-555-4000SP_Using_CGI:  orderqnty_CGI:  2Comments: Please send
me information on ordering in bulk.CreditCard:  VisaFull_Name:
John A. Doecc_number:  345-6743-334-3445expires:  01/2001
This gave me something a little cleaner and easier to read.
Another thing formmail.pl does is create a page on the fly that tells customers exactly what information they entered. Generally, this would be a good place to thank customers for ordering the book.
Look at this section of the script:
else {
   # Print Return HTML
   print "Content-type: text/html\n\n";
   print "<html><head><title>Thank You</title></head>\n";
   print "<body><h1>Thank You For Filling Out This Form</h1>\n";
   print "Thank you for taking the time to fill out my feedback form. ";
   print "Below is what you submitted to $FORM{'recipient'} on ";
   print "$date<hr>\n";
}
First, the MIME Content-type header is sent out, followed by a blank line, followed by a title (or name) for the document. As it stands, it would look like figure 7.6.
Pretty generic, eh? You can change this to suit your needs. All this entails is changing what's located within the print lines, as shown in the following fragment.
else {
   # Print Return HTML
   print "Content-type: text/html\n\n";
   print "<html><head><title>Ordering information</title></head>\n";
   print "<body><h1>Thank you for your order!</h1>\n";
   print "Your order has been submitted to the sales department.\n";
   print "Here is the information you sent on ";
   print "$date,<hr>\n";
}
In figure 7.6 you can also see that lines are between each field. Removing these lines will make the output just a little easier to read. To do so, all you have to do is remove the <hr> tag in the print "name = value<hr>\n"; line to look like this:
unless ($FORM{'redirect'}) {
         if ($value ne "") {
            print "$name = $value\n";
Removing this line makes the page look a little better, as you can see in figure 7.7. It's easier to read, and the information is together rather than separated with the horizontal rule.
Figure 7.7 : Now the page returned to users looks clear as a single item (not so separated).
Another thing you can do to completely customize the results page is simply create an HTML document the way you want and add a line in the order.html document. Suppose that the results document is results.html. Add the following line to the order.html file anywhere between the <FORM> and </FORM> markers:
<INPUT TYPE="hidden" NAME="redirect" VALUE="results.html">
Creating a form and modifying a script to suit your specific needs
isn't too difficult. You don't need to be a Perl programmer to
do this, either. You just have to understand what a few of the
lines in the source code accomplish. You can grab a script, change
it a little, see what it does, and then go on to the next item
you want to customize. After you read this book, I hope customizing
scripts will become second nature to you.
| NOTE |
Although most of the scripts available on the Net are there for the taking, some are not. Make sure that you use or modify only those scripts that the author has released for your (or public) use. It's also nice to make sure that the original authors are credited for their original work. |
Previously, this chapter discussed how you can control access to your pages. But you might not want to have everything off-limits to cyberwanderers. If the pages were off-limits, how could you sell anything? What if you wanted to let the potential customer "in" to browse around, maybe to get a look at the place? Then what if you provided a form so that if the customer were interested, he or she could pay a charge to enter? Or maybe you wanted to create an online magazine that only registered users could access?
Suppose that you have a magazine (also know as 'zines) called ITM Online! that you want available to subscribers on the Net. After you create your beautiful HTML page, how do you control access to it?
As stated earlier in the section "The Access Configuration File," the .htaccess file can be used with the NCSA server. This file lets you define access to your pages that are in the same directory the file is in, or to any subdirectories under it. You'll be able to retrieve the pages, and/or you can control access to the pages by requiring a password. Listing 7.6 is an example of an .htaccess file.
Listing 7.6 An Example .htaccess File
AuthUserFile /usr/local/web/magazine/.htpasswd
AuthGroupFile /dev/null
AuthName ITM_Online
AuthType Basic

<Limit GET>
require valid-user
</Limit
The AuthUserFile needs to point to where the user names and passwords are going to be kept. For this example, use the path and the file .htpasswd. The AuthUserFile can be named anything you want, but if you place a period (.) at the beginning of the file name, the file becomes a hidden file on UNIX systems.
The AuthGroupFile directive tells the server where to look for group authorizations. This file simply contains the user names of the people who you want to have access to this directory. For this example, you don't need a group file (because it contains only user names and doesn't hold password information); therefore, you point it to /dev/null, which in UNIX means that it's a non-file.
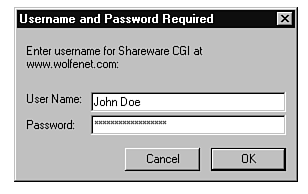
The AuthName directive simply gives the area a name. If you look at figure 7.8, you can see that when users are prompted to enter a user name and password, the AuthName is displayed in the prompt. It simply lets users know what area they're going into so that they can supply the proper user name and password. As you may have guessed, you can have quite a few areas on your system that can be controlled independently through different .htaccess files.
The authentication type, or the AuthType directive, tells the server what authorization method will be used. There isn't too much to tell you about this directive because Basic is the only type supported at this time.
Now you see another directive within the <Limit> sectioning directives, called require. This tells the server which user names can be allowed into the directory. For example, you can supply the line
require user jdoe
and only jdoe will be allowed. In listing 7.6 you have
valid-user. This option tells the server that only the
users listed in the .htpasswd file are authorized to gain access
to this directory.
| TIP |
A few more options aren't covered here, but documentation is available on the Web at http://hoohoo.ncsa.uiuc.edu/docs/setup/access/Overview.html. |
Use of the .htaccess file lets an individual control access to a directory and all the subdirectories within that directory. This is beneficial if you have a multiple-user system. You can place this same information in the conf/access.conf file if you want, but it would mean that even a small change would require you to restart the server. Users can change the .htaccess file without restarting the server and maintain control over their own area. On a server with quite a few users, editing the access.conf file to appease every user would be quite a headache.
After you configure .htaccess to your specific needs, you need to use a program that takes the information from the user, formats it properly, and enters it into the .htpasswd file. HTPASSWD is a program supplied by NCSA that accomplishes this. The only problem with HTPASSWD is that it doesn't like information sent to it via STDIN. It works well within a shell, but it doesn't work with CGI. Luckily, a program called htpasswd.pl, written in Perl by Nem V. Schlecht and later modified by Mark Solomon, can take information via STDIN without difficulties. It can be found on this book's CD-ROM, as well as at http://www.wolfenet.com/~rniles/htpasswd.pl.
Next, because you want subscribing users to be able to access the 'zine, you need to write a script that will interface your registration page with the htpasswd.pl script. You need your script to do three things:
Now that that's all laid out, you can start writing the script that will interface htpasswd.pl with your HTML page. For this example, call the script register.pl (this makes it easier for Webmasters to figure out what the script is for). First, tell the script where it can find Perl:
#! /usr/local/bin/perl
Next, define the things that might change from system to system. Putting all this in one place makes it easier to configure and, if necessary, to change at a later date.
$passfile ="/usr/local/web/magazine/.htpasswd";
$htpasswd ="/usr/local/web/cgi-bin/htpasswd.pl";
$referer ="register.html";
$private_area ="magazine/magazine.html";
You've told it in the $passfile variable where to find the .htpasswd file. Because this is going to be for the magazine, simply create a directory called magazine and place all your pages there with the .htaccess and .htpasswd files. Remember, you can change the name of .htpasswd to whatever you like. However, the generally accepted convention is to name it .htpasswd. Unless you have a very good reason, I suggest sticking with the standard.
Next is the path and name of the htpasswd.pl script. The other variables, $referer and $private, tell the script the name of the HTML files. The first variable tells the script what HTML page the users entered their information in. You should have this here so that if a user enters a name that's already in use, the script will send that user back to try it again. The $private variable gives the user a link to the online magazine after your script confirms the user's unique user name.
Next, if you look at listing 7.7, the information that's passed through CGI is broken up.
Listing 7.7 Breaking Up the Information
if ($ENV{'REQUEST_METHOD'} eq 'POST')
{
     read(STDIN, $buffer, $ENV{'CONTENT_LENGTH'});
     @pairs = split(/&/, $buffer);
     foreach $pair (@pairs)
     {
          ($name, $value) = split(/=/, $pair);
          $value =~ tr/+/ /;
          $value =~ s/%([a-fA-F0-9][a-fA-F0-9])/pack("C", hex($1))/eg;
          $contents{$name} = $value;

     }
}

chop($date = `date`);
| NOTE |
The line chop($date = `date`); isn't really necessary-I use it just in case I would want to add an entry to a log of some sort. Also notice the accent marks around date. This Perl convention has been often confused with single quotes ("). |
Now tell the script that everything is to be sent out as text/html. Without this MIME header, the server doesn't know what type of information is being sent back out.
print "Content-type: text/html\n\n ";
Now, as you can see in listing 7.8, the script checks to see whether the user name already exists in the .htpasswd file.
Listing 7.8 Seeing Whether the User Exists
open (HTFILE, "$passfile");
  until (eof (HTFILE))
  {
     $line =<HTFILE>;
       chop ($line);
       if ($line =~ /$contents{'username'}/)
        {

        close (HTFILE);

        print <<"HTML";
        <HTML><HEAD><TITLE>Sorry, user exists</TITLE></HEAD>
        <BODY>
        <H1>Username: \"$contents{'username'}\" already exists!</H1>
          <p>
          Please select a different username to use.
          <p><HR>
          <a href=\"$referer\">Return to registration page</a>
          </BODY></HTML>
HTML
die;

          }
  }
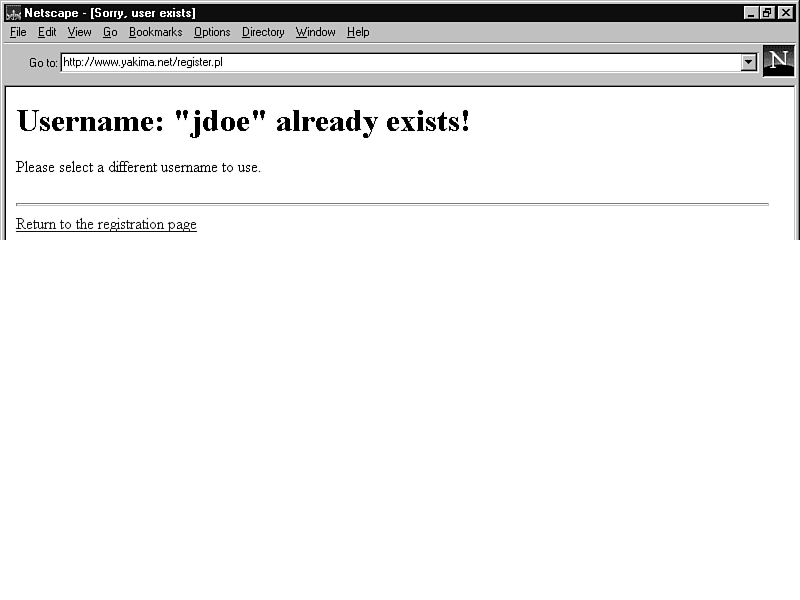
First, do this by opening the .htpasswd file. Then scan through the file one line at a time to see whether anything matches with $contents{'username'}. If so, send a small page alerting the user of this and give him or her a link back to the registration form to try again (see fig. 7.9).
| TIP |
The print <<"HTML"; line takes everything between it and the HTML line and sends it back out to the user. It's a lot easier to use this line than it is to write multiple print statements for each line you want to output. |
If the user name isn't already being used, go ahead and call htpasswd.pl and have it encrypt the password, adding the user name and the encrypted password to .htpasswd. To accomplish this, first call htpasswd.pl and pass it the path and name to your .htpasswd file, along with the user name. If you were running this script from the shell, the command line would look something like this:
% htpasswd.pl /usr/local/web/magazine/.htpasswd jdoe
In the script, you pass that information with variables. The script also needs to send any output from htpasswd.pl to /dev/null. If you recall from earlier, /dev/null is kind of like a black hole to which you can send output you don't really care about. Without this, the script would try to send that output back to the user. You can accomplish all this with one line in the script:
open(HTPASSWD, "|$htpasswd $passfile $contents{'username'}
Â>/dev/null 2>&1");
Now, the script needs to enter the password that the user gave and then close the program:
print HTPASSWD "$contents{'password'}\n";
close(HTPASSWD);
Hooray! You made it! As you can see in listing 7.9, the script gives users a pat on the back and sends them off to view the protected pages. After that, you need to have the script exit gracefully.
Listing 7.9 Letting the User Know That Everything Worked Fine
print <<"HTML";
<HTML><HEAD><TITLE>Entry successful</TITLE></HEAD>
<BODY>
<H1>Entry successful!</H1>
<p>
<hr>
<p>
<H2>You may now view our special online magazine!</H2>
Simply click the link below and then enter your username,
<b>$contents{'username'}</b> and your private password when asked.

<p>
Thank you for registering with us!<p>
Enjoy!!
<p>
<HR>
<A HREF=\"$private_area\">Go read the magazine!!</A>
</BODY>
</HTML>
HTML

exit;
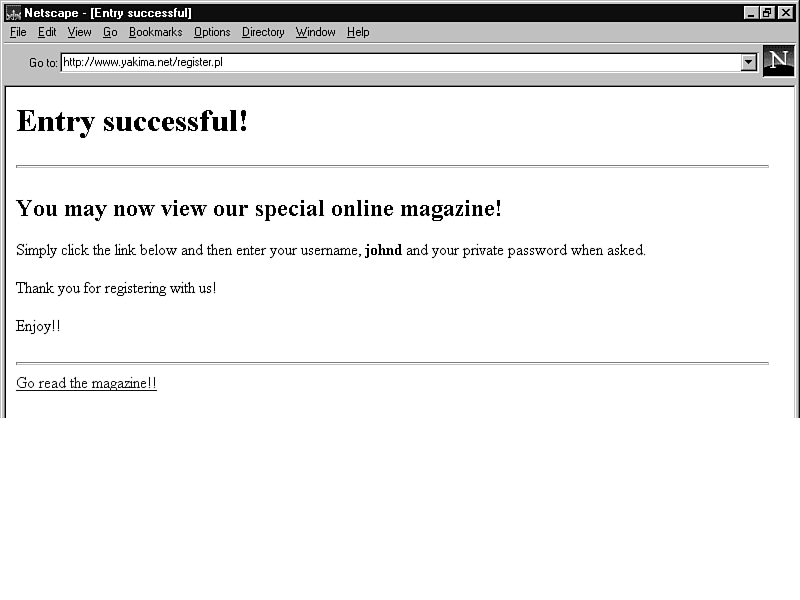
Figure 7.10 shows what users will see when the script accepts the information they provide. It reminds them of the user name that they provided with the form, which keeps the page friendly.
Now you're done! If you look at listing 7.10, you can see how the register.pl script would look in its entirety.
Listing 7.10 register.pl: A Complete Listing of the Example Script
#! /usr/local/bin/perl

$passfile ="/usr/local/web/magazine/.htpasswd";
$htpasswd ="/usr/local/web/cgi-bin/htpasswd.pl";
$referer ="passwd.html";
$private_area ="magazine/magazine.html";

if ($ENV{'REQUEST_METHOD'} eq 'POST')
{
     read(STDIN, $buffer, $ENV{'CONTENT_LENGTH'});
     @pairs = split(/&/, $buffer);
     foreach $pair (@pairs)
     {
          ($name, $value) = split(/=/, $pair);
          $value =~ tr/+/ /;
          $value =~ s/%([a-fA-F0-9][a-fA-F0-9])/pack("C", hex($1))/eg;
          $contents{$name} = $value;

     }
}

chop($date = `date`);

print "Content-type: text/html\n\n ";
open (HTFILE, "$passfile");
  until (eof (HTFILE))
  {
     $line =<HTFILE>;
       chop ($line);
       if ($line =~ /$contents{'username'}/)
     {

     close (HTFILE);

     print <<"HTML";
     <HTML><HEAD><TITLE>Sorry, user exists</TITLE></HEAD>
     <BODY>
     <H1>Username: \"$contents{'username'}\" already exists!</H1>
     <p>
     Please select a different username to use.
     <p><HR>
     <a href=\"$referer\">Return to registration page</a>
     </BODY></HTML>
HTML
die;

     }
  }

open(HTPASSWD, "|$htpasswd $passfile $contents{'username'}
>/dev/null 2>&1");
print HTPASSWD "$contents{'password'}\n";
close(HTPASSWD);

print <<"HTML";
<HTML><HEAD><TITLE>Entry successful</TITLE></HEAD>
<BODY>
<H1>Entry successful!</H1>
<p>
<hr>
<p>
<H2>You may now view our special online magazine!</H2>
Simply click the link below and then enter your username,
<b>$contents{'username'}</b> and your private password when asked.

<p>
Thank you for registering with us!<p>
Enjoy!!
<p>
<HR>
<A HREF=\"$private_area\">Go read the magazine!!</A>
</BODY>
</HTML>
HTML

exit;
You could do a few other things to enhance this script. For instance, you could create a log of everyone who registers for the magazine. You could also edit the script to take more information from the user (real name, address, city, state, and so on).
Now that you have the script created and in place, all you have to do is create a Web page in which the users can send you their user names and passwords. It's not going to be too difficult because all you want from them is a little information. I just happen to have an HTML page handy… (see listing 7.11).
Listing 7.11 register.htm: The Registration Form
<HTML>
<HEAD>
<TITLE>Register with ITM Online!</TITLE>
</HEAD>

<BODY>

<H1>Register with ITM Online!</H1>
<p>
<HR>
<p>

Simply enter a username and password below to enjoy a free
subscription to <b>ITM Online</b> - the premiere <i>online</i> technical magazine concerning the Web!!<p>
<FORM METHOD="POST" ACTION="/cgi-bin/register.pl">
<pre>
Enter a username:<INPUT TYPE="text" NAME="username">
Enter a password:<INPUT TYPE="password" NAME="password">
</pre>
<p>
<hr>
<p>
<INPUT TYPE="submit" VALUE="Submit-it">
</FORM>
</BODY>
</HTML>
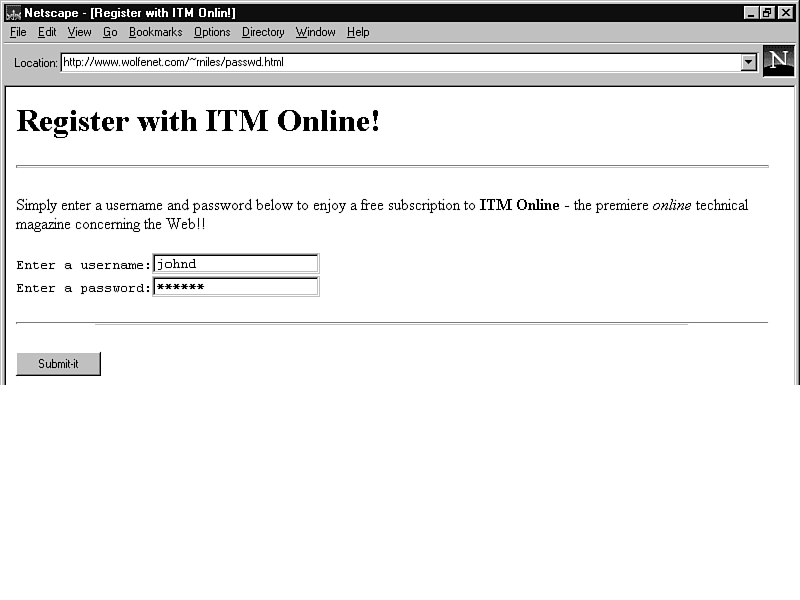
Look at figure 7.11 and notice that you're simply telling the user what the page is about. You then give the user two fields in which to enter the user name and password of choice.
Figure 7.11 : The user fills out and submits this easy-to-use form to gain access to the 'zine.
In the HTML file, notice that the line
<FORM METHOD="POST" ACTION="/cgi-bin/register.pl">
contains the path and name of the script you've just created.
You can doctor up the page with any graphics or additional information to customize the page to your specific needs.