


by Michael Erwin
As you work more and more with CGI, you'll find that many times you can modify an available CGI script to meet your needs. In this chapter, you'll actually modify existing CGI scripts, some of which have been introduced in other chapters.
As you go through this chapter, you'll see some of the inner workings of the scripts. To some of you, this may be the first time you actually work with some of the CGI languages, such as Perl or C. Many authors of CGI scripts go out of their way to make modifying the script easy. Because most of these scripts have developed and matured with time, some authors have made wonderful comments within the actual source code of the CGI application. Others have made modifying their CGI applications as simple as changing the values of variables passed to the script.
In this chapter, you'll learn how to do the following:
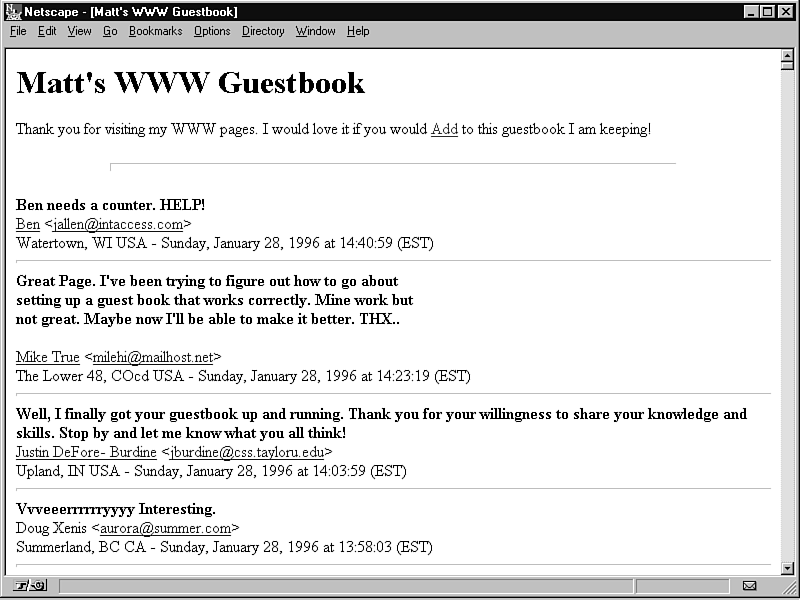
First, you'll set up Matt Wright's guestbook CGI script. This script, written in Perl, is easy to set up and get running. This guestbook script takes inputted HTML form data, as in figure 8.1, and generates an HTML log, like the one in figure 8.2.
Figure 8.1 : Notice that the HTML interface for guestbook.pl is simple and clean.
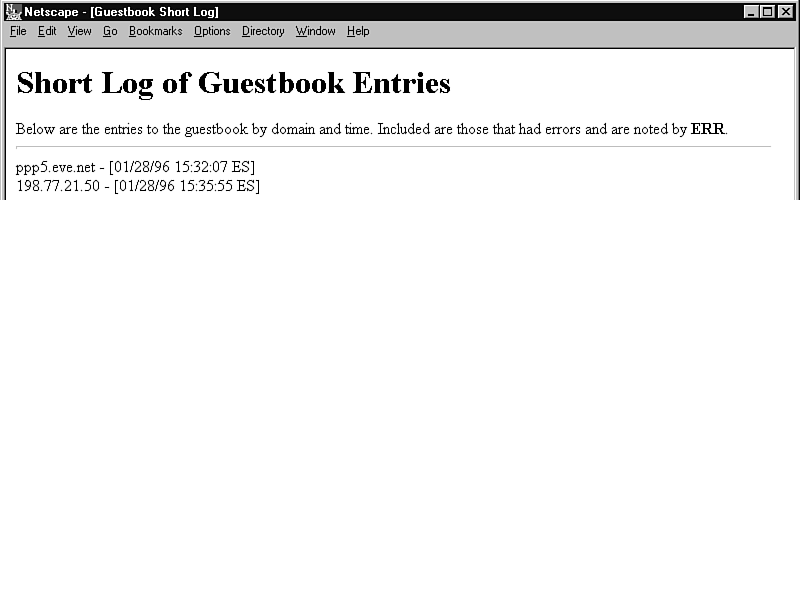
Figure 8.2 : This HTML log is generated by guestbook.pl.
You can find the guestbook.pl CGI script on the CD-ROM, or you can visit http://www.worldwidemart.com/script.
To set up guestbook.pl, you need to make some decisions about how the basic script works. Look at listing 8.1, the beginning of the CGI script and its variable configuration section. This section of Perl code tells guestbook.pl some important information about itself and your site.
Listing 8.1 The Start of guestbook.pl
#!/usr/bin/perl
# Guestbook for the World Wide Web
# Created by Matt Wright           Version 2.3.1
# Created on: 4/21/95              Last Modified: 10/29/95
# Consult the file README for more information and Installation
# Instructions.

###################################################################

# Set Variables
$guestbookurl = "http://your.host.com/~yourname/guestbook.html";
$guestbookreal = "/home/yourname/public_html/guestbook.html";
$guestlog = "/home/yourname/public_html/guestlog.html";
$cgiurl = "http://your.host.com/cgi-bin/guestbook.pl";
$date_command = "/usr/bin/date";
| TIP |
Perl scripts are just ASCII text files, so you can use ASCII text editors to look at and modify the Perl code. |
The first line in the CGI script tells the computer running the
script where the Perl interpreter is and to start it. Perl can
be located just about anywhere on your system, but in this case,
it's located in /usr/bin on a UNIX-based system.
| TIP |
If your Web server is UNIX based, enter one of the following commands at the shell prompt: whereis perl The results of either command will tell you where Perl is located. |
| NOTE |
If you're running a Web server on Windows NT or OS/2, you need to change the initial line of the script to where you installed Perl. For example, if Perl is installed in c:\perl4, you need to change the first line of the CGI script to #/perl4/perl4.exe. |
The next section of the guestbook.pl script contains the variable definitions for the script. The first variable you need to define is $guestbookurl, which is the complete URL of the actual guestbook.html file. In this example, you need to set this variable as follows:
$guestbookurl = "http://www.eve.net/~mikee/guestbook.html";
This tells the CGI script what server the guestbook.html file is located on (http://www.eve.net/). Then it states which user directory it's stored in (~mikee). Lastly, it tells the script the name of the guestbook HTML file (guestbook.html).
If you were running a commercial Web site, this variable could have been something like
$guestbookurl = "http://www.eve.net/guestbook/index.html";
This would allow you to say that the guestbook URL is http://www.eve.net/guestbook/ . To do this, you need to have your INDEX document set to index.html in your server's configuration files. (In my opinion, this makes your guestbook URL seem more professional.)
The next variable in the CGI script, $guestbookreal, tells the script the absolute file path (that is, the "real" location) of your guestbook.html file. On my BSD/OS UNIX system, this line reads like this:
$guestbookreal = "/var/www/docs/guestbook/index.html";
If you're using some of the Windows NT-based Web servers, it may read as follows:
$guestbookreal = "/wwwdocs/guestbook/index.htm";
Whatever you set this variable to, make sure that it points to the actual guestbook HTML file, including the path, or the script won't be able to append the visitor's information to the guestbook HTML file.
The next variable you need to change is $guestlog, which contains the system file path of the guest log HTML file. This file is a simple log of visitors who have added their information and any errors that have occurred (see fig. 8.3). In this example, I'm running a UNIX-based server, so I'm going to change this line to
$guestlog = "/var/www/docs/guestbook/guestlog.html";
Next, you need to tell your CGI script where the CGI script is located. You do this by setting the variable $cgiurl, which contains the complete URL of the CGI script. I'm going to set mine to
$cgiurl = "http://www.eve.net/cgi-bin/guestbook.pl";
This should be close to yours except for the actual host name, www.eve.net. Because you're going to place the CGI script into the cgi-bin, you need to verify where cgi-bin is. On my UNIX-based system, it's in the system file path of /var/www/cgi-bin. On most Windows NT-based servers, however, it will be /cgi-bin. Look in your Web server's configuration files to make sure where you need to put this CGI script.
For this script to work on UNIX-based systems, you also need to define where the date command is located. You define this by using the following line:
$date_command = "/usr/bin/date";
What you should have for the top part of the script now can be seen in listing 8.2.
Listing 8.2 The Modified Beginning of guestbook.pl
#!/usr/bin/perl
# Guestbook for the World Wide Web
# Created by Matt Wright           Version 2.3.1
# Created on: 4/21/95       Last Modified: 1/26/96 by Michael Erwin
###################################################################
# Set Variables
$guestbookurl = "http://www.eve.net/guestbook/index.html";
$guestbookreal = "/var/www/docs/guestbook/index.html";
$guestlog = "/var/www/docs/guestbook/guestlog.html";
$cgiurl = "http://www.eve.net/cgi-bin/guestbook.pl";
$date_command = "/usr/bin/date";
Now it's time to make a few more decisions. In this section, you will be turning options on and off within the CGI script. Listing 8.3 shows the default option settings for guestbook.pl. Like standard computer binary logic, defining a variable equal to 1 means that option will be on, or yes-1 equals on, 0 equals off.
Listing 8.3 The Last Section of guestbook.pl Options
# Set Your Options:
$mail = 0;              # 1 = Yes; 0 = No
$uselog = 1;            # 1 = Yes; 0 = No
$linkmail = 1;          # 1 = Yes; 0 = No
$separator = 1;         # 1 = <hr>; 0 = <p>
$redirection = 0;       # 1 = Yes; 0 = No
$entry_order = 1;       # 1 = Newest entries added first;
                        # 0 = Newest Entries added last.
$remote_mail = 0;       # 1 = Yes; 0 = No
$allow_html = 1;        # 1 = Yes; 0 = No
$line_breaks = 0;     # 1 = Yes; 0 = No

# If you answered 1 to $mail or $remote_mail you will need to fill
# out these variables below:
$mailprog = '/usr/lib/sendmail';
$recipient = 'you@your.com';
| CAUTION |
If you're now running a Windows NT- or Windows 95-based Web server with Perl, you need to leave $mail turned off ($mail=0) because the MAIL section of this CGI script doesn't currently work on these platforms. This isn't to say it couldn't be forced to, but that would go beyond the scope of this book. |
The first option you need to set is $mail. If you set
the mail option to on, you're notified by an e-mail message when
someone enters a new listing in your guestbook file. Before you
turn this option on, consider this: If your Web site is very active,
and many people enter their information into your guestbook, you'll
be swamped with inbound mail. But if your site isn't very active,
these messages won't be a problem.
| NOTE |
If your Web server hardware is a little on the low-end side (486DX-33 or less), you might want to think about what CGI scripts you put on your system. Every active CGI script you install places a load on the Web server. So you'll want to make sure that you have the hardware to handle CGI. |
If you decide to turn the $mail option on-$mail=1-you need to define two additional variables: $mailprog and $recipient. The $mailprog variable tells the CGI script where the mail software is located and what command starts it. In this case, using a BSD/OS UNIX system, I use sendmail to handle the e-mail notification, which is located in the /usr/lib directory. The last variable to define for using mail is $recipient. This tells the mail program to what e-mail address you want the notification sent. As shown in the following code fragment, this variable is defined as $recipient='mikee@eve.net':
$mailprog = '/usr/lib/sendmail';
$recipient = 'mikee@eve.net';
The second option to think about is $uselog. This option
tells the script to keep a small log file on visitors and errors.
I recommend leaving this option on (the default) because you want
to know of any errors that occur with the CGI script.
| TIP |
Turn the log on for the first few weeks to see where there are any problems with CGI script. After you feel that everything is working okay, you can turn the logging feature off. |
The next option, $linkmail, makes the visitor's e-mail address a hyperlink. Rather than just the guestbook display of a simple e-mail address of the visitor, the CGI script puts the hyperlink tags within the guestbook file. Compare figures 8.4 and 8.5; figure 8.4 doesn't have linkmail turned on, but figure 8.5 has it set to $linkmail=1. This allows you, or anyone else, to click the visitor's e-mail address to send the visitor mail-but only if the Web browser supports the mailto tags.
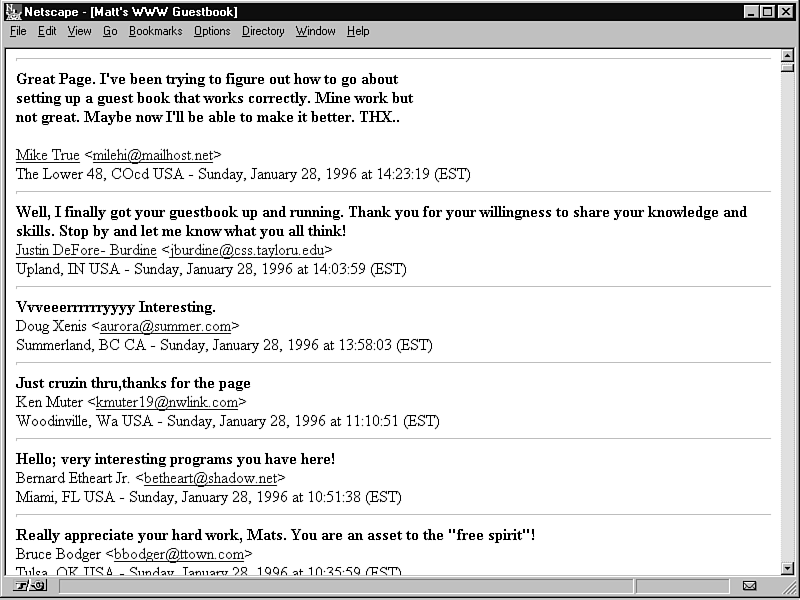
The fourth option to think about is $separator. This is how the CGI script handles the separation of guestbook entries. You can have the default of $separator=1, which produces HTML output that uses the horizontal rule (<HR>) tag as a separator (see fig. 8.6). Or you can set the separator option to 0, which produces HTML output that uses a paragraph (<P>) tag as the separator between the guestbook entries (see fig. 8.7).
Figure 8.6 : This Guestbook HTML output has <HR> tags within the HTML output, or $separator=1.
The option of $redirection allows you to decide how your implementation of the guestbook script sends URL redirection to the users' browsers. The default setting for this option, $redirection=1, determines what URL visitors receive after submitting their FORM information. If this option is turned on, the CGI script sends a message to the browser that tells the browser to load the page you set up with the variable $guestbookurl. In this case, it's
$guestbookurl="http://www.eve.net/guestbook/index.html".
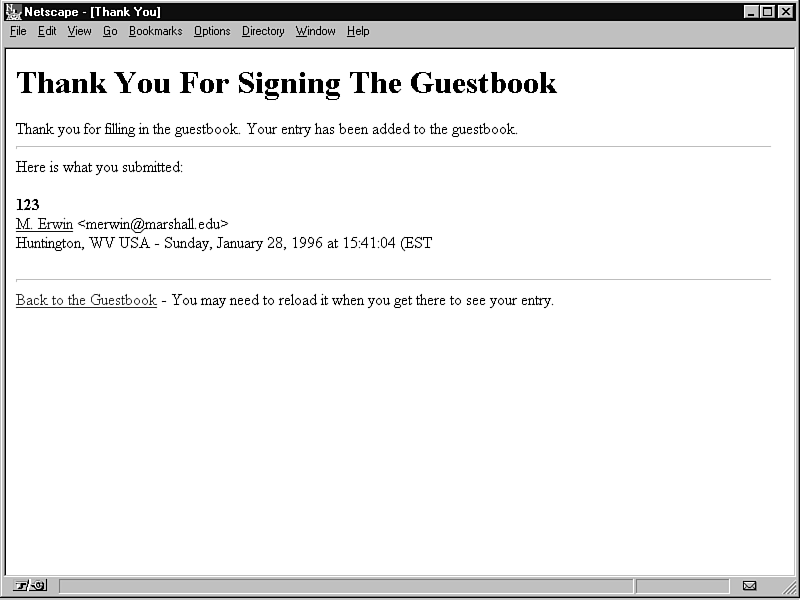
If you set the option to $redirection=0, or off, the CGI script sends a thank-you page to each visitor that also includes his FORM information (see fig. 8.8).
| NOTE |
Lynx, a text-only Web browser, doesn't handle redirection well, which is why the $redirection option is helpful/needed. Leave redirection off ($redirection=0) to keep Lynx users from receiving an error message. |
With the next option, $entry_order, you can tell the CGI script how to place new entries to your guestbook in the HTML file. If you set $entry_order to 0, the CGI script adds the newest visitor's entry at the bottom of the guestbook.html file. This causes you, and others viewing guestbook.html, to scroll through the entire file to see the newest entries. You may decide to leave the option at $entry_order=1, or on, so that the newest entries are at the top of guestbook.html. In this example, use the default, newest entries first.
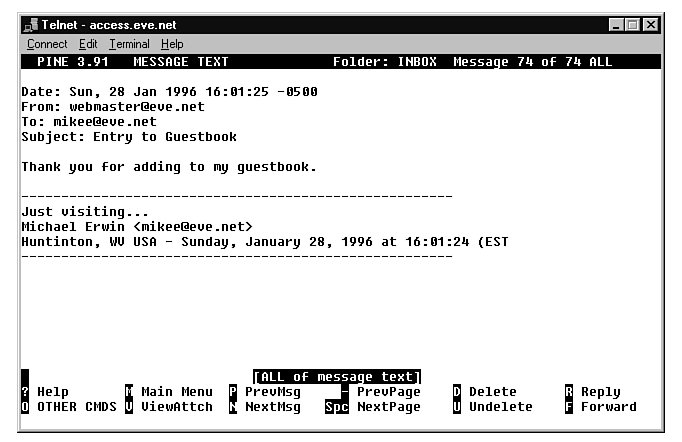
One of the nice things you can do with this CGI script is send a nice thank-you message to visitors (if they leave their e-mail address). You can do this by turning on the $remote_mail option ($remote_mail=1). If you turn this option on, the script automatically sends visitors a message that looks something like figure 8.9.
Figure 8.9 : Shown here is the Guestbook script's thank-you e-mail message, as viewed from PINE.
If you turn on the $remote_mail option ($remote_mail=1),
you might need to define two additional variables: $mailprog
and $recipient. These are the same variables that you
define with the $mail option. If you've already defined
these variables, you don't need to define them again.
| CAUTION |
If you're running a Windows NT- or Win95-based Web server with Perl, you need to leave $remote_mail turned off ($remote_mail=0) because the MAIL section doesn't currently work on these platforms. As stated before, this isn't to say it couldn't be forced to, but that would go beyond the scope of this book. |
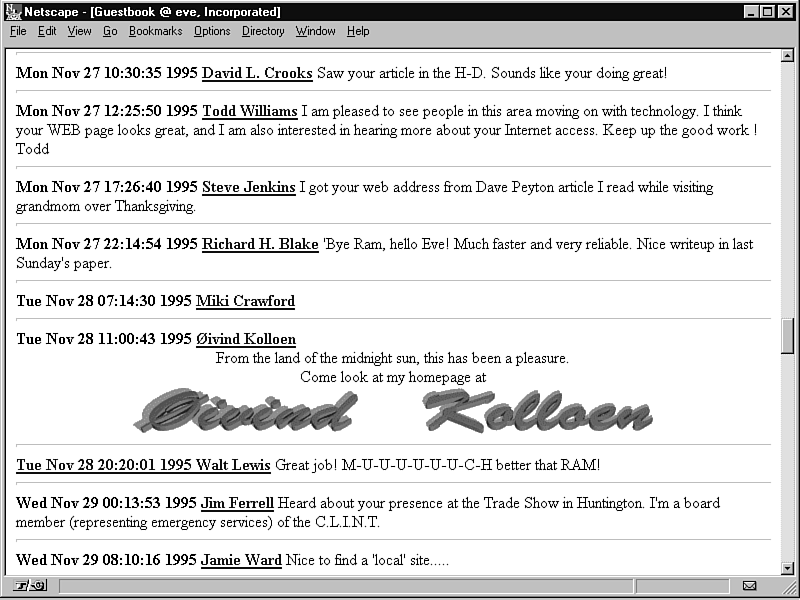
As you can see in figure 8.10, some visitors get very creative with the HTML tags they put into your guestbook. For example, this visitor inserted an inline image that's hyperlinked to his home page in Norway. He could have just as easily inserted other HTML tags, such as <I> or <BLINK>. There's nothing wrong with allowing visitors to insert HTML tags like this-just be aware of it.
Figure 8.10 : A visitor inserts HTML embedded tags within his comments.
You have the option of not allowing visitors to insert HTML tags within the comments. If you change the option $allow_html from its default of on to off ($allow_html=0), this CGI script won't allow any HTML code within the visitor's comments or any other field on the form. The setting of this option has no effect on the e-mail link.
The last option you have for this CGI script is whether you want line breaks in the visitor's comment field to be turned into <BR> tags. The default for this option is $line_breaks=0, or off.
Now to put the finishing touches on the modified guestbook.pl script, in this section you'll be saving the modified version and place some files into their correct places that correspond to your setup.
You should now have the top of the guestbook.pl script looking something like listing 8.4. Save your edited version of guestbook.pl script. Based on how you defined the variables and set up the script options, you need to move some files now.
Listing 8.4 The Top Section of the Modified guestbook.pl
#!/usr/bin/perl
# Guestbook for the World Wide Web
# Created by Matt Wright           Version 2.3.1
# Created on: 4/21/95       Last Modified: 1/26/96 by Michael Erwin
###################################################################
# Set Variables
$guestbookurl = "http://www.eve.net/guestbook/index.html";
$guestbookreal = "/var/www/docs/guestbook/index.html";
$guestlog = "/var/www/docs/guestbook/guestlog.html";
$cgiurl = "http://www.eve.net/cgi-bin/guestbook.pl";
$date_command = "/usr/bin/date";

# Set Your Options:
$mail = 0;              # 1 = Yes; 0 = No
$uselog = 1;            # 1 = Yes; 0 = No
$linkmail = 1;          # 1 = Yes; 0 = No
$separator = 1;         # 1 = <hr>; 0 = <p>
$redirection = 0;       # 1 = Yes; 0 = No
$entry_order = 1;       # 1 = Newest entries added first;
                        # 0 = Newest Entries added last.
$remote_mail = 0;       # 1 = Yes; 0 = No
$allow_html = 1;        # 1 = Yes; 0 = No
$line_breaks = 0;       # 1 = Yes; 0 = No

# If you answered 1 to $mail or $remote_mail you will need to fill
# out these variables below:
$mailprog = '/usr/lib/sendmail';
$recipient = 'mikee@eve.net';
| NOTE |
If you're running guestbook.pl on an operating system other than UNIX, you may need to add the line require "ctime.pl" after #!/this/that/perl. Next, edit the script by changing every instance of $date with $date = $ctime(time);. |
First you need to move the Perl CGI script, guestbook.pl, into your Web server's cgi-bin directory. Look at your Web server's configuration files to find out where this directory is located on your system. On my BSD/OS system, I copy the script into /var/www/cgi-bin. If you're running a UNIX-based system, you need to chmod the rights of the file to 751. You can do this by typing the following at the UNIX shell prompt:
chmod 751 guestbook.pl
The next step is to create the guestbook subdirectory in your Web server's document directory. You'll need to look at your Web server's configuration again. In my case, this will be /var/www/docs; if you're using a Windows NT Web server, your Web documents might be in c:\wwwdocs. After you determine where to put the HTML files, use mkdir to create the guestbook subdir-ectory. If you're using UNIX, be sure to chmod the directory to 751. You can do this by typing the following at the UNIX shell prompt:
chmod 751 /var/www/docs/guestbook
After you have the subdirectory set up, copy the files guestbook.html, guestlog.html, and addguest.html into it. Make sure that you're in the guestbook subdirectory, and then rename guestbook.html to index.html, as defined in the variables. Then you need to do the following chmods:
chmod 751 guestbook/index.html
chmod 754 guestbook/guestlog.html
chmod 751 guestbook/addguest.html
| CAUTION |
Be very careful of what you set to world readable, writable, and executable. Setting a program or files to world readable, writable, and executable means that everyone who can access your system can modify, delete, or change data or programs. |
Because you already know HTML, edit the index.html and addguest.html files to insert your Web server's URL into the appropriate places. One other change you might want to consider deals with the addguest.html file. If you don't want users to be able to put their URL into the document, not only do you need to set $allow_html to on, but you need to remove the following line from the addguest.html file:
URL: <input type=text name=url size=50><BR>
You're now ready to put hyperlinks in your existing home page to access guestbook.pl. You might want to do something like what's shown in the following script fragment. Through the visitor's browser, this will look like figure 8.11.
Figure 8.11 : This is one way of adding hyperlinks to the guestbook.pl script.
Please <A HREF="http://www.eve.net/guestbook/addguest.html">sign
</a> our <A HREF="http:/www.eve.net/guestbook/index.html"> guestbook</A>.
For more information on basic operation and upgrades to guestbook.pl,
check out http://www.worldwidemart.com/scripts.
| NOTE |
Don't forget to put the URL of your Web server into the CGI script. |
You can try your modifications out by using your browser and loading the URL http://www.http://www.yourhost.com/guestbook/addguest.html. After you submit the HTML form, try loading the URL http://www.yourhost.com/guestbook/index.html. (or wherever you set the guestbook URL to). You should see the data you entered in the HTML form in the guestbook index.html file. If it doesn't work, check the guestlog.html file. If that doesn't help you figure what the problem is, verify that you have the correct access rights on the files and directories. If a problem still exists, you can also check out the FAQ at URL http://www.worldwidemart.com/scripts/.
You're now done with guestbook.pl. The CGI script should work very well for you. As you've seen, installing and setting up CGI script can be pretty easy.
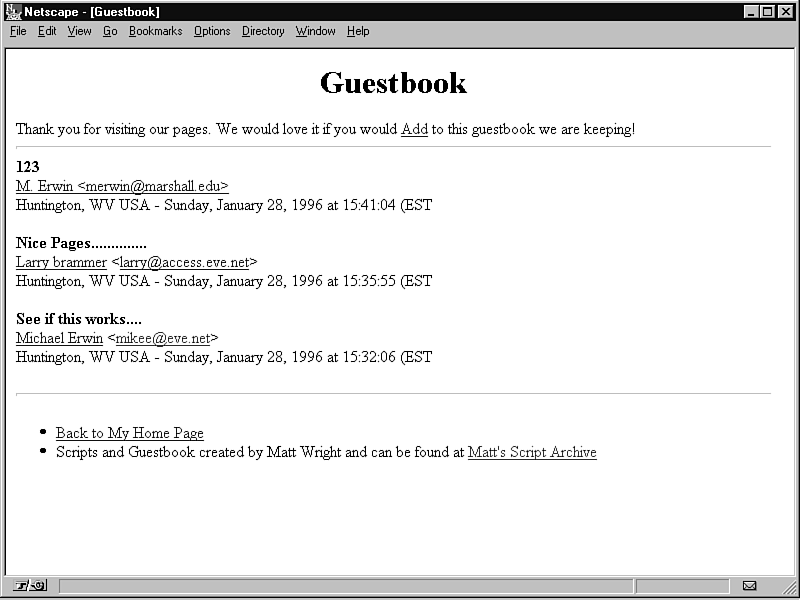
Now that the hard part is done, you'll tackle a simple CGI modification. In this example, you'll modify the guestbook CGI Perl script that you just installed. The CGI script is simple, but you want to change it from being a guestbook to a CGI script that creates an HTML list of your friends' and clients' Web sites. First, you need to decide what HTML items you want to keep and what you want to get rid of.
Because this is to be a list of friends' Web sites, you want the Web site name, an URL, and a comment about the site. You don't need a date and time. The following shows a section of the HTML output that guestbook.pl generates:
<b>Nice Pages..............</b><br> <a href="http://www.eve.net">Larry brammer</a> <<a href="mailto:larry@access.eve.net">larry@access.eve.net</a>> <br> Huntington, WV USA - Sunday, January 28, 1996 at 15:35:55 (EST) <hr>
You need to remove the date and time from the HTML output, and then change the e-mail name and the corresponding URL tag to the Web site name and the appropriate URL. Thus, the HTML output should look like this:
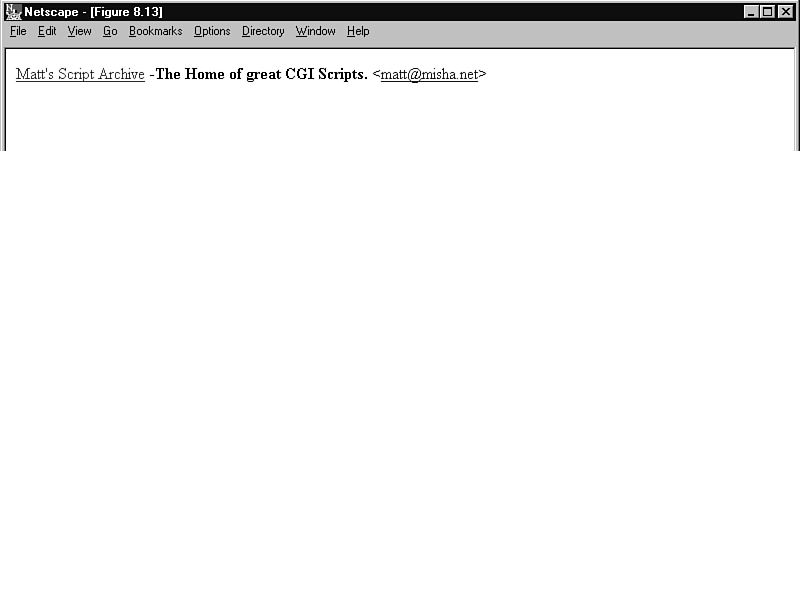
<a href="http://www.worldwidemart.com/scripts/">Matt's Script Archive</a>- <b>The home of great CGI scripts.</b> <<a href="mailto:matt@misha.net">matt@misha.net</a>><br> <hr>
If the HTML log is made up of HTML code like in the preceding example, the user's browser will render it to look something like figure 8.12.
Figure 8.12 : The Friends' script site log is the rendered HTML.
In this section, you will modify the installed guestbook.pl to make it a CGI script to create a list of Web sites. The first thing to do is complete the ini-tial setup of the CGI script-an easy task. Because you've already installed the guestbook.pl script, go to your cgi-bin directory and copy the script to wwwsites.pl. Then start your favorite ASCII text editor and load wwwsites.pl. In my case, it looks like listing 8.5.
Listing 8.5 The Modified and Installed guestbook.pl
#!/usr/bin/perl
# Guestbook for the World Wide Web
# Created by Matt Wright           Version 2.3.1
# Created on: 4/21/95       Last Modified: 1/26/96 by Michael Erwin
###################################################################
# Set Variables
$guestbookurl = "http://www.eve.net/guestbook/index.html";
$guestbookreal = "/var/www/docs/guestbook/index.html";
$guestlog = "/var/www/docs/guestbook/guestlog.html";
$cgiurl = "http://www.eve.net/cgi-bin/guestbook.pl";
$date_command = "/usr/bin/date";

# Set Your Options:
$mail = 0;              # 1 = Yes; 0 = No
$uselog = 1;            # 1 = Yes; 0 = No
$linkmail = 1;          # 1 = Yes; 0 = No
$separator = 1;         # 1 = <hr>; 0 = <p>
$redirection = 0;       # 1 = Yes; 0 = No
$entry_order = 1;       # 1 = Newest entries added first;
                        # 0 = Newest Entries added last.
$remote_mail = 0;       # 1 = Yes; 0 = No
$allow_html = 1;        # 1 = Yes; 0 = No
$line_breaks = 0;          # 1 = Yes; 0 = No

# If you answered 1 to $mail or $remote_mail you will need to fill
# out these variables below:
$mailprog = '/usr/lib/sendmail';
$recipient = 'mikee@eve.net';
First, you need to edit the script's variables. If you compare listing 8.6 with listing 8.5, notice that I changed $guestbookurl, $guestbookreal, $guestlog, and $cgiurl so that the installed guestbook.pl script will not overwrite the files. I also changed the directory in $guestbookurl and $guestbookreal. This means that I need to create a directory below the Web server's root Web document directory-/var/www/docs with a subdirectory name of wwwsites, or /var/www/docs/wwwsites.
Listing 8.6 wwwsites.pl: The Converted guestbook.pl
#!/usr/bin/perl
# WWWSITES.PL from the Guestbook for the World Wide Web
# Created by Matt Wright           Version 2.3.1
# Created on: 4/21/95       Last Modified: 1/26/96 by Michael Erwin
###################################################################
# Set Variables
$guestbookurl = "http://www.eve.net/wwwsites/index.html";
$guestbookreal = "/var/www/docs/wwwsites/index.html";
$guestlog = "/var/www/docs/wwwsites/wwwlog.html";
$cgiurl = "http://www.eve.net/cgi-bin/wwwsites.pl";
$date_command = "/usr/bin/date";
I also changed the $guestlog variable contents to point to an HTML file named wwwlog.html in the subdirectory /var/www/docs/wwwsites. This log file will contain what sites are added and any CGI script errors. Notice that I also changed the $cgiurl variable. I had to change it because I copied the guestbook.pl to create wwwsites.pl.
The next part of the CGI script that needs to be modified is the guestbook options. Now for the wild part: Change only two options from their original default settings. The first option you should change is the $allow_html, which controls whether the user can put HTML tags within the form fields. Change it to $allow_html=0.
The second option you should change is $redirection, which should be $redirection=1. This saves a lot of CGI script rewriting now. The modifications should now look like the Perl code in listing 8.7.
Listing 8.7 The Options Area of wwwsites.pl
# Set Your Options:
$mail = 0;              # 1 = Yes; 0 = No
$uselog = 1;            # 1 = Yes; 0 = No
$linkmail = 1;          # 1 = Yes; 0 = No
$separator = 1;         # 1 = <hr>; 0 = <p>
$redirection = 1;       # 1 = Yes; 0 = No
$entry_order = 1;       # 1 = Newest entries added first;
                        # 0 = Newest Entries added last.
$remote_mail = 0;       # 1 = Yes; 0 = No
$allow_html = 0;        # 1 = Yes; 0 = No *
$line_breaks = 0;       # 1 = Yes; 0 = No
| TIP |
If you decide to use $remote_mail=1 to send a thank you to the user, you should modify the wording in the MAIL sections of the Perl script so that it will reflect that it's not a guest book follow-up. |
| NOTE |
If you're running wwwsites.pl on an operating system other than UNIX, you may need to add the line require "ctime.pl" after #!/this/that/perl. Next, edit the wwwsites.pl script by changing every instance of $date with $date = $ctime(time);. This will allow the date and time to still be reflected in the log file. |
Now you need to make a few changes to the Perl source code. Find the line in the code that reads if ($entry_order eq '1') {. To change the output HTML code, change this section of code from what appears in listing 8.8 to that in listing 8.9.
Listing 8.8 A Section of Perl Code from guestbook.pl
if ($entry_order eq '1') {
print GUEST "<!--begin-->\n";
}
if ($line_breaks == 1) {
$FORM{'comments'} =~ s/\cM\n/<br>\n/g;
}
print GUEST "<b>$FORM{'comments'}</b><br>\n";
if ($FORM{'url'}) {
print GUEST "<a href=\"$FORM{'url'}\">$FORM{'realname'}</a>";
}
else {
print GUEST "$FORM{'realname'}";
}
if ( $FORM{'username'} ){
if ($linkmail eq '1') {
print GUEST " \<<a href=\"mailto:$FORM{'username'}\">";
print GUEST "$FORM{'username'}</a>\>";
}
else {
print GUEST " <$FORM{'username'}>";
}
}
Listing 8.9 A Section of Perl Code from wwwsites.pl
if ($entry_order eq '1') {
print GUEST "<!--begin-->\n";
if ($FORM{'url'}) {
print GUEST "<a href=\"$FORM{'url'}\">$FORM{'realname'}</a>- ";
}
else {
print GUEST "$FORM{'realname'}- ";
}
if ($line_breaks == 1) {
$FORM{'comments'} =~ s/\cM\n/\n/g;
}
print GUEST "<b>$FORM{'comments'}</b>\n";
}
if ( $FORM{'username'} ){
if ($linkmail eq '1') {
print GUEST " \<<a href=\"mailto:$FORM{'username'}\">";
print GUEST "$FORM{'username'}</a>\>";
}
else {
print GUEST " <$FORM{'username'}>";
}
}
You also need to modify the CGI script so that the date and time aren't printed. Find the line in the Perl source code that reads if ($separator eq '1') {. To remove the date from the HTML output, change this section of code from what appears in listing 8.10 to what's in listing 8.11. After you make this change, save the text file as wwwsites.pl.
Listing 8.10 Another Section of Perl Code from guestbook.pl
if ($separator eq '1') {
    print GUEST " - $date<hr>\n\n";
 }
 else {
    print GUEST " - $date<p>\n\n";
}
Listing 8.11 Another Part of the Perl Code with Modification to wwwsites.pl
if ($separator eq '1') {
    print GUEST " <hr>\n\n";
 }
 else {

    print GUEST " <p>\n\n";
 }
After you save the newly modified wwwsites.pl script, move it to your Web server's cgi-bin subdirectory. Look at your Web server's configuration files to find out where this directory is located on your system. On my BSD/OS system, I copy the script to /var/www/cgi-bin. If you're running a UNIX-based system, you need to chmod the rights of the file to 751. You can do this by typing the following at the UNIX shell prompt:
chmod 751 wwwsites.pl
The next step is to create the wwwsites subdirectory in your Web server's document directory. You'll need to look at your Web server's configuration again. In my case, this will be /var/www/docs. If you're using a Windows NT Web server, your Web documents might be in c:\wwwdocs. After you determine where to put the HTML files, use mkdir to create the wwwsites subdirectory. If you're using UNIX, be sure to chmod the directory to 751. You can do this by typing the following at the UNIX shell prompt:
chmod 751 /var/www/docs/wwwsites
After you have the subdirectory set up, copy the HTML files guestbook.html, guestlog.html, and addguest.html into it. Make sure that you're in the wwwsites subdirectory, and then rename guestbook.html to index.html, rename guestlog.html to wwwlog.html, and rename addguest.html to addsites.html. Then you need to do the following chmods:
chmod 751 guestbook/index.html
chmod 751 guestbook/wwwlog.html
chmod 751 guestbook/addsites.html
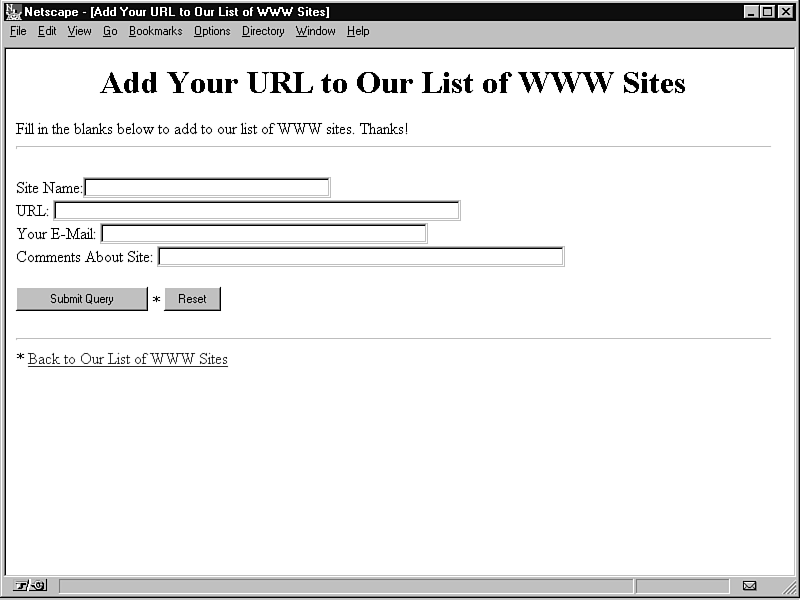
Now that you've copied the HTML files, you need to edit addsites.html. This HTML should look something like listing 8.12. You should edit the file to make it look like the HTML code in listing 8.13, which will be rendered to look like figure 8.13.
Figure 8.13 : This HTML form, as rendered by Netscape, adds Web sites from listing 8.13.
Listing 8.12 addsites.htm: The Unmodified Version of Addsites.html
<html>
<head>
<title>Add to our Guestbook</title>
</head>
<body>
<center>
<h1>Add to our Guestbook</h1>
</center>
Fill in the blanks in the following code to add to the guestbook.
The only blanks that you have to fill in are the comments and name section.
<hr>
<form method="POST" action="http://your.host.com/cgi-bin/guestbook.pl">
Your Name:<input type="text" name="realname" size=30><br>
E-Mail: <input type="text" name="username" size=40><br>
URL: <input type="text" name="url" size=50><br>
City: <input type="text" name="city" size=15>, State: <input type="text" name="state" size=2>
Country: <input type="text" value="USA" name="country" size=15><p>
Comments:<br>
<textarea name="comments" COLS=60 ROWS=4></textarea><p>
<input type="submit"> * <input type="reset">
</form>
<hr>
<a href="http://your.host.com/guestbook.html">Back to the Guestbook Entries</a><br>
Script and Guestbook Created by: <a href="http://worldwidemart.com/scripts/">Matt Wright</a>.
</body>
</html>
Listing 8.13 Modified Version of addsites.html
<html>
<head>
<title>Add Your URL to Our List of WWW Sites</title>
</head>
<body>
<center>
<h1>Add Your URL to Our List of WWW Sites</h1>
</center>
Fill in the blanks in the following code to add to our list of WWW sites. Thanks!<hr>
<form method="POST" action="http://www.eve.net/cgi-bin/wwwsites.pl">
Site Name:<input type="text" name="realname" size=30><br>
URL: <input type="text" name="url" size=50><br>
Your E-Mail: <input type="text" name="username" size=40><br>
Comments About Site:<input type="text" name="comments" size=50><p>
<input type="submit"> * <input type="reset">
</form>
<hr>
* <a href="http://www.eve.net/wwwsites/index.html">Back to Our List of WWW Sites</a><br>
</body>
</html>
You're now ready to put hyperlinks in your existing home page to access wwwsites.pl. You might want to do something like the following:
Please <A HREF="http://www.eve.net/wwwsites/addsites.html">add</a>
your URL to our <A HREF="http:/www.eve.net/wwwsites/index.html">
List of Friends Web Sites</A>.
You can try out this modification of addsites.html by using your browser and loading the URL http://www.yourhost.com/wwwsites/addsites.html. After you submit the HTML form, try loading the URL http://www.yourhost.com/wwwsites/index.html. You should see the data you entered in the HTML FORM in the wwwsites index.html file. If it doesn't work, check the file wwwlog.html. If the log file doesn't help you figure out what the problem is, verify the permissions on the files and directories. If a problem still exists, you can also check out the FAQ at http://www.worldwidemart. com/scripts/.
You've now modified wwwsites.pl. If everything works as expected, congratulations! You've seen that modifying a script-in this case, a two-part modification-is fairly simple. The first modification was to the CGI script, and the second modification was to the HTML files.
Now that you've got your wwwsites CGI script up and running, you may also want to find out how to modify various page-hit counters. First, you need to decide what type of page-hit counter it is and how it works. You'll look at the two different types of CGI-based page-hit counters. A third type of page-hit counter-server-side include hit counters-is covered in Chapter 16, "Using Server-Side Includes."
Hardwired hit counters are normally small, fast, and not easy to modify. Normally written in C or VB, these counters are called hardwired because by being compiled, they normally do one thing-count page hits. The only thing you can easily change about them is where the counter data file is stored. Another thing you might be able to change is the font style of the numbers used. But with this type of counter, it's not easy to modify the font style of the numbers.
One good example of a hardwired counter is count.c by Chris Stephens (see listing 8.14). One problem with hardwired counters is where the data is stored. If you need to have several counters located on your server, you have to compile a different version of the counter every time you need additional counters. You can look at the C source code and see where the data files are stored, and what their file names are. If you need to make changes to the source code, save the code, recompile it, and give the compiled program another name. (To use count.c, you'll need a C library header file named util.h. You can find this file on the CD.)
Listing 8.14 count.c: A Simple Shareware C-Based Page-Hit Counter
/**
  Count.c  Written by Chris Stephens (c) 1995

  This Script is Shareware.  See the Readme with this Tar for
  information.
  ...
**/

#include <stdio.h>
#include <stdlib.h>
char *digits[] =
      {"0xff","0xff","0xff","0xc3","0x99","0x99","0x99","0x99",
         "0x99","0x99","0x99","0x99","0xc3","0xff","0xff","0xff",
         "0xff","0xff","0xff","0xcf","0xc7","0xcf","0xcf","0xcf",
         "0xcf","0xcf","0xcf","0xcf","0xcf","0xff","0xff","0xff",
         "0xff","0xff","0xff","0xc3","0x99","0x9f","0x9f","0xcf",
         "0xe7","0xf3","0xf9","0xf9","0x81","0xff","0xff","0xff",
         "0xff","0xff","0xff","0xc3","0x99","0x9f","0x9f","0xc7",
         "0x9f","0x9f","0x9f","0x99","0xc3","0xff","0xff","0xff",
         "0xff","0xff","0xff","0xcf","0xcf","0xc7","0xc7","0xcb",
         "0xcb","0xcd","0x81","0xcf","0x87","0xff","0xff","0xff",
         "0xff","0xff","0xff","0x81","0xf9","0xf9","0xf9","0xc1",
         "0x9f","0x9f","0x9f","0x99","0xc3","0xff","0xff","0xff",
         "0xff","0xff","0xff","0xc7","0xf3","0xf9","0xf9","0xc1",
         "0x99","0x99","0x99","0x99","0xc3","0xff","0xff","0xff",
         "0xff","0xff","0xff","0x81","0x99","0x9f","0x9f","0xcf",
         "0xcf","0xe7","0xe7","0xf3","0xf3","0xff","0xff","0xff",
         "0xff","0xff","0xff","0xc3","0x99","0x99","0x99","0xc3",
         "0x99","0x99","0x99","0x99","0xc3","0xff","0xff","0xff",
         "0xff","0xff","0xff","0xc3","0x99","0x99","0x99","0x99",
         "0x83","0x9f","0x9f","0xcf","0xe3","0xff","0xff","0xff"
         };
main () {
int num;

FILE *fp = NULL;
FILE *out = NULL;
char numb[7];
char hold[8]= "00000000";
char cc[]= "0";
int len;
int holdlen;
int x;
int y;
int c;
int i;

/**  change to the file that holds your numeric counter value  **/

fp = fopen("/usr/var/www/docs/count.txt","r");

   fgets(numb, 8, fp);

fclose(fp);
sscanf(numb,"%d",&num);
num++;

/**  change to the file that holds your numeric counter value  **/

out = fopen("/usr/var/www/docs/count.txt","w");

fprintf(out,"%d",num);
fclose(out);

len = strlen(numb);

for (i=0; i<len; i++)
  {
    hold[8-len+i] = numb[i];
  }
printf ("Content-type: image/x-xbitmap%c%c",10,10);

printf ("#define count_width 56\n");
printf ("#define count_height 16\n");
printf ("static char count_bits[] = {\n");

for (x=0; x<16; x++)
{
  for (y=1; y<8; y++)
  {
   cc[0]=hold[y];
   sscanf(cc,"%d",&c);
   printf(digits[((c*16)+x)]);
   if (y<7) { printf(", "); }
}
if (x==15) { printf("};");}{printf(",\n");}
}
printf("\n");

}
It's nearly impossible to change the way this counter looks (see fig. 8.14). To change the style of the numbers in the counter requires a lot of work. First, sit down with a piece of graph paper and, working with an 8¥16 grid, plot what pixels you want to turn on for each number. Next, convert each row on the grid to an 8-digit binary number; use a 1 for each pixel that you want turned on, and a 0 for each pixel that you want off. The last step is to convert the binary number into hexadecimal and then recompile the C source code again. Now your changes to the font will take place.
Figure 8.14 : This graphic output of count.c is used in a simple test page.
This hardwired type of page-hit counter is fine for Web servers on which you want only a few counters. Also, the benefit of these counters is speed. The file size for this type of counter is normally around 50K. Because of the performance of these counter types, they're great for heavily hit Web sites.
Flexible counters are great if you'll have multiple counters on the Web site. This type of counter is what you should use if you'll allow other users to place Web page-hit counters in their Web pages, and this type of counter is especially suited for Web space providers.
One of the best flexible counters available is Muhammad A. Muquit's WWW Homepage Access Counter and Clock. This isn't just a page-hit counter; it also displays the time and date. This CGI script is written in C, and Muquit has gone out of his way to make this CGI script easy to install.
Before you get started with this CGI script, you need to know a few things. First, I'm going to show you Count v2.2, which runs only on UNIX-based Web servers. Muquit also has an earlier version that has been ported to Windows NT- and OS/2-based Web servers. Both versions of his counter are available on the CD-ROM and at http://www.semcor.com/~muquit/Count.html.
After you acquire the source code for Count v2.2, gunzip and untar the file. One great thing that Muquit did with this file is that he made it a snap to install.
The following is a step-by-step installation of Count v2.2. You must be the superuser (that is, be logged in as "root" or equivalent) for this installation to work. Enter each of the following commands at the UNIX shell prompt:
gunzip wwwcount2.2.tar.gz
tar xvf wwwcount2.2.tar
cd wwwcount2.2
| NOTE |
For more information on installation of Count v2.2, check out the URL http://www.semcor.com/~muquit/Count.html, where Count's author goes into great detail about how to install the counter. |
The next few steps require you to answer several questions about your Web server's configuration. Just pay close attention to and answer each question the shell script asks. Enter each of the following commands at the UNIX shell prompt:
./Count-config
This script generates the C header files and template for the install program.
./configure
This script generates a correct makefile for any UNIX system.
make
Compile the C source code. If everything goes right, you should now have in the directory a program called Count.cgi. If for some reason you need to run make again, do a make clean before running make again.
./Gen-conf
This script will generate the counters configuration file for you.
./Count-install
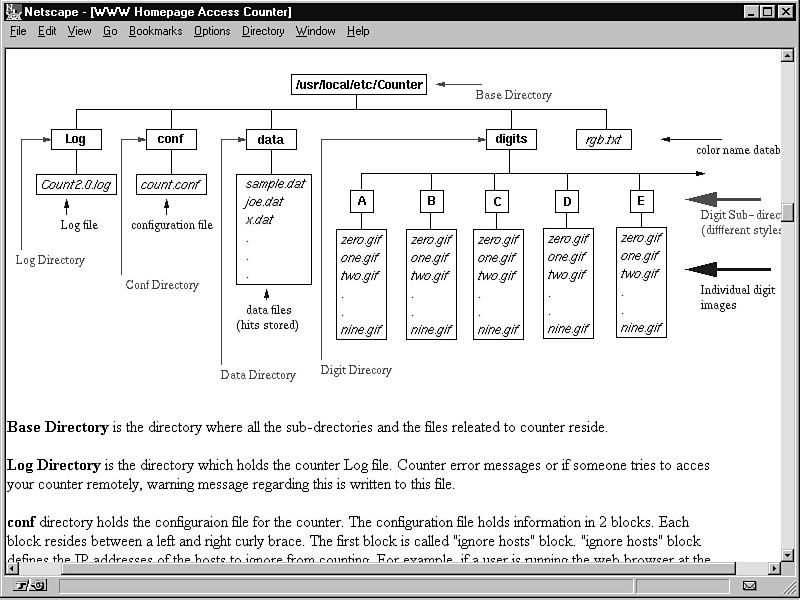
If everything has gone according to plan, this is the final step. This script actually creates the directory structure and places all the files in the right directories.
After you finish this configuration and the installation steps, you'll have created not only the compiled CGI program, but also a very complex directory structure (see fig. 8.15). You can tell by the directory names and the directory structure of the counter that this CGI counter seems to do more than the average hardwired counter.
Figure 8.15 : This figure shows the complete directory structure of Count v2.2.
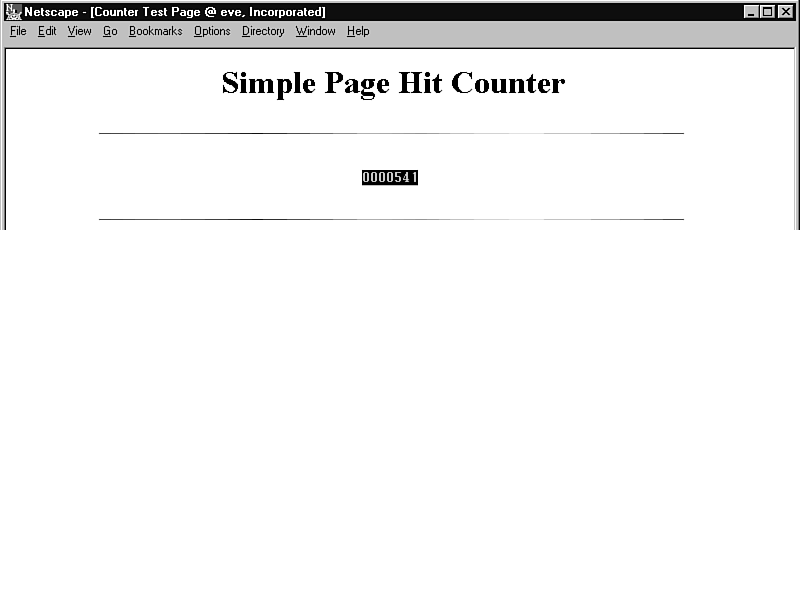
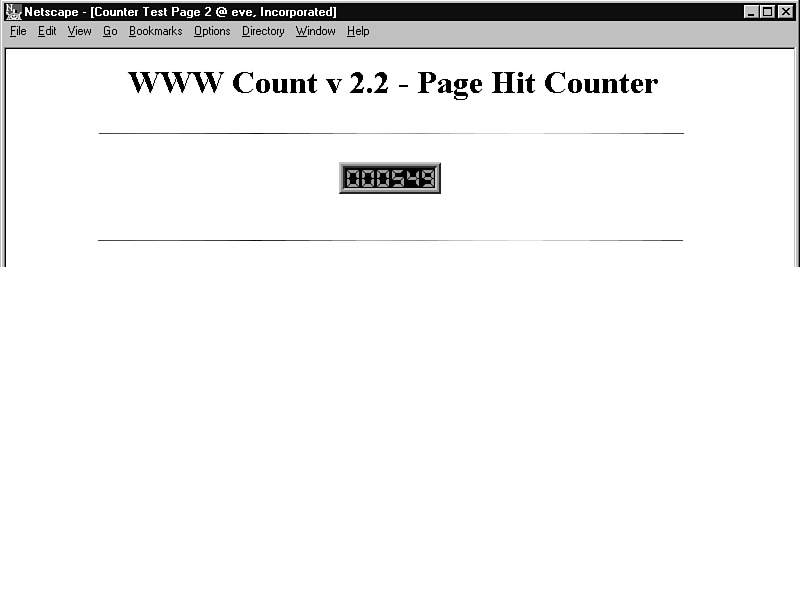
To test the new counter, add a line of HTML code to a test page on your Web server that looks something like this:
<IMG SRC="/cgi-bin/Count.cgi">
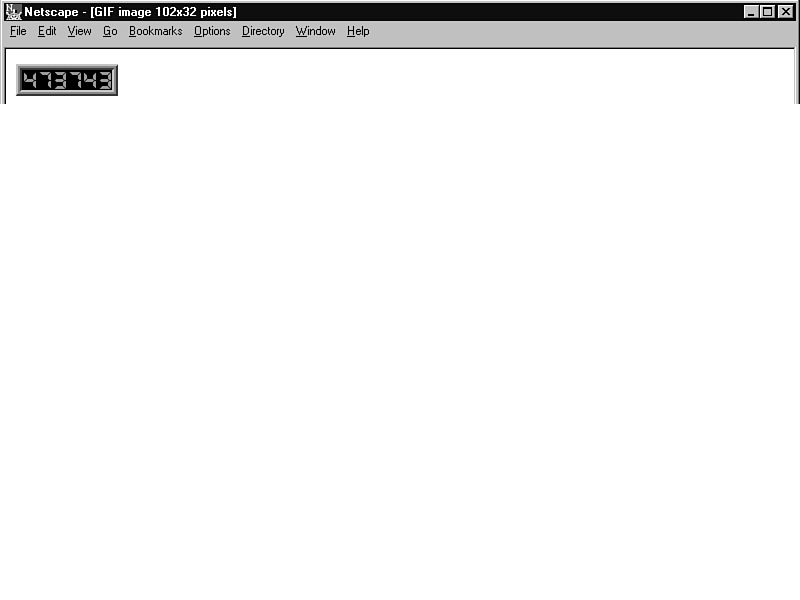
Then fire up your favorite Web browser and request the URL of the page you've set up as a test document. If everything went right, you should see a rendered image like figure 8.16.
Figure 8.16 : This is the page-hit counter image returned by testing Count v2.2
This is where Muquit's software really shines. One really nice feature of this counter is how easy the counter is to modify to suit your needs. You can manipulate many features and options by sending information within the HTML code. Using these parameters make this counter quite flexible.
The first parameter you need to know about is the DF option, which tells the CGI script which data file to use. To use a data file called clcount.dat, the HTML code looks like this:
<IMG SRC="/cgi-bin/Count.cgi?df=clcount.dat">
This HTML code will start the counter script on the Web server. Then the HTML code tells the counter to look at the number stored in the file called clcount.dat, increment the number by one, and then save the new number. When the counter has the number, it then builds a GIF image to match that number (see fig. 8.17). If you don't tell the counter what data file to use, the CGI script generates a random number and then builds the GIF image to match that number.
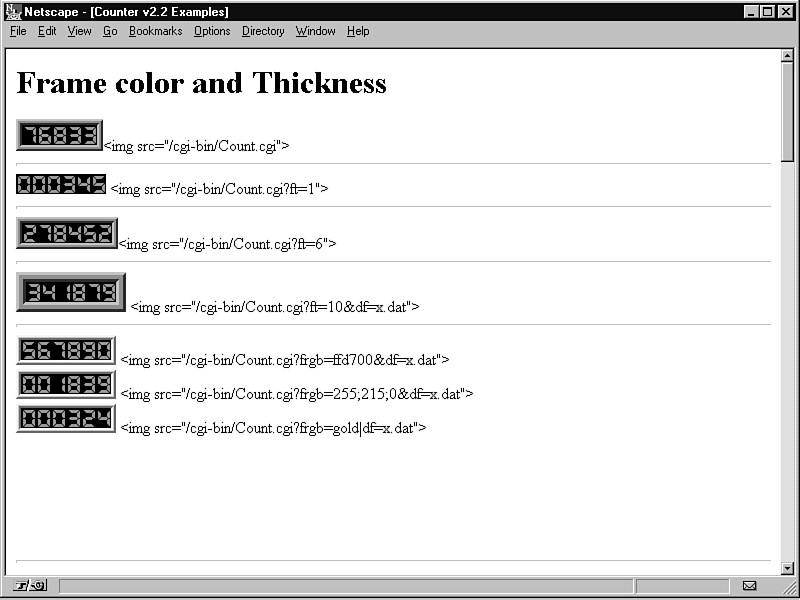
Several options also control the frame around the numbers generated by Count v2.2. You can control the thickness and color of the frame. By using the FT (frame thickness) option, you can tell the CGI counter to generate different formats of the counter's surrounding frame. If you set FT=1, the 3-D frame that surrounds the counter isn't generated. To change the color of a frame, you use the FRGB option. With FRGB, you give the hexadecimal RGB triplets for the frame color. For examples of various frame options, see figure 8.18.
| CAUTION |
When defining colors, don't use the # symbol like you do when specifying colors within HTML. Otherwise, Count v2.2 will generate an error message. |
| NOTE |
Following the first option you define, you must use & or | to separate the various options you set in the HTML code for the CGI counter. Either one will work. |
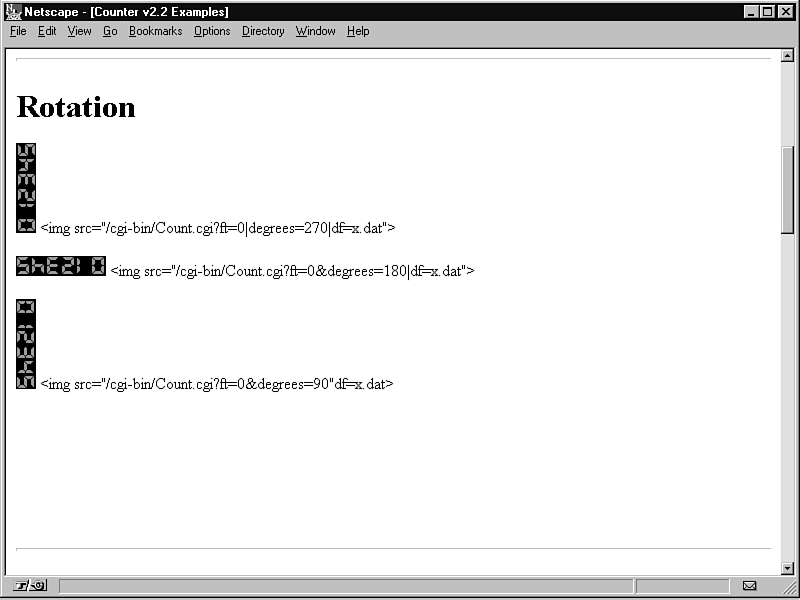
This counter CGI script can even rotate the graphic output in 90-degree increments. For examples of various rotation options, see figure 8.19.
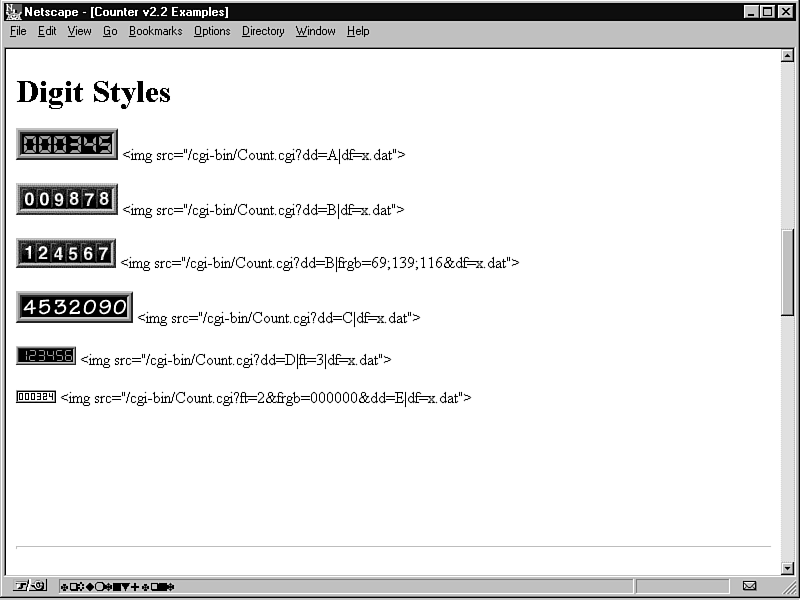
One advantage of this CGI counter is that you can use different digits with it. Webmasters use the term digits to refer to the individual numbers that the counter uses to assemble a completed GIF image.
For several examples of digits, look at figure 8.20. In the first counter example, I used the dd (digit directory) option to tell the CGI script which directory it needs to retrieve the GIF images from to build the graphic counter. For example, if you set dd=C, the counter goes to the directory /usr/local/etc/Counter/digits/C to get the GIF images for the graphic output. This program comes with five styles of digits-A, B, C, D, and E.
| NOTE |
Because Muquit's CGI page-hit counter can use many different digits, I've included a wide variety of additional digits on the CD-ROM. You need to create directories for the additional digits. You can find even more digits at the Digit Mania home page at the URL http://www.cervantes.comptons.com/digits/digits.htm. |
Another cool thing you can do with this counter is to have it display the current date (see fig. 8.21). You can tell it to do this by using the following HTML code:
Figure 8.21 : Count v2.2 can generate various examples of date and clock options.
<IMG SRC="/cgi-bin/Count.cgi?display=date">
You can even have it display a real-time clock by telling the CGI script to "display=clock" (refer to fig 8.21). The HTML code for the clock is as follows:
<IMG SRC="/cgi-bin/Count.cgi?display=clock">
If you decide you want to use other digit styles for the date
or clock, you need to see whether they're compatible with them.
The A, D, and E digits that come with the software are compatible
with the clock and date options in Count v2.2. You can tell whether
a digit style is compatible with the clock and date option, if
it comes with four additional digits-dash, colon, AM, and PM indicators.
| NOTE |
Because so many additional options can be used with this software-such as transparent conversions-I recommend that you check out the URL http://www.semcor.com/~muquit/Count.html. |
All these features come with a penalty: The compiled CGI script is fairly large. On my BSD/OS UNIX system, it's nearly 475K. This really isn't a problem on fast systems, but it can be on slower ones. However, if you have the system performance to handle it and you'll provide Web hosting services for your company or for others, this is one of the best and most flexible CGI page-hit counters available.