


by Matt Wright
While traveling the Web, you've probably encountered many image maps. An image map is a single picture that contains hot spots. When you click a hot spot, you're taken to another location. These image maps generally appear as a main logo or button bar. Rather than load onto your Web page several smaller images that users can click, you can load one image, which requires fewer server calls and is generally better looking.
The user can configure image maps in two ways-on the server-side or the client-side. The most common usage requires the server-side configuration, which either calls a CGI script to process the incoming information or uses functions built into the server software to send the user to the specified URL. Only a limited number of browsers now support the client-side implementation. Unless noted throughout this chapter, the server-side implementations are described.
In this chapter you'll learn
The image map, as previously stated, is a single image that consists of many hot spots users click to travel to other parts of your Web site. You can designate these hot spots in your image map with a number of different objects. These include a circle, polygon, rectangle, and a point. Image maps can also have a default URL, in case the user clicks a point in the image that's not designated with another object. When the image map is clicked, it sends a pair of coordinate points to the CGI program or Web server, which are then compared with the hot spots defined in your map configuration file to see what URL the user should be sent to. The URL that's sent to your image map program or Web server when a user clicks your map resembles this:
http://your.server.xxx/map_program?x,y
x and y are the coordinates in pixels on the image
map. Because many of these concepts and object types are similar
throughout most implementations of image maps, the configuration
objects, concepts, and terms are briefly described in the following
table.
| Concepts/Object Types | Description |
| circle | This object creates a hyperlinked circle within your image map. In some versions of the image map program, the circle is defined with the center point and another point located on the circumference of the circle, and in others with the center point and radius. |
| default | This object is used to simply define the URL to which users are to be taken if they click an area that's not defined by any other line in the config-uration file. No coordinates are defined with this object type. |
| poly | You can use the polygon object when the area you want to hyperlink in your image isn't a perfect circle or rectangle. The polygon is usually defined with up to 100 points, located at the vertices of the selected area you're trying to hyperlink. If, for example, you want to hyperlink a pentagon, you would configure the five points in your map file. |
| point | The point is defined with a single coordinate. Clicks closest to that point on your image map will be taken to the URL specified with this object type. |
| rect | The rect object is used to define the four sides of a rectangle. You can also use the poly object to do this, but the rectangle is so commonly used that it saves extra coordinate points you would need to label. The rect object is defined with two coordinate points-the upper left and bottom right corners of the rectangle. |
| Other Image Map Concepts | |
| URL | The URL is the location of the Web page that you want the object type and coordinate points on the configuration line to take the user. URLs can be both local and full, although full URLs are more widely implemented. For example, if you want to access the document http://your.server.xxx/~mypage/, you would use either http://your.server.xxx/~mypage/ or /~mypage/. Keep in mind that when referencing pages not located on your server, you must use a full URL. |
| Coordinate points | Coordinate points are used to define the locations of the objects within the image of which you're making an image map. The coordinates should be in the format x,y, in terms of pixels across, pixels down. The upper left corner of your image map would be coordinate 0,0. Coordinate points are sent to the image map program or Web server when the user clicks the image map. |
| Client | This is the browser with which the user is visiting your site. When I use the term client-side image mapping, I'm referring to the fact that the client, a Web browser, handles the configuration files embedded in the HTML file and determines where the user will go based on the click. |
| Server | The server is the HTTP daemon that's running on your computer. The server sends out files when they're requested by the client and does any necessary configuration and/or parsing of the contents before they're sent out. |
| CAUTION |
Not all image map CGI programs and servers support the point configuration method. Check the specification for your server, outlined later in this chapter, before trying to use the point method in your configuration file. Similarly on the client side, not all Web browsers support image maps, such as text-based browsers like Lynx and older graphical browsers. |
Most Webmasters now compile or have image map programs on their servers, because they're a relatively low security risk. You may need to contact your system administrator or Webmaster and ask for the URL to the image map program, if he or she has one available. Because some CGI programs can contain large security holes, many system administrators are reluctant to let you execute your own CGI programs. If they don't let you use your own CGI programs, you'll have to use the ones they've installed on the system or try to use the client-side image map configuration.
If you're allowed to compile or run your own CGI programs, and your system doesn't already have a default image map program or there isn't one that's already built into the server, you can retrieve and compile your own. You should probably check with your system administrator before you try to do this, because chances are the image map program was either installed when the server was put in, or your system administrator has installed one since. If your server doesn't have an image map program, you may still want to check that you have access to the cgi-bin or at least the capability to run CGI programs.
Several programs are available on the Internet that allow you to compile them and then run your image map coordinates and configuration files through them. The following are just a few sites on the Web that let you download and use their image map programs:
Versions of the NCSA HTTPd server before version 1.5 uses a CGI image map program written in C. Version 1.5 of NCSA's HTTPd server has a built-in image map function, so you no longer have to launch an external CGI script in order to handle image map requests.
The creation of the image map configuration file is pretty much the same for both methods; the only difference lies in the URL with which you reference your map configuration file. The basic setup of a configured map file is
object URL coordinates
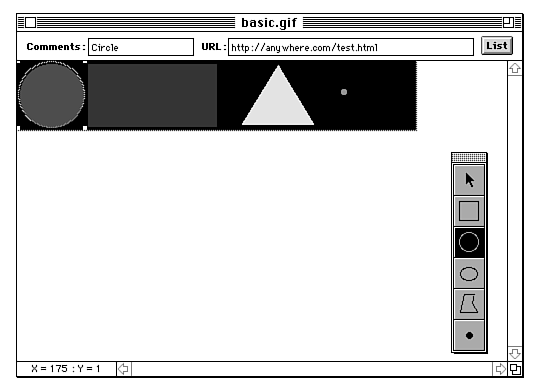
All the preceding elements in a common NCSA configuration map file are described in the beginning of this chapter under "How an Image Map Functions." The NCSA image map configuration file can include comment lines, which are designated with a # as the first character on that line. These are often useful if you want to remember what sections of your map configuration file are set to the image map. All other lines, which aren't blank, should use the preceding format with the object first-be it a rect, poly, circle, or point. The image map configuration file shown in listing 9.1 corresponds to the image in figure 9.1.
| NOTE |
Some earlier versions of the NCSA HTPPd Web server required that all image map files be relayed through one central registry file. This file usually had limited access, which only the server administrator could access. If this is the case, you should upgrade to the latest version of the image map program, which removes this restriction. |
Listing 9.1 Basic Map Configuration File for NCSA Server
# Basic Map Configuration File For NCSA Server
# Corresponds to Basic Image
# Written on: 1/12/95        Last Modified on: 1/12/95
# Map File Created by: Matt Wright

# Default URL if user clicks outside of hyperlinked areas

default http://www.server.xxx/

# Circle URL.  URL used if user clicks in the circle.

circle http://www.server.xxx/circle.html 35,35 67,35

# Rectangle URL.  URL used if user clicks in the rectangle.

rect http://www.server.xxx/rect.html 71,3 199,65

# Point URL.  URL used if user clicks on the dot.

point http://www.server.xxx/point.html 326,30

# Triangle URL.  URL used if user clicks in the triangle.

# poly http://www.server.xxx/poly.html 225,63 296,63 261,4
To call your image map inside your HTML document, you must set the ISMAP attribute on your <img> tag as well as call the image map program and the path to your basic.map file. This is where the versions of NCSA HTTPd begin to vary. If you have a version before 1.5 or are using the image map.c program, you'll need to call your image map configuration file in your document, like this:
<a href="http://www.server.xxx/cgi-bin/imagemap/url/to/basic.map">
<img src="http://www.server.xxx/url/to/basic.gif" ISMAP>
</a>
Here, I've included the full URLs to make the example clear. After you reference the image map program with the URL, you must then append the URL of the location of your map file on your server. That's what the /url/to/basic.map must be. The ISMAP attribute to the <img> tag alerts browsers that they'll need to append the coordinates where the user clicked to the URL so that the image map program can work effectively.
Version 1.5 of the NCSA HTTPd has built-in image mapping capabilities. These can be turned on by adding a new type, just as you would with CGI extensions. The Webmaster or system administrator has to do this in the configuration files of the server. It can be added by simply including this line in the server's srm.conf configuration file:
AddType text/x-imagemap .map
The server must also be started with IMAGEMAP_SUPPORT
defined, which is the default.
| TIP |
If you have access to NCSA version 1.5 or later, you should use the built-in image map handling, rather than the external CGI program, because the relay of the URL to the user will be much quicker than using a CGI image map program. |
Similar to NCSA version 1.5, the Apache Server 1.0 has image map capabilities built into the server, so you don't need an outside CGI script to do the work. When adding a new MIME type to support image maps such as you did with the AddType for NCSA, the Apache server requires you to use the following MIME type:
AddType application/x-httpd-imap map
This enables all files with a .MAP extension to be parsed as though they're image map configuration files. This saves server response time and the stress put on the server to execute external CGI programs. Similar to the NCSA server is the order in which the lines call the objects and coordinates in the map configuration file:
object URL coordinates
The format of an Apache map file is slightly different from that
of NCSA's. One of the major differences is in the use of a base_uri
command. The options for the base_uri command are described
in the following table.
| Option | Description |
| map | This provides the default behavior of most older image map programs, where all URL references are relative to the URL of the map configuration file. |
| referer | This attribute to the base_uri command treats all URLs relative to the HTTP_REFERER environment variable. This is very useful if you have a base directory at http://www.server.xxx/, and this is the page at which your image map will appear. You can set base_uri to referer and then make all other URL references relative to that URL. So if you're referencing, as in http://www.server.xxx/circle.html, http://www.server.xxx/rect.html, and http://www.server.xxx/poly.html, set the base_uri to referer and then just use relative URLs to the referer, such as circle.html, rect.html, and poly.html. If you use the referer option, all URLs will be relative to the page with the image map. |
| Actual URL | You can also set your base_uri to an actual URL. For instance, taking the example I described earlier for the referer attribute, you could use a definition such as base_uri http://www.server.xxx/. All your URL references inside your map configuration file can be relative to this base_uri. This saves typing time and makes the URL references more concise. |
Listing 9.2 is the configuration file for the same image as used in the NCSA example. This time, however, the map file has been tailored for the Apache server.
Listing 9.2 Basic Map Configuration File for Apache Server
# Basic Map Configuration File For Apache Server
# Corresponds to Basic Image
# Written on: 1/12/95        Last Modified on: 1/24/95
# Map File Created by: Matt Wright

# Default URL if user clicks outside of hyperlinked areas

default http://www.server.xxx/

# Base URL.  All URLs will be relative to this URL.

base_url http://www.server.xxx/

# Circle URL.  URL used if user clicks in the circle.

circle circle.html 35,35 67,35

# Rectangle URL.  URL used if user clicks in the rectangle.

rect rect.html 71,3 199,65

# Point URL.  URL used if user clicks on the dot.

point point.html 326,30

# Triangle URL.  URL used if user clicks in the triangle.

# poly poly.html 225,63 296,63 261,4
Referencing your map file and your image map through your HTML document can be accomplished in much the same way as you referenced the two in the NCSA version 1.5 configuration example. Following is the example repeated:
<a href="http://www.server.xxx/path/to/basic.map">
<img src="http://www.server.xxx/path/to/basic.gif" ISMAP>
</a>
The CERN and W3C HTTPd servers come with the source to a CGI program called htimage, which allows you to link your images up with a map file, much like the other servers. After your htimage script is compiled, you need to add the Exec rule to the server's configuration file. Most likely, if you aren't a system administrator, you won't be able to do this, but it has probably already been configured. For more information on adding the Exec rule to your server, take a look at the documentation provided online at http://www.w3.org/pub/WWW/Daemon/User/CGI/HTImageDoc.html.
The major difference between the CERN and W3C servers and NCSA and Apache is that the CERN/W3C htimage program doesn't recognize the point object in your map configuration file. The map configuration file also has a slightly different format, which takes the form of
object coordinates URL
Listing 9.3 is the basic.map, rewritten to follow the htimage format, which is the program used by CERN and W3C.
Listing 9.3 Basic Map Configuration File for the CERN and W3C Servers
# Basic Map Configuration File For CERN and W3C Servers
# Corresponds to Basic Image
# Written on: 1/12/95         Last Modified on: 1/24/95
# Map File Created by: Matt Wright

# Default URL if user clicks outside of hyperlinked areas

def http://www.server.xxx/

# Circle URL.  URL used if user clicks in the circle.  The
# htimage program must have the Center and Radius of the
# circle defined.

circle (35,35) (32) http://www.server.xxx/circle.html

# Rectangle URL.  URL used if user clicks in the rectangle.

rect (71,3) (199,65) http://www.server.xxx/rect.html

# Point URL.  URL used if user clicks on the dot.  htimage
# is not point compatible with the point method, so we will
# represent it with a circle with a radius of 2, which will
# create a small point.

circ (326,30) 2 http://www.server.xxx/point.html

# Triangle URL.  URL used if user clicks in the triangle.

# poly (225,63) (296,63) (261,4)
http://www.server.xxx/poly.html
As you can see in the preceding example, there are a few differences between the NCSA and Cern/W3C servers. For one, you can abbreviate the circle and default configuration objects with circ and def, rather than have to spell them out (circle and default). The htimage programs also require that you configure your circle coordinates in the form of (x,y) for the center and then the radius of the circle. Because the htimage program doesn't have the point capability built in, I simply defined a circle with a radius of 2 to make it seem as though it were a point. The other difference you may notice in the preceding configuration file is that the URL is placed after the coordinates on each line, as opposed to before the coordinates as is done with other programs. The coordinates in this map configuration file must also be placed in parentheses, with the radius of a circle following the center coordinates but not inside the parentheses.
To call your image map from your Web page, you can use almost the same syntax as was used in the previous examples:
<a href="http://www.server.xxx/url/to/htimage/url/to/basic.map">
<img src="http://www.server.xxx/url/to/basic.gif" ISMAP>
</a>
Netscape servers come with the image map program built in, so you don't need an external CGI script to do the parsing of the coordinate points. The first thing you need to do is create your map file for the image map that you want to use.
The NCSA and Netscape servers have the same configuration file; you can refer to the NCSA map file in listing 9.1 for more background information. The difference between the Netscape and NCSA servers is that you don't have to call on an external CGI program before calling the map file. Instead, simply place a reference like
<a href="http://www.server.xxx/url/to/basic.map">
<img src="http://www.server.xxx/url/to/basic.gif" ISMAP>
</a>
into your HTML document. Your map file should end with the .MAP
extension for the Netscape server to recognize it as an image
map configuration file.
| TIP |
The Netscape server has a 100-point limit when defining polygons; however, by the time you start nearing this limit, your configuration line will also get too large for Netscape servers to handle. If this happens, simply spread your points out more evenly throughout the polygon. |
You can download several image map programs for the Apple Internet server. One of these is Mac-Imagemap, which can be downloaded from
http://weyl.zib-berlin.de/imagemap/MAC-IMAGEMAP.html
This program handles map files in the same configuration setup as NCSA map files, so refer to listing 9.1 if you have problems setting up your map files. Full details and installation instructions for Mac-ImageMap can be found at the preceding URL.
New standards are emerging for client-side implementations of image maps, which not only means much faster processing, but you'll no longer require the server to handle every client's request for image mapping. This is the best alternative if your system administrator or Webmaster refuses to set up an image map CGI program, and you don't have access to create CGI programs. It's now supported in later versions of Netscape and Microsoft Internet Explorer, although I believe it will be more widely implemented in the near future.
Besides the fact that you no longer have to route through a CGI program or your server to use an image map, the client-side image map implementation offers other advantages. You'll no longer have to specify a default document because users won't be allowed to click outside a highlighted region. Certain areas will be hyperlinked in your image, and when a user's mouse pointer moves over one of these areas, he'll be able to click the map; clicking outside hyperlinked areas will take him nowhere (in essence, it sets the default URL to null).
When an image is placed on your HTML page, you can reference the map to it by either including the complete map within your HTML document or by specifying an URL location of where the map can be found. The browser then loads this map, parses it, and remembers the hyperlinked areas just as though it had been included in your HTML document.
Instead of the ISMAP attribute that's usually added to
all image references using a server-side image map CGI program,
you must include a USEMAP attribute for the client-side
mapping procedure. The integration of a client-side image map
configuration file is done with the MAP element.
| NOTE |
Client-side image mapping currently isn't supported by all browsers. (Many ways of allowing for backward compatibility are discussed later in this chapter.) As of this writing, the browsers that now support client-side image mapping are Netscape 2.0, Microsoft Internet Explorer, and Spry Mosaic. |
The example in listing 9.4 shows how you would make basic.gif (refer to fig. 9.1) a client-side image map.
Listing 9.4 Example of a Client-Side Image Map Configuration
<MAP NAME="basic_map">

<!-- The Circle Shape. Users will be taken to circle.html if they
click inside of the circle. Like the htimage program, the circle
coordinates should be defined with the center and the radius. All
three numbers are comma separated. The Alt tag will be seen by
non-graphical browsers. -->

<AREA SHAPE=CIRCLE COORDS="35,35,32" HREF="circle.html" ALT="Circle">

<!-- The Rectangle Shape. Users will be taken to rect.html if they
click inside of the rectangle. The coordinates for the rectangle
should be the upper left (1) and lower right corners (2) of the
rectangle separated by commas, ie. COORDS="x1y1x2y2"-->

<AREA SHAPE=RECT COORDS="71,3,199,65" HREF="rect.html" ALT="Rectangle">

<!-- The Triangle is represented with a polygon shape. Coordinates
from the triangle vertices are comma separated. You can have as
many vertices as you wish, except for the fact that HTML limits an
attribute's value to 1024 characters in size. -->

<AREA SHAPE=POLY COORDS="225,63,296,63,261,4" HREF="poly.html" ALT="Triangle">

<!-- The Point attribute is not supported by the current Client-side
Image Maps specification, but to get around that we will use a
circle reference with a radius of 2, to create a point. -->

<AREA SHAPE=CIRCLE COORDS="326,30,2" HREF="point.html" ALT="Dot">
</MAP>
As you can see from this example, this configuration file looks
a lot different from other map configuration files you've looked
at thus far. The main reason for this is that all parts of the
map configuration file must be represented in a way browsers can
handle. Because older browsers that don't support newer features
are supposed to ignore elements of tags they don't understand,
this allows for the map file to be included in your HTML document.
Those browsers that can handle client-side image maps will parse
the MAP element and create the client-side image maps,
while others will just ignore that portion of your Web page. You
must start your map with the MAP element and give it
a name by which you'll later call your map configuration. The
next lines consist of the AREA element within the MAP
element. The following table describes attributes for the AREA
element.
| Attribute | Description |
| SHAPE | This attribute can be defined as CIRCLE, RECT, or POLY, depending on what shape you're defining. If this attribute isn't present, SHAPE=RECT is assumed. The POINT value to the SHAPE attribute isn't supported, but you can get around that by including a circle with a radius of 1. |
| COORDS | This is the attribute that defines the coordinates of SHAPE. For RECT and POLY shapes, the coordinates are simply shown as x1,y1,x2,y2,...,xn,yn, whereas in a circle you define the center x,y coordinate pair and the radius of the circle. Coordinate values should be represented in pixels, like all other image map specifi-cations. |
| HREF | This is the URL to the Web page you want this element to link to. It can be expressed as a full URL, or as a URI relative to the current page. |
| ALT | This attribute contains the alternative text you want to be displayed if the user is using a non-graphical browser or has images turned off. |
Comments can be represented as normal HTML comments. A comment begins with <!-- and ends with -->. Calling the image map configuration and implementing the image map in your HTML file is also rather easy. The following example explains how to link basic.gif to the basic.map file shown earlier:
<img src="basic.gif" USEMAP="#basic_map">
This tag references your basic.gif image, calling it into the HTML document, and then searches for the MAP element with the name attribute of basic_map, as defined in the example map in listing 9.4.
Client-side image mapping also provides extensive back-compatibility, as not to confuse older browsers. You can benefit immediately from the client-side image map, rather than wait for more browsers to accept this new extension to HTML. If you have access to an image map program as shown for some of the other servers discussed in previous sections, you can make a map file for this similar to the NCSA, Apache, CERN, W3C, Netscape, or Apple format, and call the CGI program and the client-side image map. Older browsers will throw out attributes they don't recognize and simply use the older style of image mapping; however, the newer browsers that support client-side image mapping will use the client-side version you supply rather than the CGI script. You can implement this into the previous example as
<a href="http://www.server.xxx/url/to/imagemap/url/to/basic.map">
<img src="basic.gif" USEMAP="#basic_map" ISMAP>
</a>
If you don't have access to another CGI image map program or your server doesn't support it, you can still notify users when they try to click the image that it's a client-side image map and their browser doesn't support that. To do this, modify the first example to look like this:
<a href="no_map.html">
<img src="basic.gif" USEMAP="#basic_map">
</a>
Next, create a file called no_map.html and notify users that they have reached that page because their Web browser doesn't support client-side image maps. From there you can offer them other ways of reaching their destination.
The previous examples show how to call the USEMAP attribute if your map is contained in the same document as the image from which you're calling it. This doesn't always have to be the case-you can include your map in a separate file. For instance, if you want to have an HTML file called maps.html that contains all your client-side image map configuration files, simply place the configuration file shown at the beginning of this section, including the MAP elements, into the file called maps.html. You can now call your image map with
<img src="basic.gif" USEMAP="maps.html#basic_map">
Many tools are available on the Internet to help you create images and find points on them that correspond to the pixel coordinates you need for your configuration file. The following sections provide descriptions and instructions for using several of these tools, including tools for the Macintosh, Windows, and UNIX.
The image map tool I reviewed for the Macintosh was WebMap 2.0b8. It can be found on the accompanying CD-ROM, or you can download it from the WebMap Web site at http://www.city.net/cnx/software/webmap.html.
You can use WebMap to create image maps out of GIF and PICT formatted image files. It can trace the circle, rectangle, oval, polygon, and point (see fig. 9.2). Also in figure 9.2, you see the basic.gif from figure 9.1 with the circle outlined.
| NOTE |
Most browsers don't support PICT images; therefore, these images should be converted to GIF or JPEG format before you incorporate them into your HTML pages. |
After you completely trace all your locations in the image map and fill in the URL and comments box for each one, you can save the file. When the save dialog box pops up, it looks similar to figure 9.3. WebMap supports NCSA and CERN image map formats, so you can choose which one you want to save to. Choose the name for your map file and then click the Save button.
Figure 9.3 : WebMap offers two choices when saving files: CERN or NCSA format.
The following sections provide step-by-step instructions for two popular Windows NT image map programs: Map This version 1.20 and Web Hotspots version 2.0 by 1automata. These programs are also Windows 95 compatible.
Map This runs under all Windows platforms, from 3.1 (running Win32s) to Windows 95, and including Windows NT. A very fast image mapping program for the Windows platform, Map This is probably one of the best on the Net. One of the top features of this program is that it's freeware, so you don't need to worry about registration fees.
Map This version 2.0 is included on the CD-ROM located in the back of this book. If you're using Windows 3.1 to run Map This, you also need to install version 1.3 of Win32s, also located on the CD-ROM.
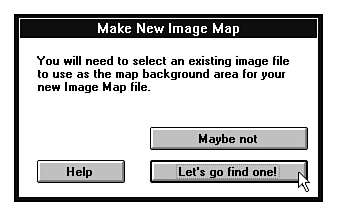
After installing Map This, open the program, pull down the File menu, and choose New. The dialog box that appears tells you that you need to select an image to correspond to your map file if you want to continue (see fig. 9.4). Click Let's Go Find One! if you want to continue.
Figure 9.4 : Click the Let's Go Find One! button to continue creating your image map file.
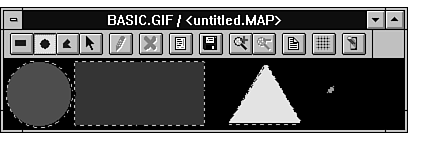
After opening your image, choose the basic.gif file, and your screen will look something like figure 9.5.
Figure 9.5 : Basic.gif opens inside Map This.
Notice the tools located above your image in figure 9.5. The leftmost tool allows you to create a rectangular area. Moving across the toolbar, the next one is the circle tool, followed by the polygon tool, which allows you to trace around an object of many sides. Using this toolbar and the cursor, click the tool you want and then select the vertices of rectangles and polygons, or outline the circle until all the portions of the image you want to be included in your map file are highlighted. After they're all outlined, your image should look similar to figure 9.6.
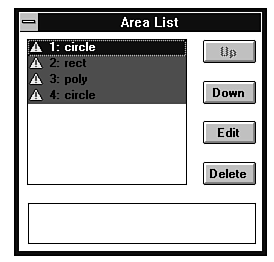
Now that you've selected all the areas on your image map, pull down the Mapping menu and choose Area List. The Area List dialog box shows all the areas that you've highlighted in your image (see fig. 9.7). With this dialog box, you can delete and edit any of the areas that you've specified. All areas you want to keep must be edited and their proper URLs filled in before you can create a map file from the image.
To edit a selected portion of the image, click the choice in your Area List and click the Edit button. This brings up a dialog box similar to figure 9.8.
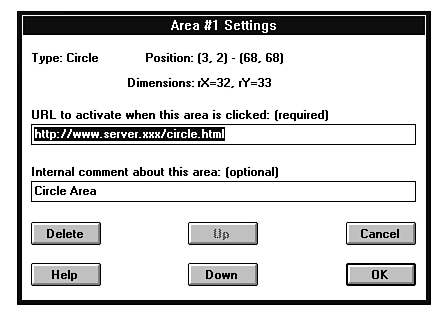
The Area dialog box shows the type of area you're working with, its position in the image map, and the dimensions of the image. You need to fill in the URL text box and, if you want, can also add a comment about the area. You can now choose to Delete the area, or click OK to continue. Continue to edit all portions of the image map that you selected. After you finish editing, choose Save from the File menu, and the dialog box in figure 9.9 appears.
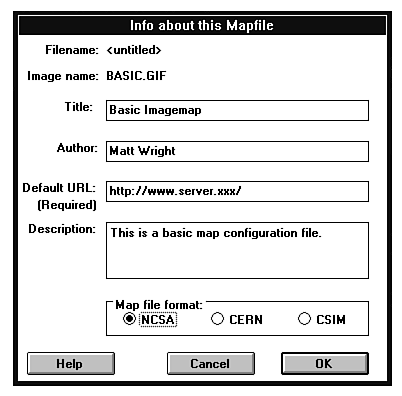
Fill in the Title, Author, Default URL, and Description text boxes accordingly and choose your file format. Map This now supports NCSA, CERN, and Client-Side ImageMapping (CSIM) standards. Click OK and then choose a file name to which you can save the map file.
Web Hotspots provides an easy-to-use interface with which you can create server-side and client-side image map configuration files. Web Hotspots is shareware and can be found at http://www.cris.com/~automata/hospots.html, or on the CD-ROM accompanying this book.
To begin a new image map file, install the Web Hotspots program and then start the program. After you start it, choose New from the File menu. A dialog box appears, asking you to specify the file name of the image from which you want to create the image map configuration file. Select one of the images from your hard drive and click OK to open the image inside the Web Hotspots program (see fig. 9.10).
Now go through the steps to create a basic image map configuration file as if your image was basic.gif (refer to fig. 9.1). The first object you need to define is the circle. Select the circle tool from the menu bar at the left. Starting from the upper right of the circle, drag to the lower left to select a circular area that you want to highlight with a URL. Notice that a temporary URL has popped into the URL box at the bottom of your Hotspots screen. You must edit this URL to point to the correct URL for the circle: http://www.server.xxx/circle.html. Figure 9.11 shows the image map after highlighting the circle and changing the URL.
You can continue to designate hot spots on your image with the different tools at the left. You'll need to use the polygon tool to hyperlink the triangle and the rectangle tool to hyperlink the rectangle. Because there's no point specification with this program, you must use the circle shape to create a very small circle around the dot in the image map.
After all the hyperlinks and portions of the image map are defined, you need to open the File menu and select Page New.
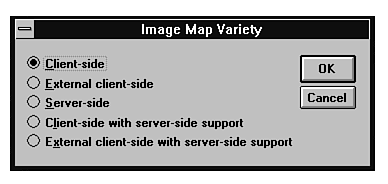
You're now presented with the Image Map Variety dialog box, which asks you to choose whether you want to create one of many different kinds of image map configuration files (see fig. 9.12). The options for image map configuration files are Client-Side, External Client-Side, Server-Side, Client-Side with Server-Side Support, and External Client-Side with Server-Side Support. The following table describes what each choice from the Image Map Variety dialog box does.
| Option | Description |
| Client-Side | When you choose this type of map file, you're presented with another dialog box, which asks the file name to which you want to save the map. Hotspots then creates this file, with the image and the map file referenced in one Web page. |
| External Client-Side | This map file is very similar to that of the Client-Side option, except when you choose this type, your image is called from one document and the map source file resides in another HTML document. |
| Server-Side | After you select this option, a file-save dialog box appears, asking what you want to call your map file. It will default to a .MAP extension with NCSA formatting. You can also choose to have it saved in CERN formatting, if you use the CERN or W3C servers. The use of a Server-Side image map configuration file requires you to have an image map program on your server or a server that can handle image maps. Refer to the configuration of each server, which was discussed earlier in the section "Web Server Image Map Configurations." |
| Client-Side with | This includes an HTML file that references both a client Server-Side Support side implementation of image maps and a server-side for those browsers that don't currently support client-side image mapping. |
| External Client-Side | This is similar to Client-Side with Server-Side Support, with Server-Sideexcept the configuration tags for the client-side image Support mapping are kept in another HTML document and are referenced when they're called on. This includes backward compatibility with versions of Web browsers that don't support client-side image mapping. |
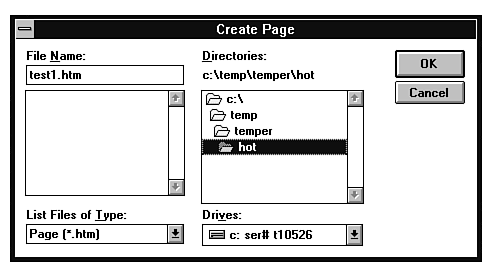
After you pick the type of image map you want to create, a dialog box, as shown in figure 9.13, appears to let you choose the path to the file in which you want to save your map.
Figure 9.13 : This dialog box appears when you try to save a map file.
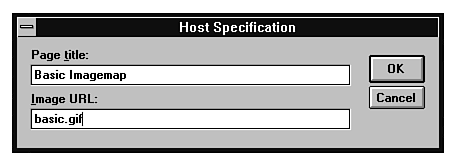
Client-side image maps are saved in files called .htm, while server-side implementations are saved in files with a .map extension. After you save the image map file, a Host Specification dialog box appears (see fig. 9.14). After you enter the Page Title and Image URL, your map file is saved.
Figure 9.14 : The final configuration needed for your map file
Many standard image-viewing utilities come with most UNIX operating systems that allow you to find coordinates in the image and plot them into a standard map file. Currently, no UNIX-based image map programs available on the Internet offer a friendly interface and provide the tools necessary to make image map files. Instead, you must load your favorite UNIX image editor and click various spots in the image to locate the position of the image you want to highlight inside the larger image. After you find these coordinates, you need to manually create a map file, as demonstrated earlier in this chapter. Choose the server you use, and then tailor your map file to resemble the format. Understandably, UNIX isn't a popular platform for creating image map files.
Many Web applications require you to generate images on the fly. Some of these include creating a counter, where the image is incremented every time a user hits your page, and a coloring book, where users can click portions of an image map and have the colors changed. Many of these types of programs are available on the Internet, and the following sections discuss two of them: GIFlib and FLY.
GIFlib is very useful when creating images on the fly. Many programs on the Web use it to generate counters and other images that need to be updated when users visit a site.
GIFlib can be used in UNIX and DOS environments.
GIFlib version 2.2 is on the CD that comes with the book. You
can also download GIFlib from ftp://mph124.rh.psu.edu/pub/programming.
Compilation instructions are included with the file. Installation
instructions and documentation explaining the program are included
in the distribution.
| NOTE |
When you have the file, it will already be tarred and gzipped. From there, you have to execute the following commands from a command shell: % gunzip giflib-2.2.tar.gz |
Some of the useful programs included in GIFlib include many conversion
utilities, image manipulation components, report generators, and
GIF composition tools, including a few C templates. More detailed
instructions on how to use the program are included in the compressed
file. (See Chapter 22, "Tips and Techniques for C and C++,"
for more information on C programming.)
| CAUTION |
GIFlib is a relatively complex program, and it may be rather difficult to use effectively if you aren't well versed in C. |
FLY, created by Martin Gleeson (gleeson@unimelb.edu.au), can be used as an interface from Perl/CGI scripts to interact with the gd graphics library for fast GIF creation. Version 1.3 of FLY, included on the CD-ROM, is now available only for UNIX platforms (although Windows and Macintosh versions of FLY are planned). Written in C, FLY allows for easy interaction between Perl and shell scripts with the gd library.
You can download the most recent version of FLY from http://www.rasip.fer.hi/man/fly.html, where the current versions are always located. These sites also contain complete instructions on how to install and use FLY.
FLY is usually invoked with the path to a file containing the FLY commands, and then the path to which you want the image to be output. There are also options that allow you to specify whether you want to read input from the command line and send the image to STDOUT.
FLY allows for the easy creation of rectangles, polygons, circles, lines, and many other objects. You can choose what color to fill your images, or leave them without color. FLY also has the option of copying and pasting from other images. This is useful when it comes to making counter programs, because you can have a set of premade number files and then simply copy and paste the correct ones into the new image and send that back to the client. More information on using FLY can be found on the Web page.